
After configuring an image-level backup for a physical Windows Server 2016 machine, I wanted to verify that the backup could actually recover the server. I restored a Veeam Agent full backup to an isolated KVM virtual machine while leaving the original physical server unchanged.
The restore completed successfully. In a fresh repeat validation, Veeam updated the registry, BCD, and drivers during recovery, and Windows Server booted directly from the restored SATA/AHCI disk. An optional StorAHCI recovery procedure is included for systems that still encounter INACCESSIBLE_BOOT_DEVICE.
Goal
- Test a Veeam Agent full backup without modifying the physical server
- Restore the complete Windows Server system to a KVM virtual machine
- Keep the test VM isolated from the production network
- Confirm that Windows can boot on different storage hardware
This was a recovery and physical-to-virtual validation test. It was not a production cutover.
Environment
- Source operating system: Windows Server 2016 Standard
- Backup software: Veeam Agent for Microsoft Windows 13.1
- Backup type: Entire computer, full restore point
- Recovery environment: Veeam Recovery Media
- Target: KVM virtual machine
- Target boot disk: Virtual SATA/AHCI disk
- Test network: Isolated libvirt network
The backup was created using the process described in Install Veeam Agent for Microsoft Windows on Windows Server 2016 and Back Up to a Synology NAS.
Prepare an Isolated Restore Test
A restored server initially has the same hostname, local accounts, services, and network configuration as the physical source. Do not boot the clone on the production network while the original server is still running.
- Keep the original server running and unchanged
- Use
--network noneor an isolated libvirt network with no forwarding or IP configuration - Create a VM disk large enough for the restored partitions
- Attach the Veeam Recovery Media ISO
- Attach a copy of the Veeam full backup on a separate virtual disk
- Configure the VM to boot from the recovery ISO
Network Isolation
A restored server may retain its original static IP address, hostname, scheduled tasks, and service configuration. The first boot must therefore use a network that cannot reach the production environment.
There are two safe choices:
- No network interface: Use
--network none. This is the simplest choice for restoring and confirming that Windows boots. - Isolated libvirt network: Attach the VM to an internal virtual switch with no forwarding, IP address, DHCP service, gateway, NAT, or physical uplink.
This test used the second option. Create a persistent libvirt network that contains only an internal bridge:
sudo tee /tmp/p2v-isolated.xml > /dev/null <<'EOF'
<network>
  <name>p2v-isolated</name>
  <bridge name='virbr-p2v' stp='on' delay='0'/>
</network>
EOF

sudo virsh net-define /tmp/p2v-isolated.xml
sudo virsh net-start p2v-isolated
sudo rm /tmp/p2v-isolated.xmlThe XML intentionally has no <forward> element and no <ip> element. Libvirt therefore creates an internal Layer 2 switch without a router, NAT, DHCP server, or gateway. No physical interface is attached to the bridge.
Verify the network before starting the restored VM:
sudo virsh net-dumpxml p2v-isolated
ip -brief address show virbr-p2v
ip route show dev virbr-p2v
bridge link show master virbr-p2vConfirm that the network XML still has no <forward> or <ip> element, the bridge has no IP address or route, and no physical interface appears as a bridge port.
Windows services may attempt outbound connections, but their traffic remains on the isolated virtual switch and cannot reach any network outside that switch.
Do not attach the restored VM to libvirt’s default network, a host bridge such as br0, macvtap, or a physical network interface while the original server is still active.
Recovery VM Storage Layout
Before creating the VM, it helps to separate the three storage roles. The VM has three attached storage devices, but only two of them are virtual hard disks. The Recovery Media ISO is attached as a virtual CD/DVD drive.
| VM device | What it contains | Purpose | After recovery |
|---|---|---|---|
| SATA disk 1 Blank QCOW2 system disk | Empty before recovery | The restore destination. Veeam writes the Windows boot partitions, operating system, and data volumes to this disk. | Keep it attached; this becomes the VM’s Windows system disk |
| SATA disk 2 RAW disk formatted as NTFS | Veeam .vbm metadata and .vbk full backup files | The restore source. Veeam reads the backup files from this disk. | Detach it after the restore |
| Virtual CD/DVD Recovery Media ISO | Bootable Veeam recovery environment | Starts Veeam Bare Metal Recovery. It does not contain the server backup. | Eject the ISO |
Data flow: Recovery Media ISO boots Veeam → Veeam reads the full backup from SATA disk 2 → Veeam restores Windows onto SATA disk 1.
Do not select the NTFS backup disk as the restore destination. Doing so would overwrite the backup being used for recovery.
1. Create the KVM VM and Attach the Recovery Media and Backup
With the three storage roles defined, create the blank restore target, build the NTFS backup carrier disk, and then attach all three devices to the VM.
Create the Blank Restore Target
Create a blank QCOW2 image for the restored Windows Server. It must be large enough for the original partition layout, not only the amount of currently used data. The tested server required a 1 TB target disk. The examples use /var/lib/libvirt/images; replace it with the image directory for the KVM host’s actual storage pool when necessary.
sudo qemu-img create -f qcow2 \
/var/lib/libvirt/images/server01-restore-test.qcow2 1TThis is the destination disk that Veeam will overwrite during Entire computer recovery.
Create an NTFS Disk for the Backup Files
The selected full backup occupied about 69 GB, so I created an 80 GB RAW disk image. Adjust the size for the backup being tested.
sudo qemu-img create -f raw \
  /var/lib/libvirt/images/server01-veeam-full.raw 80G

sudo parted -s \
  /var/lib/libvirt/images/server01-veeam-full.raw \
mklabel gpt mkpart primary ntfs 1MiB 100%Attach the RAW image to a temporary loop device, format its partition as NTFS, and mount it on the KVM host. Run this block and the following copy block in the same shell because the second block reuses the loopdev variable:
loopdev=$(sudo losetup --find --show --partscan \
  /var/lib/libvirt/images/server01-veeam-full.raw)

sudo mkfs.ntfs -f -L VEEAMFULL "${loopdev}p1"
sudo mkdir -p /mnt/veeam-full
sudo mount "${loopdev}p1" /mnt/veeam-fullCreate a folder on the NTFS disk and copy the Veeam metadata file and full backup file into the same folder:
sudo mkdir -p /mnt/veeam-full/VeeamBackup

sudo cp "/path/to/full-backup/"*.vbm \
  /mnt/veeam-full/VeeamBackup/

sudo cp "/path/to/full-backup/"*.vbk \
  /mnt/veeam-full/VeeamBackup/

sudo sync
sudo umount /mnt/veeam-full
sudo losetup -d "$loopdev"Keep the .vbm and .vbk files together. This test used the full restore point only, so incremental .vib files were not copied.
Create the VM and Attach All Three Devices
Create the Windows Server test VM with Q35, UEFI firmware, 4 GB of memory, and 4 vCPUs. Use SATA for both disks because Windows Server 2016 already includes the Microsoft SATA/AHCI driver.
sudo virt-install \
  --name server01-restore-test \
  --memory 4096 \
  --vcpus 4 \
  --machine q35 \
  --boot uefi \
  --os-variant win2k16 \
  --disk path=/var/lib/libvirt/images/server01-restore-test.qcow2,format=qcow2,bus=sata,cache=none \
  --disk path=/var/lib/libvirt/images/server01-veeam-full.raw,format=raw,bus=sata \
  --cdrom /var/lib/libvirt/images/VeeamRecoveryMedia_SERVER01.iso \
  --network network=p2v-isolated,model=e1000e \
  --graphics vnc,listen=127.0.0.1 \
--noautoconsole--cdrom attaches the Recovery Media ISO as a virtual CD/DVD drive. The first --disk option attaches the empty restore destination. The second --disk option attaches the NTFS backup carrier disk.
The command above attaches the VM only to p2v-isolated. For a restore and boot test that does not require a virtual NIC, replace that option with --network none.
Before starting the restore, confirm the device mapping:
sudo virsh domblklist server01-restore-test --detailsThe list should contain one CD-ROM, one blank QCOW2 target disk, and one RAW backup disk. virt-install starts the VM immediately even with --noautoconsole, so open its VNC console and promptly press any key when Press any key to boot from CD or DVD appears. If the prompt is missed, the blank target disk produces a no-bootable-device message; reset the VM and try again. Do not select the RAW backup disk as the restore destination.
2. Boot Veeam Recovery Media
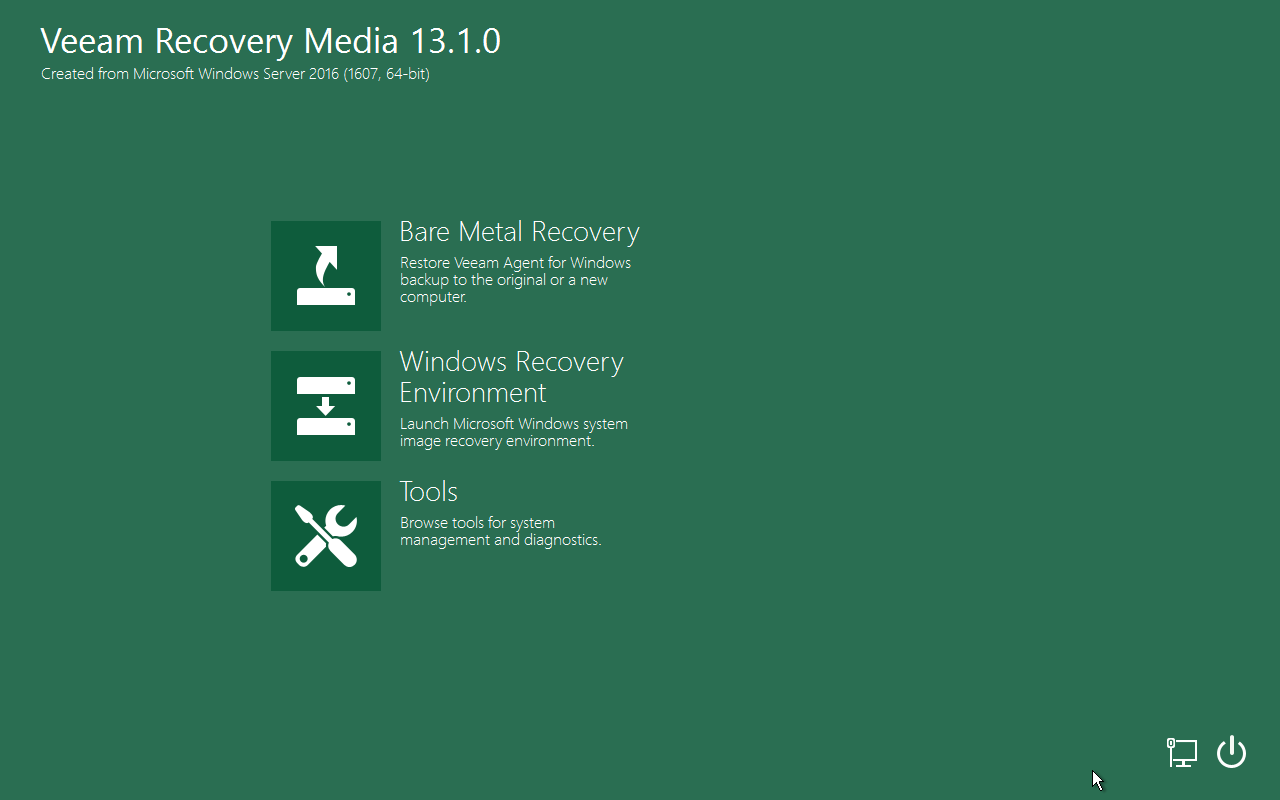
Start the VM from the Veeam Recovery Media ISO. On the main menu, select Bare Metal Recovery.
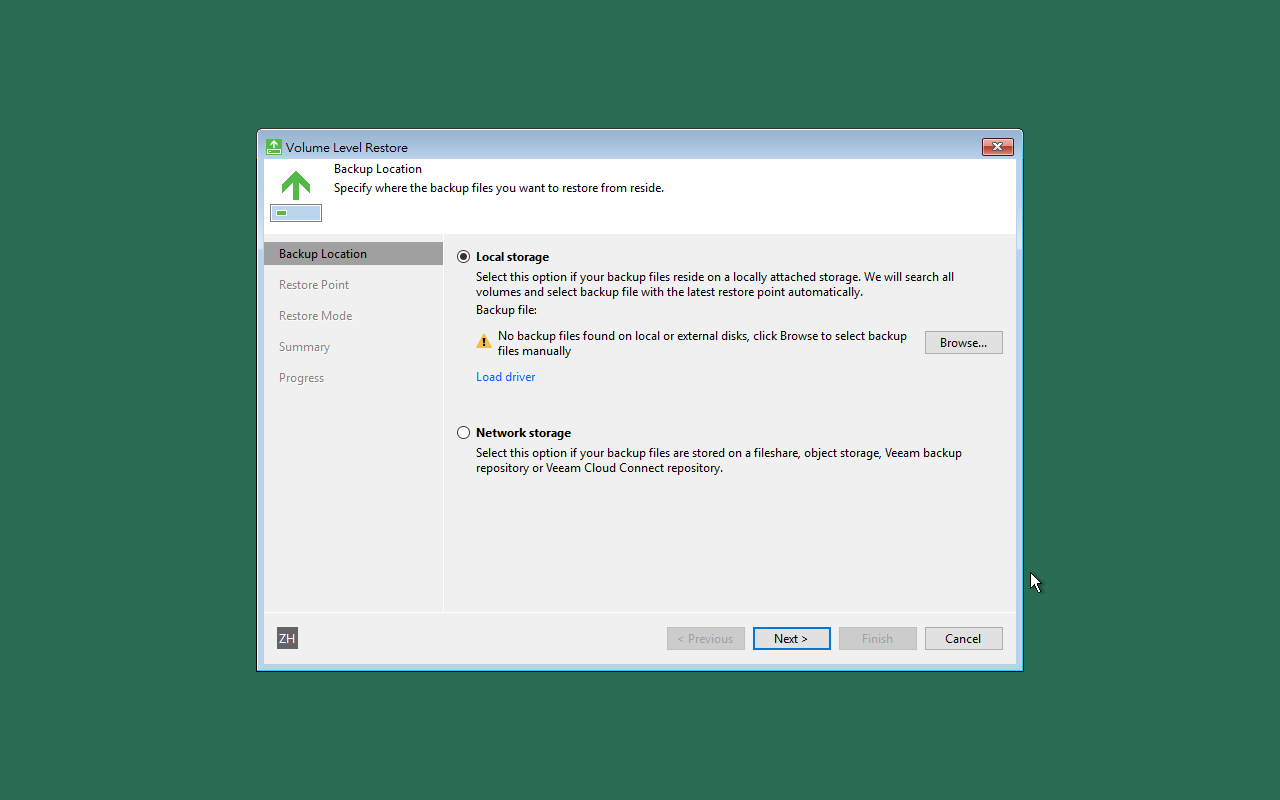
The recovery environment may not find a backup automatically. Select Browse and open the disk or folder containing the copied Veeam backup.
3. Verify the Recovery Disks
If the backup disk or drive letter is unclear, return to the main menu, open Tools, and start Command Prompt. Use DiskPart to list the volumes:
diskpart
list volume
exit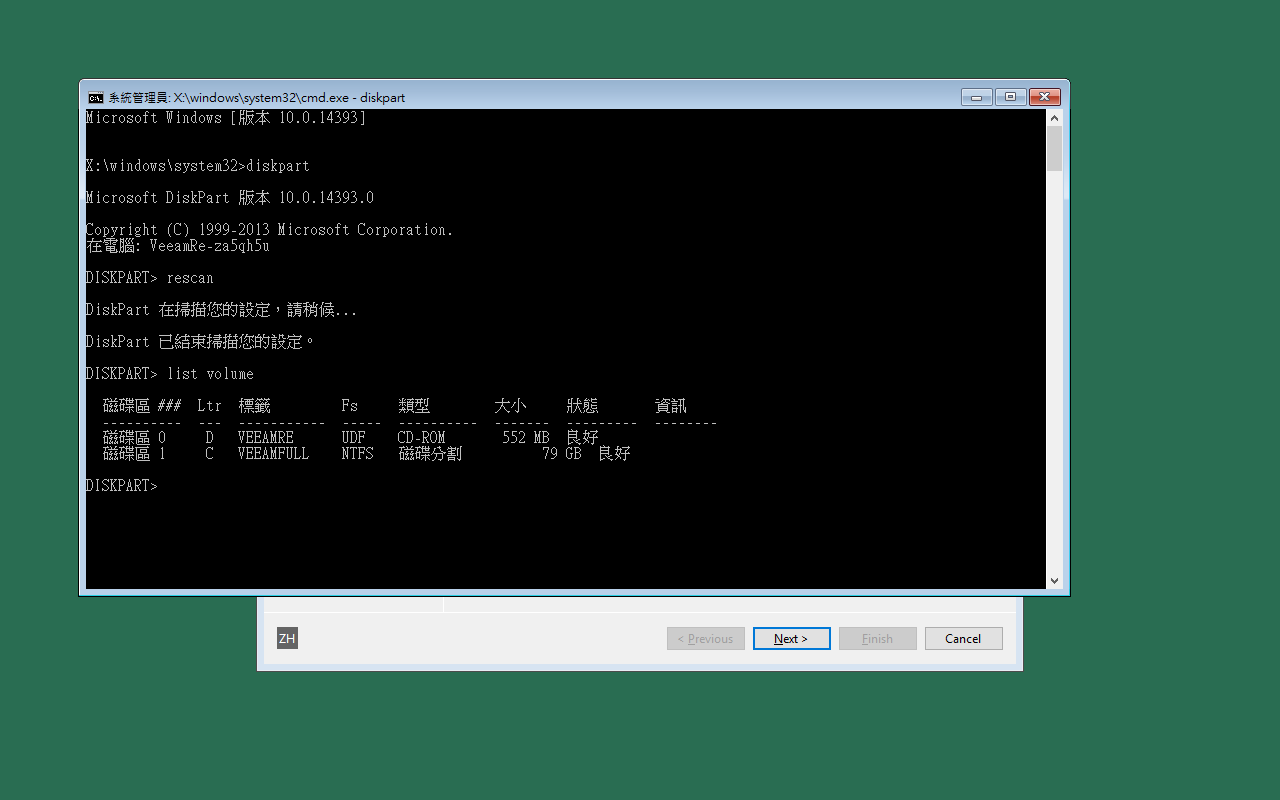
Drive letters in the recovery environment may differ from the letters used by the running Windows installation. Identify disks by their label, size, and contents rather than assuming that Windows is always on C:.
4. Select the Restore Point and Restore Mode
Select the computer backup and the full restore point. For this test, I used a complete full backup rather than the newest incremental restore point. The .vbm metadata may still list incremental restore points even when their .vib files were not copied; in that situation, select the row whose Type is Full.
For Restore Mode, select Entire computer. This restores the boot partitions, Windows volume, and data volumes included in the backup.
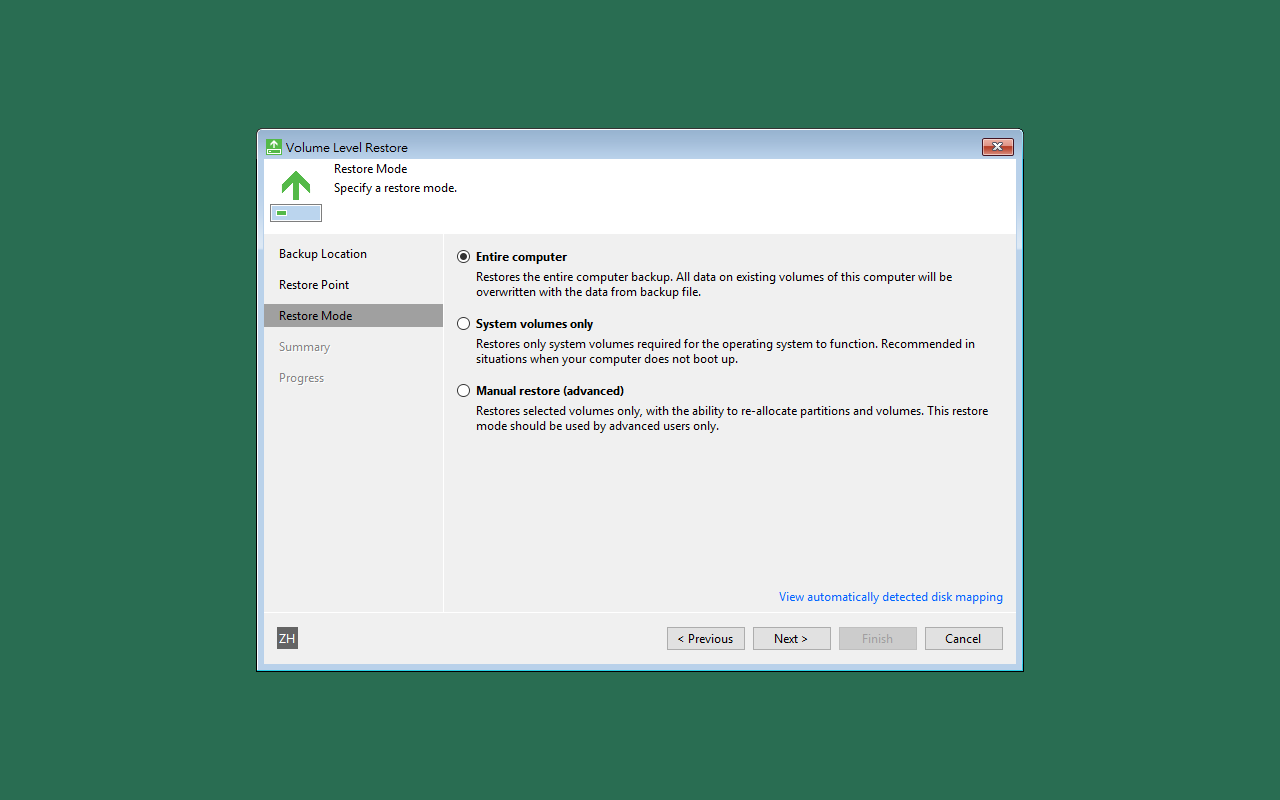
Review the automatic disk mapping carefully before starting. The destination disk will be overwritten by the restore.
5. Run the Bare-Metal Restore
Start the restore and wait for every selected volume to complete. The required time depends on backup size and the performance of the backup disk and VM storage.
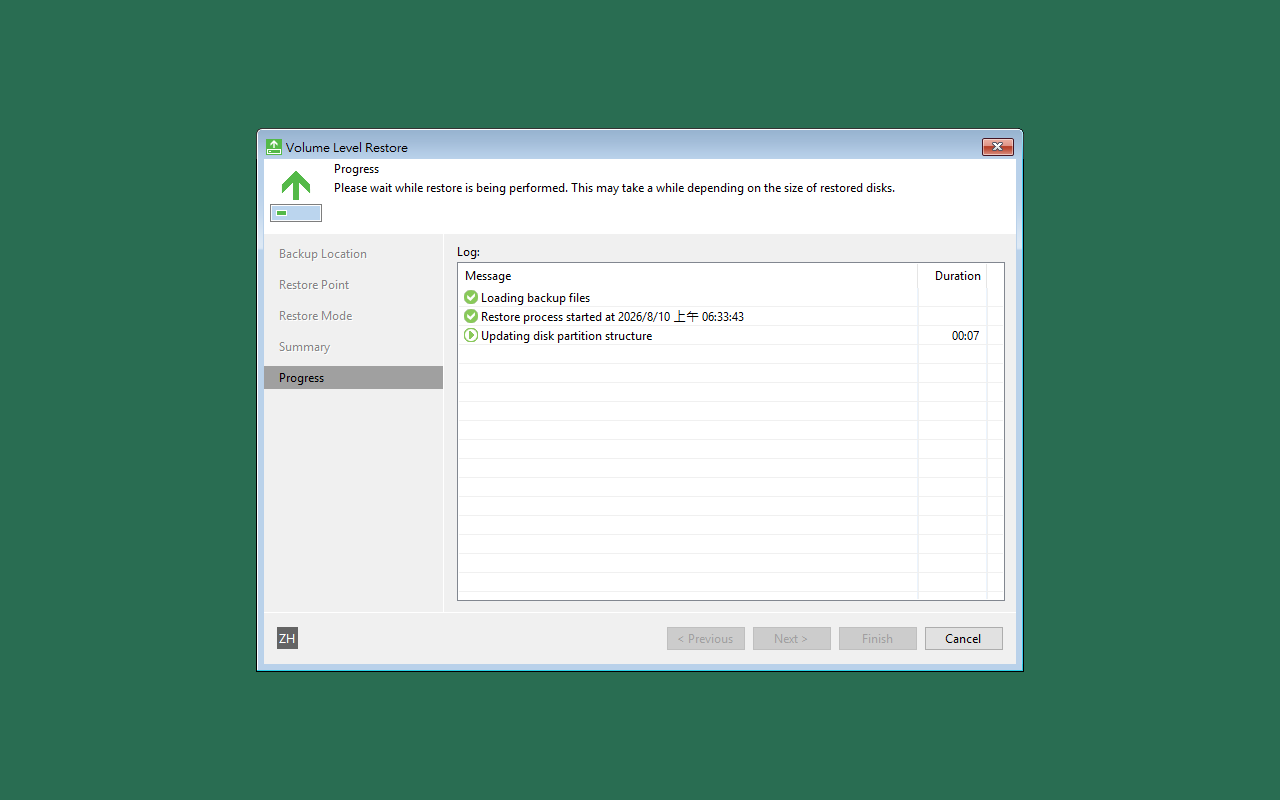
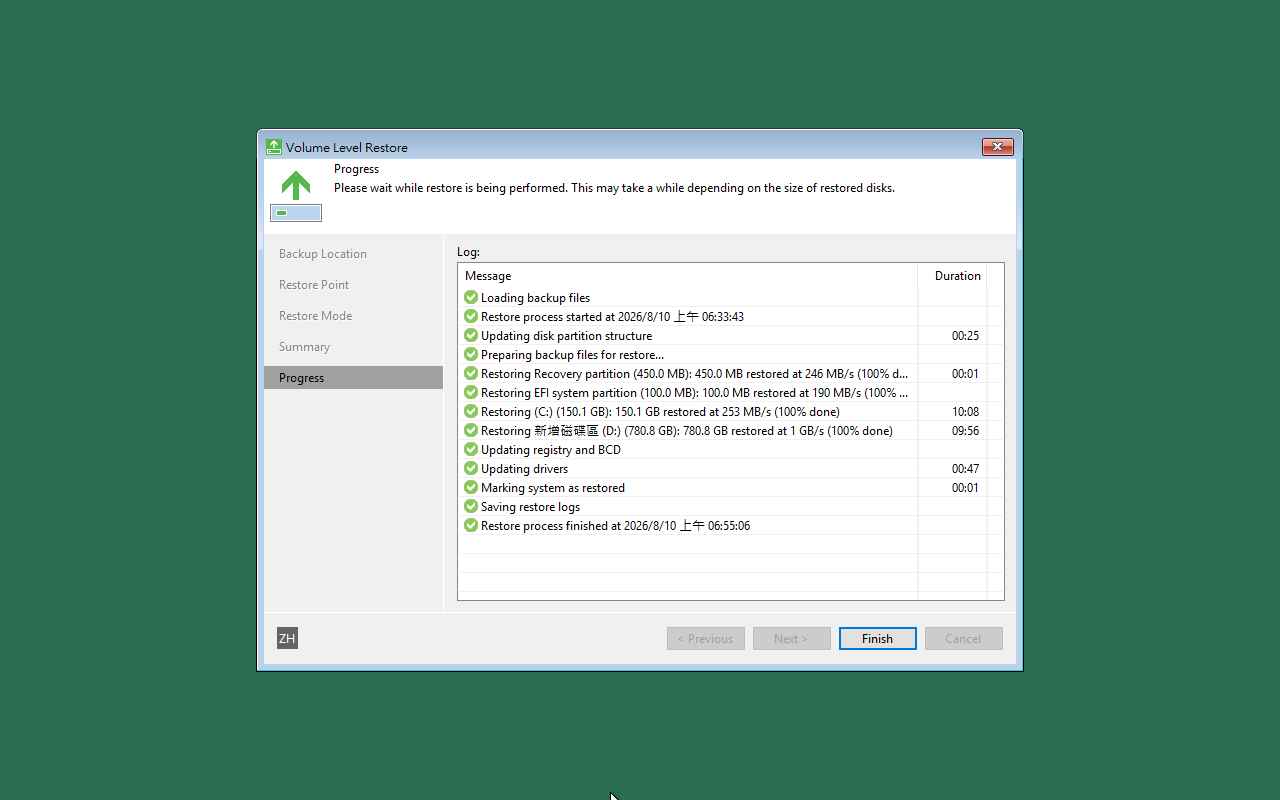
After the restore completes, click Finish, choose No when prompted to reboot immediately, and shut down the recovery environment. With the VM off, run sudo virsh detach-disk server01-restore-test sdb --config to detach the RAW backup disk, then eject the ISO with sudo virsh change-media server01-restore-test sdc --eject --config. This keeps an empty virtual CD/DVD drive that can be reused later. Confirm with sudo virsh domblklist server01-restore-test --details that sdb is gone and sdc has no source, then start the VM with sudo virsh start server01-restore-test.
First Boot Result
In the fresh repeat test, the first boot completed successfully and Windows Server 2016 reached the lock screen without an offline registry change.
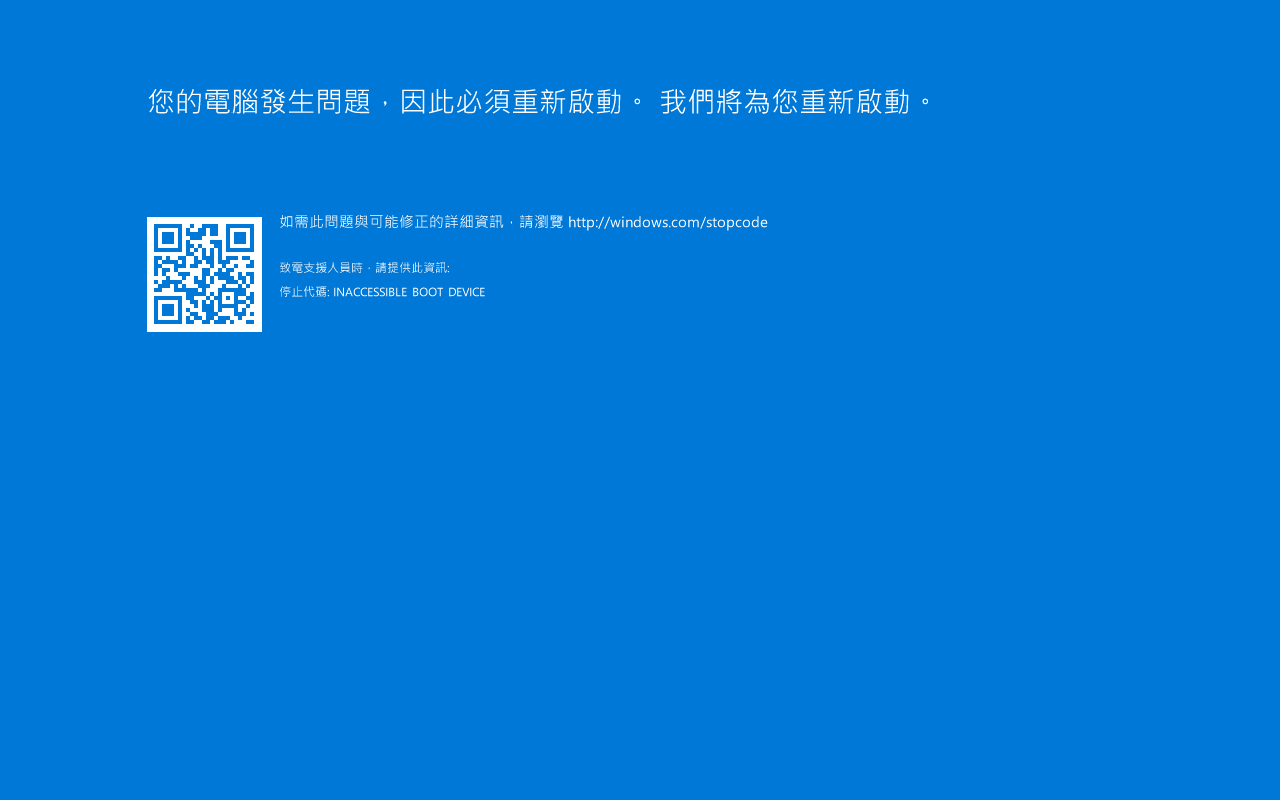
An earlier restore attempt stopped with INACCESSIBLE_BOOT_DEVICE, which can occur when the source storage controller and target virtual controller differ. That error was not reproduced during the clean retest because Veeam completed its registry, BCD, and driver updates before the first boot.
Use the following repair only if the first boot actually stops with INACCESSIBLE_BOOT_DEVICE and the VM boot disk uses a SATA/AHCI controller. A VirtIO, SCSI, or other virtual controller requires its corresponding driver instead.
6. Optional: Enable StorAHCI in the Offline Windows Registry
Shut down the VM and insert Recovery Media into the existing virtual CD/DVD drive with sudo virsh change-media server01-restore-test sdc /var/lib/libvirt/images/VeeamRecoveryMedia_SERVER01.iso --insert --config. Start the VM, press a key at the CD/DVD boot prompt, and open Tools → Command Prompt.
First identify the restored Windows volume. Test the available drive letters until the Windows directory is found:
dir C:\Windows
dir D:\Windows
dir E:\WindowsThe example below assumes that the restored Windows volume is D:. Replace it with the correct drive letter for the current recovery session.
reg load HKLM\OFF D:\Windows\System32\Config\SYSTEM
reg query HKLM\OFF\Select /v CurrentThe Current value identifies the active control set. A value of 0x1 means ControlSet001. Use the control set reported by the restored system.
reg add HKLM\OFF\ControlSet001\Services\storahci /v Start /t REG_DWORD /d 0 /f
reg add HKLM\OFF\ControlSet001\Services\storahci\StartOverride /v 0 /t REG_DWORD /d 0 /f

reg query HKLM\OFF\ControlSet001\Services\storahci /v Start
reg query HKLM\OFF\ControlSet001\Services\storahci\StartOverride /v 0

reg unload HKLM\OFF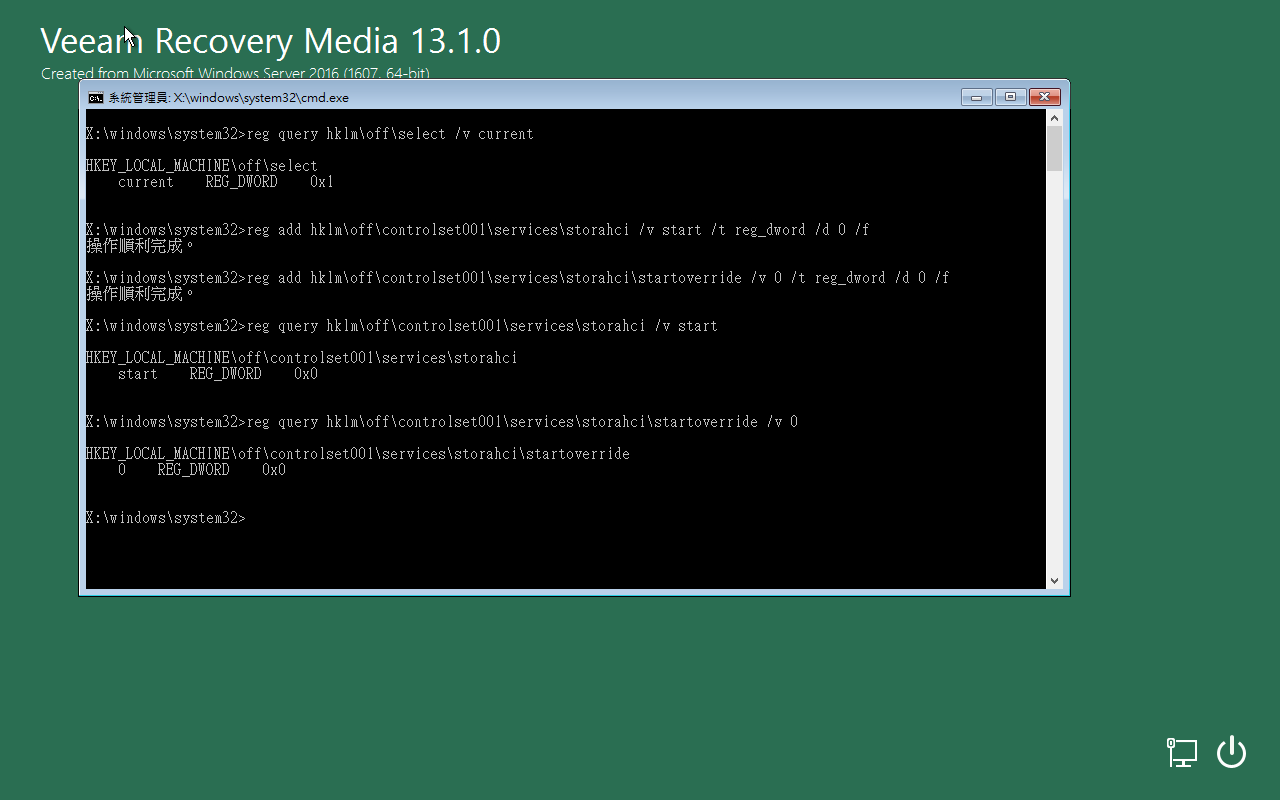
Shut down the recovery environment, eject the ISO with sudo virsh change-media server01-restore-test sdc --eject --config, and start the VM from the restored SATA system disk again.
7. Verify the Restored Windows Server
In the fresh repeat test, Windows Server 2016 reached the sign-in screen without the optional StorAHCI change. If the repair was required on another system, verify the same result after applying it.
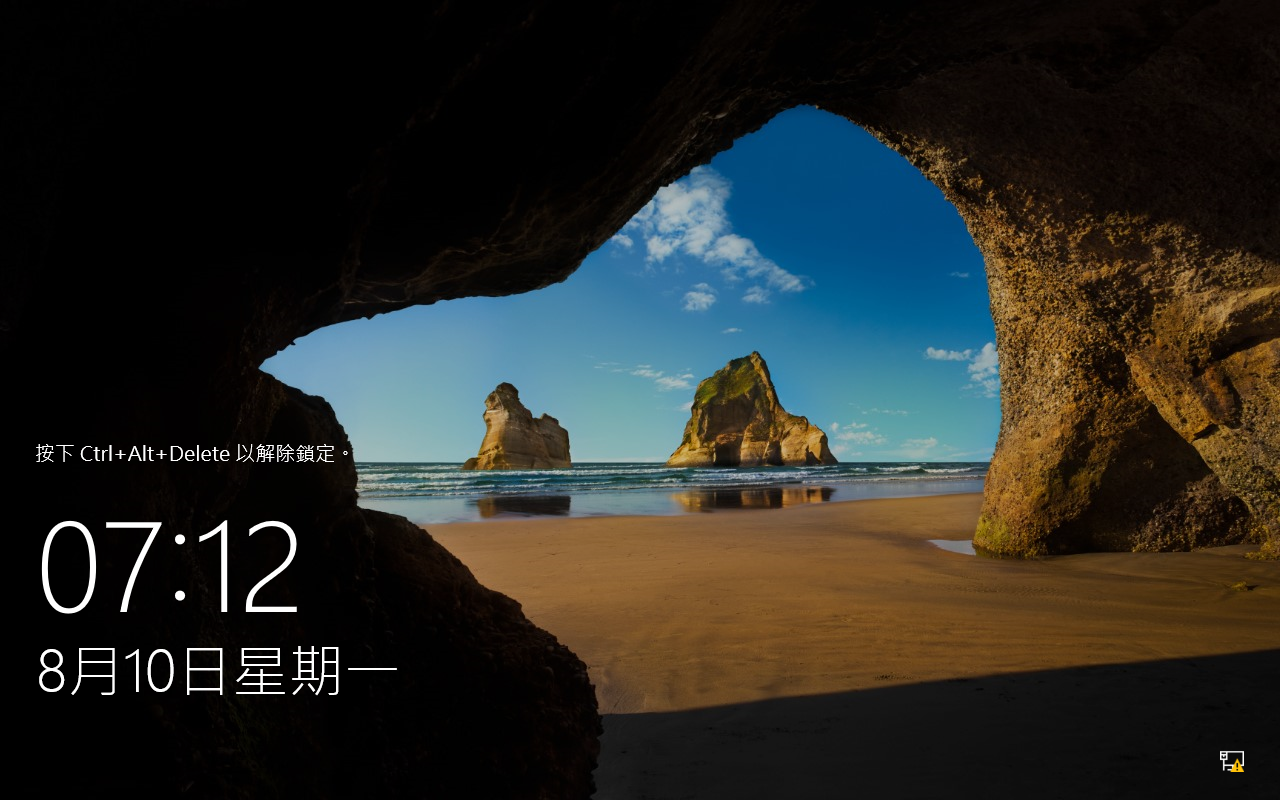
At this point, verify the restored operating system:
- Windows sign-in works
- System and data volumes are present
- Device Manager does not show a boot-critical storage error
- Windows services use the expected startup state
- The test VM remains isolated from production
What This Test Proved
- The Veeam full backup could be opened by Recovery Media
- The complete server could be restored to a KVM virtual disk
- The restored Windows Server installation was intact
- Veeam completed its registry, BCD, and driver updates, allowing the clean retest to boot directly
- The offline StorAHCI procedure remains available as a conditional recovery path
- Windows Server could boot on the test VM
Final Result
The fresh repeat test confirmed that the Veeam Agent full backup could restore the physical Windows Server 2016 system to a newly created KVM virtual machine. Veeam completed the restore, registry and BCD updates, and driver injection, and Windows booted directly from the SATA/AHCI disk. The earlier INACCESSIBLE_BOOT_DEVICE result was not reproduced, so the offline StorAHCI procedure is documented only as a conditional recovery path.