
This post enables APM in Zabbix 8.0 on Ubuntu 26.04: a Zabbix proxy receives OpenTelemetry data (OTLP/gRPC on 4317), stores it in a local ClickHouse, and the frontend reads it back via the APM data source.
This post is based on
Lab context
- Zabbix host
- Hostname:
zabbix.maksonlee.com–192.168.0.85 - OS: Ubuntu 26.04, 4 GB RAM
- Zabbix server + frontend:
8.0.0(MariaDB + NGINX)
- Hostname:
- Added in this post
- ClickHouse:
26.8.36.3(LTS), on127.0.0.1only - Zabbix proxy:
8.0.0, active mode, nameapm-proxy - OTLP receiver:
192.168.0.85:4317(gRPC, no TLS)
- ClickHouse:
- Tested on: a clean Ubuntu 26.04.1 VM with Zabbix
8.0.0
What you’ll build
- ClickHouse with Zabbix’s
otel_*tables (7-day TTL) - A Zabbix proxy receiving OTLP on
4317 - The frontend’s APM data source
Prerequisites
- Zabbix 8.0.0 with MariaDB on this host, and
zabbix-sql-scripts. - Paste each block as a whole in an SSH terminal (a VM console drops the lines after
sudo). - Synced clocks here and on every app host; Zabbix queries by time, so they can’t drift:
timedatectl show -p NTPSynchronizedExpected:
NTPSynchronized=yes1. Install ClickHouse + Zabbix proxy (example: ClickHouse 26.8.36.3)
On zabbix, add the ClickHouse LTS repository:
sudo apt update
sudo apt install -y curl gnupg
curl -fsSL https://packages.clickhouse.com/rpm/lts/repodata/repomd.xml.key \
  | sudo gpg --dearmor -o /usr/share/keyrings/clickhouse-keyring.gpg
echo 'deb [signed-by=/usr/share/keyrings/clickhouse-keyring.gpg arch=amd64] https://packages.clickhouse.com/deb lts main' \
  | sudo tee /etc/apt/sources.list.d/clickhouse.list
sudo apt updateConfirm the key fingerprint:
gpg --show-keys --with-fingerprint /usr/share/keyrings/clickhouse-keyring.gpgExpected:
pub   rsa4096 2021-11-22 [SC]
      3A9E A119 3A97 B548 BE14  57D4 8919 F6BD 2B48 D754
uid ClickHouse Inc. Repositories Key <packages@clickhouse.com>Install both. The installer asks for a password for ClickHouse’s default user; keep it, you’ll need it in step 3:
sudo apt install -y clickhouse-server=26.8.36.3 clickhouse-client=26.8.36.3 \
clickhouse-common-static=26.8.36.3 zabbix-proxy-mysql=2:8.0.0-1+ubuntu26.04Expected (example, key lines):
  Download size: 258 MB
Set up the password for the default user:
Password for the default user is saved in file /etc/clickhouse-server/users.d/default-password.xml.Confirm the versions. Neither service runs yet:
clickhouse-server --version
zabbix_proxy --version | head -n 1
systemctl is-active clickhouse-server zabbix-proxyExpected:
ClickHouse server version 26.8.36.3 (official build).
zabbix_proxy (Zabbix) 8.0.0
inactive
inactive2. Configure ClickHouse (loopback only, small logs)
Create /etc/clickhouse-server/config.d/apm.xml:
sudo tee /etc/clickhouse-server/config.d/apm.xml >/dev/null <<'EOF'
<clickhouse>
    <listen_host>127.0.0.1</listen_host>
    <max_server_memory_usage>1342177280</max_server_memory_usage>
    <max_concurrent_queries>12</max_concurrent_queries>
    <logger>
        <level>information</level>
        <size>100M</size>
        <count>3</count>
    </logger>
    <query_log>
        <ttl>event_date + INTERVAL 7 DAY DELETE</ttl>
    </query_log>
    <error_log>
        <ttl>event_date + INTERVAL 7 DAY DELETE</ttl>
    </error_log>
    <metric_log remove="1"/>
    <asynchronous_metric_log remove="1"/>
    <trace_log remove="1"/>
    <text_log remove="1"/>
    <part_log remove="1"/>
    <processors_profile_log remove="1"/>
    <background_schedule_pool_log remove="1"/>
</clickhouse>
EOFlisten_host:127.0.0.1only.max_server_memory_usage: 1.25 GiB, for this 4 GB host.logger,remove="1",ttl: keep ClickHouse’s own logs small. With the defaults they grew about 1 GiB per day in this lab.
Create /etc/clickhouse-server/users.d/apm.xml:
sudo tee /etc/clickhouse-server/users.d/apm.xml >/dev/null <<'EOF'
<clickhouse>
    <profiles>
        <default>
            <max_memory_usage>268435456</max_memory_usage>
            <max_threads>2</max_threads>
        </default>
    </profiles>
    <users>
        <default>
            <networks replace="replace">
                <ip>127.0.0.1</ip>
                <ip>::1</ip>
            </networks>
        </default>
    </users>
</clickhouse>
EOFStart ClickHouse:
sudo systemctl enable --now clickhouse-server
systemctl is-active clickhouse-serverExpected (last line):
active3. Create the otel database + tables
Read the default password into this shell (nothing is echoed), and stay in this shell through step 4:
read -rs -p 'ClickHouse default password: ' CLICKHOUSE_PASSWORD; export CLICKHOUSE_PASSWORD; echoCreate the database and Zabbix’s tables with a 7-day TTL:
clickhouse-client --host 127.0.0.1 --query 'CREATE DATABASE otel'
/usr/share/zabbix/sql-scripts/clickhouse/otel_all.sh \
  -s http://127.0.0.1:8123 -d otel -u default -p "$CLICKHOUSE_PASSWORD" -t 604800
clickhouse-client --host 127.0.0.1 --query 'SHOW TABLES FROM otel'Expected:
otel_logs
otel_metrics_exponential_histogram
otel_metrics_gauge
otel_metrics_histogram
otel_metrics_sum
otel_traces4. Create the accounts + the proxy database
Generate three passwords into root-only files:
sudo install -d -m 700 /root/apm
for name in writer reader proxy-db; do
  openssl rand -hex 24 | sudo tee /root/apm/$name >/dev/null
done
sudo chmod 600 /root/apm/writer /root/apm/reader /root/apm/proxy-dbCreate apm_writer (proxy) and apm_reader (frontend + server):
clickhouse-client --host 127.0.0.1 --multiquery <<SQL
CREATE USER apm_writer HOST IP '127.0.0.1'
  IDENTIFIED WITH sha256_password BY '$(sudo cat /root/apm/writer)';
GRANT SELECT, INSERT ON otel.* TO apm_writer;
CREATE USER apm_reader HOST IP '127.0.0.1'
  IDENTIFIED WITH sha256_password BY '$(sudo cat /root/apm/reader)';
GRANT SELECT ON otel.* TO apm_reader;
SQL
clickhouse-client --host 127.0.0.1 --query 'SHOW GRANTS FOR apm_writer, apm_reader'
unset CLICKHOUSE_PASSWORDExpected:
GRANT SELECT ON otel.* TO apm_reader
GRANT SELECT, INSERT ON otel.* TO apm_writerThe proxy needs its own MariaDB database:
sudo mariadb <<SQL
CREATE DATABASE zabbix_proxy_apm CHARACTER SET utf8mb4 COLLATE utf8mb4_bin;
CREATE USER 'zabbix_apm_proxy'@'localhost' IDENTIFIED BY '$(sudo cat /root/apm/proxy-db)';
GRANT ALL PRIVILEGES ON zabbix_proxy_apm.* TO 'zabbix_apm_proxy'@'localhost';
SQL
sudo mariadb --default-character-set=utf8mb4 zabbix_proxy_apm \
  < /usr/share/zabbix/sql-scripts/mysql/proxy.sql
sudo mariadb -N -e "SELECT COUNT(*) FROM information_schema.tables WHERE table_schema = 'zabbix_proxy_apm'"Expected (table count):
+-----+
| 230 |
+-----+5. Configure + start the Zabbix proxy
The packaged zabbix_proxy.conf already includes /etc/zabbix/zabbix_proxy.d/*.conf, so we leave it untouched and add one file:
sudo install -m 600 /dev/null /etc/zabbix/zabbix_proxy.d/apm.conf
sudo tee /etc/zabbix/zabbix_proxy.d/apm.conf >/dev/null <<EOF
ProxyMode=0
Server=127.0.0.1
Hostname=apm-proxy
ListenIP=127.0.0.1
ListenPort=10052
DBHost=localhost
DBName=zabbix_proxy_apm
DBUser=zabbix_apm_proxy
DBPassword=$(sudo cat /root/apm/proxy-db)
StartAPMCollector=1
APMListenIP=192.168.0.85
APMListenPort=4317
TelemetryProvider=clickhouse;url=http://127.0.0.1:8123,db=otel,username=apm_writer,password=$(sudo cat /root/apm/writer)
EOFHostname: must match the Proxy name in step 6.ListenPort=10052: the server already uses10051.APMListenIP: an address on this host; otherwise the proxy keeps restarting.
Validate and start:
sudo zabbix_proxy -T
sudo systemctl enable --now zabbix-proxy
systemctl is-active clickhouse-server zabbix-proxyExpected (key lines):
Validation successful
active
activeUntil the proxy exists in the frontend, its log repeats one line. That’s expected:
sudo tail -n 1 /var/log/zabbix/zabbix_proxy.logExpected (example):
19091:20261117:142905.319 cannot send proxy data to server at "127.0.0.1": proxy "apm-proxy" not found6. Add the proxy + the APM data source (frontend)
Sign in as a Super admin:
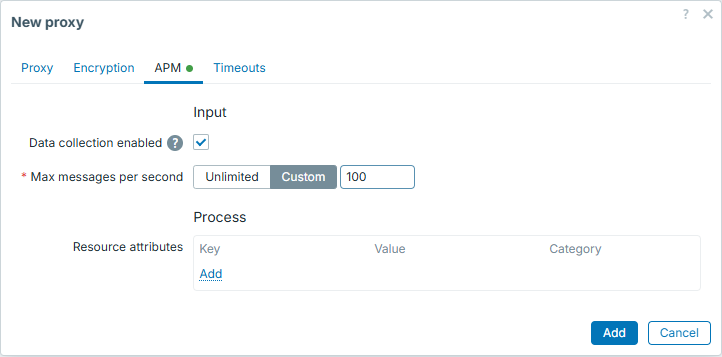
- Administration → Proxies → Create proxy
- Proxy name:
apm-proxy - Proxy mode: Active
- Proxy address:
127.0.0.1
- Proxy name:
- APM tab
- Check Data collection enabled
- Max messages per second: Custom →
100
- Click Add
Show the reader password:
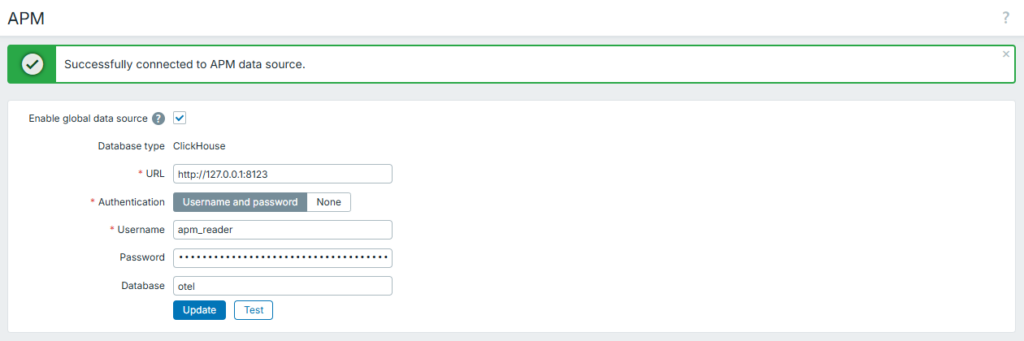
sudo cat /root/apm/reader- Administration → Data source → APM
- Check Enable global data source
- URL:
http://127.0.0.1:8123 - Authentication: Username and password
- Username:
apm_reader, Password: the value above - Database:
otel
- Click Test →
Successfully connected to APM data source. - Click Update
About 10 seconds after you add the proxy, it opens the receiver. Confirm:
sudo ss -ltn | grep -E ':(4317|10052) 'Expected:
LISTEN 0      4096               127.0.0.1:10052      0.0.0.0:*
LISTEN 0 4096 [::ffff:192.168.0.85]:4317 *:*Note: the receiver has no authentication and no TLS. Allow 4317 only from your app hosts, or use the proxy’s APMTLS* settings (not tested here).
Summary
You now have Zabbix 8.0 APM on zabbix.maksonlee.com: an OTLP/gRPC receiver on 4317, ClickHouse storage with a 7-day TTL, and the APM data source. The next post sends FastAPI metrics to it.