This post upgrades the previous single-PC WireGuard client setup into a site-to-site VPN:
- AWS side: OPNsense 25.7 (WireGuard server / VPN gateway)
- Homelab side: MikroTik hEX (WireGuard site router)
- Goal:
192.168.0.0/24(homelab) can reach AWS networks (ex:10.0.128.0/20), and AWS hosts can route back to homelab.
Follow-up to:
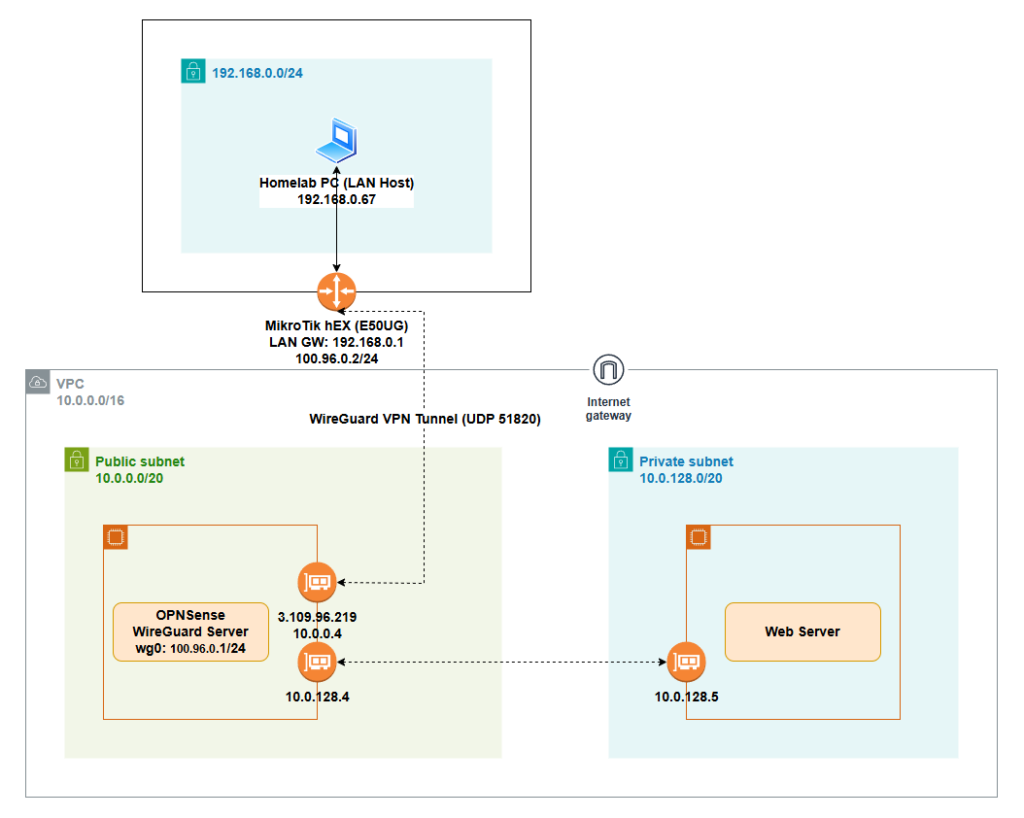
Architecture
- Homelab LAN:
192.168.0.0/24- MikroTik LAN GW:
192.168.0.1
- MikroTik LAN GW:
- WireGuard tunnel network:
100.96.0.0/24- OPNsense wg0:
100.96.0.1/24 - MikroTik wg:
100.96.0.2/24
- OPNsense wg0:
- AWS VPC:
10.0.0.0/16- Public subnet:
10.0.0.0/20(OPNsense WAN ENI here, has EIP3.109.96.219) - Private subnet:
10.0.128.0/20(example web server10.0.128.5, OPNsense LAN ENI10.0.128.4)
- Public subnet:
What changes vs “single PC WireGuard client”?
In the previous post, the “client” was a single Windows PC, so you allowed a client subnet (example: 100.64.0.0/24).
In site-to-site, the “client” becomes your MikroTik router, and the real routed LAN is:
- Homelab LAN:
192.168.0.0/24
So the firewall/routing will be updated accordingly.
Prerequisites
Already done from the previous post
On OPNsense (AWS) you already have:
- WireGuard enabled
- wg0 instance created
- Listen port:
51820 - Tunnel address:
100.96.0.1/24
- Listen port:
- Interface assigned (example name:
WG_VPN) - WAN firewall rule allowing UDP/51820 to OPNsense
If you don’t have those, finish the previous post first.
- OPNsense: copy wg0 Public Key
OPNsense:
- VPN → WireGuard → Instances
- Open wg0
- Copy Public Key
You will paste this into MikroTik when creating the peer.
- MikroTik: create WireGuard interface
- MikroTik (WinBox / WebFig):
- WireGuard → WireGuard → + New
- Create:
- Name:
wg-aws - Listen Port:
51820(OK to use; MikroTik will still initiate outbound) - MTU:
1420(recommended)
- Name:
- Click Apply / OK
Important MikroTik UI note (key not shown)
If you click + and don’t see keys immediately: save/apply, then reopen the interface page — the Public Key will appear after it’s created.
Copy MikroTik WireGuard Public Key (you’ll paste it into OPNsense later).

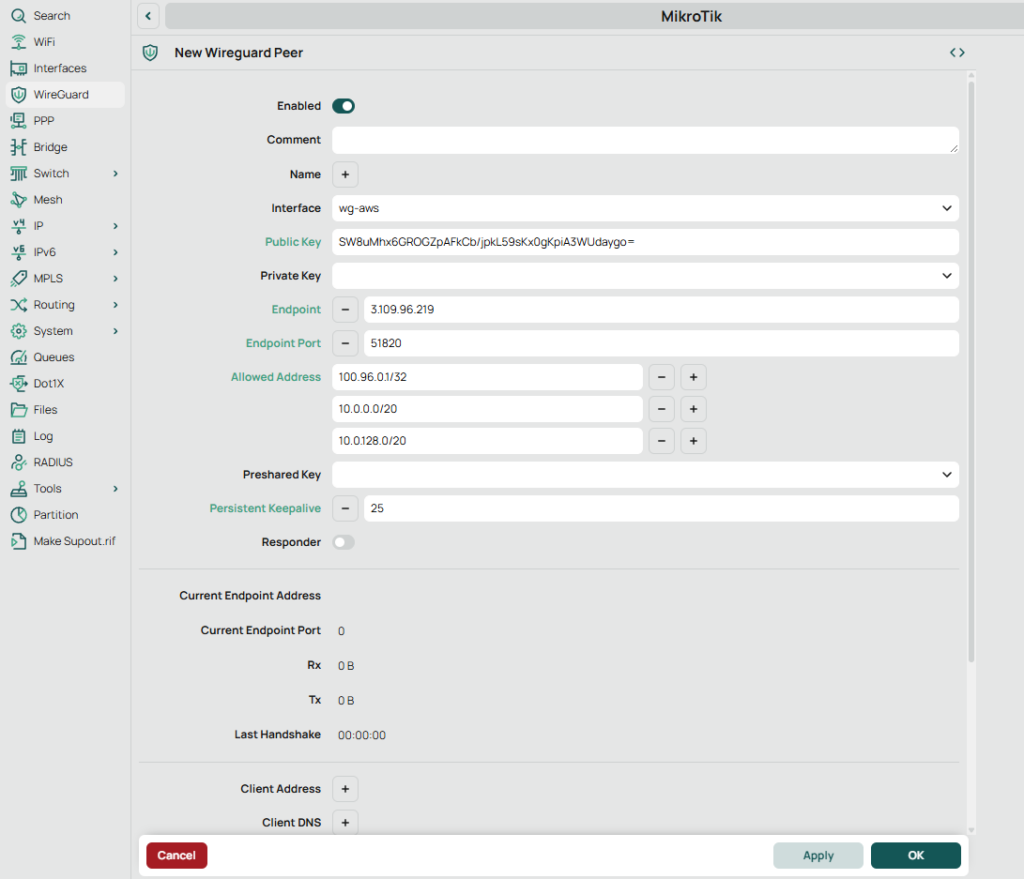
- MikroTik: create peer to OPNsense
MikroTik:
- WireGuard → Peers → + New
- Set:
- Interface:
wg-aws - Public Key: (paste OPNsense wg0 public key from Step 1)
- Endpoint Address:
3.109.96.219 - Endpoint Port:
51820 - Allowed Address:
100.96.0.1/32(OPNsense wg0 tunnel IP)10.0.0.0/20(AWS public subnet)10.0.128.0/20(AWS private subnet)
- Persistent Keepalive:
25s
- Interface:
Apply / OK.
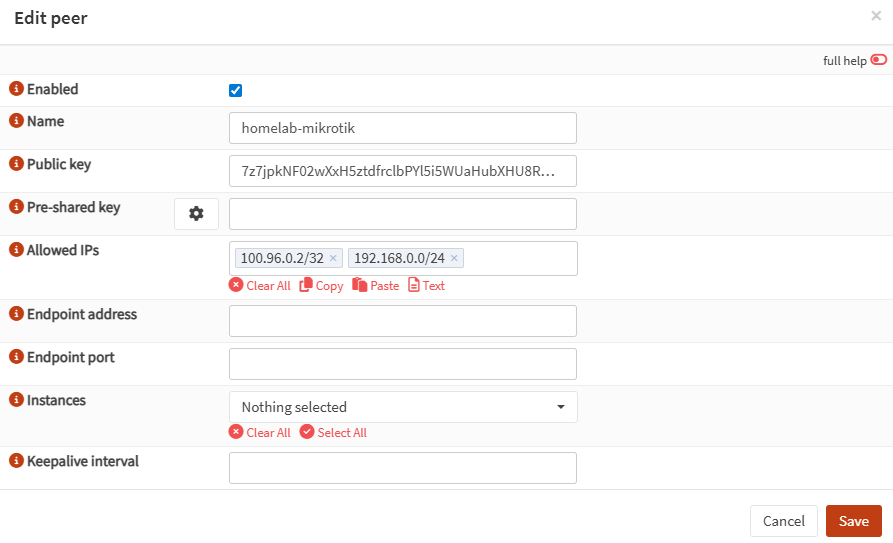
- OPNsense: create WireGuard peer for MikroTik
Now that you have MikroTik’s public key, create the peer on OPNsense.
OPNsense:
- VPN → WireGuard → Peers → Add
- Fill in:
- Name:
homelab-mikrotik - Public Key: (paste MikroTik WireGuard public key from Step 2)
- Allowed IPs:
100.96.0.2/32(MikroTik tunnel IP)192.168.0.0/24(homelab LAN behind MikroTik)
- Endpoint Address / Port: leave blank
(Let MikroTik initiate; OPNsense will learn endpoint from handshake)
- Name:
Save / Apply.

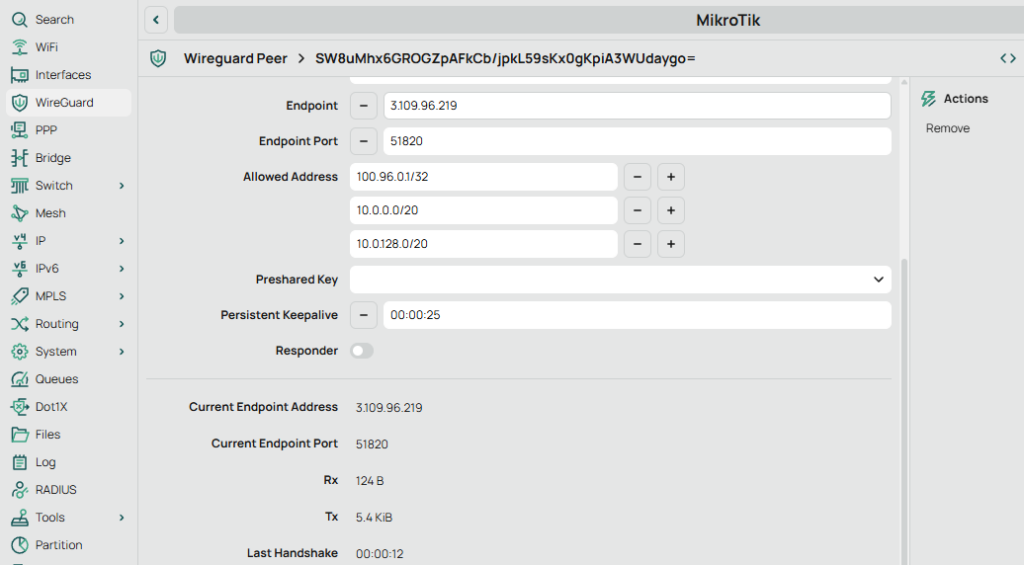
- Checkpoint: confirm the WireGuard tunnel (handshake) is up
At this checkpoint, you are only confirming “tunnel up” (handshake + keys).
This does not guarantee routing/firewall is finished yet.
MikroTik GUI check
Open the peer and confirm:
- Last Handshake is recent (seconds)
- Rx/Tx counters are increasing
MikroTik CLI check
Run:
/interface wireguard peers print detailYou want to see:
last-handshake=...(recent)rx=... tx=...(not zero)
[admin@MikroTik] > /interface wireguard peers print detail
Flags: X - disabled; D - dynamic
 0    interface=wg-aws name="peer1" public-key="SW8uMhx6GROGZpAFkCb/jpkL59sKx0gKpiA3WUdaygo=" private-key="" endpoint-address=3.109.96.219 endpoint-port=51820 current-endpoint-address=3.109.96.219 current-endpoint-port=51820
      allowed-address=100.96.0.1/32,10.0.0.0/20,10.0.128.0/20 preshared-key="" persistent-keepalive=25s client-endpoint="" rx=208.4KiB tx=105.0KiB last-handshake=14s
[admin@MikroTik] > - MikroTik: assign tunnel IP + add routes to AWS
Now we do routing on the homelab side.
MikroTik CLI:
/ip address add address=100.96.0.2/24 interface=wg-aws

/ip route add dst-address=10.0.0.0/20 gateway=wg-aws
/ip route add dst-address=10.0.128.0/20 gateway=wg-awsVerify:
/ip address print where interface=wg-aws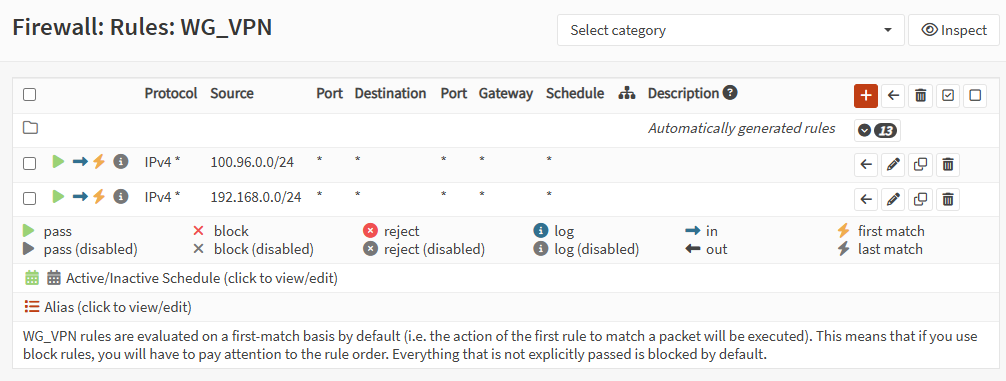
/ip route print where gateway=wg-aws- OPNsense: update WG_VPN firewall rules for site-to-site
This replaces the old single-client rule (example 100.64.0.0/24) with site-to-site rules.
OPNsense:
- Go to Firewall → Rules → WG_VPN
- Remove the old single-PC subnet rule (if it exists):
100.64.0.0/24 → any
- Add / keep these rules (Pass, protocol any, destination any):
Rule A — allow WireGuard tunnel subnet
- Source:
100.96.0.0/24 - Destination:
any - Description:
Allow WireGuard tunnel subnet
Rule B — allow homelab LAN behind MikroTik
- Source:
192.168.0.0/24 - Destination:
any - Description:
Allow homelab LAN over WireGuard
Save / Apply.
- AWS: ensure AWS subnets can route back to homelab (192.168.0.0/24)
For AWS instances to reach homelab, the AWS subnet route table must send 192.168.0.0/24 traffic to OPNsense (so it can forward into WireGuard).
Which route table needs it?
- Any subnet that should reach homelab must have a route for
192.168.0.0/24pointing to the correct OPNsense ENI in that subnet.
Typical layout:
- Public subnet route table (
10.0.0.0/20):- Add route:
- Destination:
192.168.0.0/24 - Target: OPNsense WAN ENI (the ENI inside the public subnet)
- Destination:
- Add route:
- Private subnet route table (
10.0.128.0/20):- Add route:
- Destination:
192.168.0.0/24 - Target: OPNsense LAN ENI (the ENI inside the private subnet)
- Destination:
- Add route:
- Validation (recommended order)
- From MikroTik → AWS private host (quick proof)
From MikroTik terminal:
/ping 10.0.128.5Expected: replies, packet-loss=0%.
- From homelab PC → AWS private host (real user traffic)
From a homelab PC (example 192.168.0.x):
- Ping / curl / open the service on
10.0.128.5
If ping fails but TCP works, it’s often security group / OS firewall on the target.
- From AWS private host → homelab (traceroute)
From an AWS private instance (example 10.0.128.5):
traceroute -n 192.168.0.67Expected hops look like:
10.0.128.4(OPNsense inside AWS private subnet)100.96.0.2(MikroTik tunnel IP)192.168.0.67(homelab host)
If you traceroute to Windows and it stalls at 100.96.0.2, Windows firewall may be blocking ICMP/time-exceeded. Use a Linux homelab host to test, or adjust Windows firewall rules.
Did this guide save you time?
Support this site