In a previous post,
I built a 3-node HA Kubernetes cluster on bare-metal Ubuntu 24.04 with:
- kube-vip exposing an API VIP:
k8s.maksonlee.com → 192.168.0.97 - MetalLB providing a LoadBalancer IP:
192.168.0.98 - Traefik as the Ingress controller exposed via MetalLB
In this guide, I’ll reuse that same bare-metal cluster as a dynamic build farm for Jenkins, while keeping Jenkins itself outside the Kubernetes cluster on a separate VM (https://jenkins.maksonlee.com).
We’ll use the Jenkins Kubernetes plugin with:
- WebSocket agents over HTTPS (no fixed TCP agent port like
50000) - Minimal, namespaced RBAC for Jenkins
- No kubeconfig file – Jenkins talks to the API using a ServiceAccount token (and optionally the cluster CA)
Goals
- Use the existing 3-node bare-metal HA cluster as Jenkins build capacity.
- Keep the Jenkins controller outside Kubernetes on a dedicated machine:
jenkins.maksonlee.com. - Launch ephemeral Jenkins agents as Pods in a
jenkinsnamespace. - Use WebSocket so agents connect over HTTPS and we don’t open a separate TCP agent port.
- Give Jenkins only the permissions it needs (namespaced Role/RoleBinding, not cluster-admin).
- Verify the setup with a simple pipeline.
Lab Overview / Assumptions
From the HA cluster post, the Kubernetes side looks like this:
- Nodes (Ubuntu 24.04, control-plane + worker on each):
k8s-1.maksonlee.com–192.168.0.99k8s-2.maksonlee.com–192.168.0.100k8s-3.maksonlee.com–192.168.0.101
- API VIP (kube-vip):
k8s.maksonlee.com:6443→192.168.0.97
- Networking:
- Pod CIDR:
10.244.0.0/16(Calico) - Service CIDR:
10.96.0.0/12
- Pod CIDR:
- MetalLB:
- IP pool:
192.168.0.98-192.168.0.98
- IP pool:
- Traefik:
- LoadBalancer IP:
192.168.0.98 - Ingress hosts:
app1.maksonlee.com,app2.maksonlee.com
- LoadBalancer IP:
Jenkins assumptions:
- Jenkins controller runs outside the cluster.
- Jenkins URL:
https://jenkins.maksonlee.com - Jenkins is new enough to support WebSocket agents.
- The Kubernetes nodes can reach
https://jenkins.maksonlee.com:443.
Firewall:
- Only HTTPS to Jenkins (port 443) is required from nodes and users.
- The TCP port for inbound agents is disabled by default in Jenkins; we’ll keep it that way and not use it.
- Install the Kubernetes Plugin in Jenkins
On the Jenkins VM (jenkins.maksonlee.com):
- Go to Manage Jenkins → Plugins.
- Install the Kubernetes plugin.
- Restart Jenkins if required.
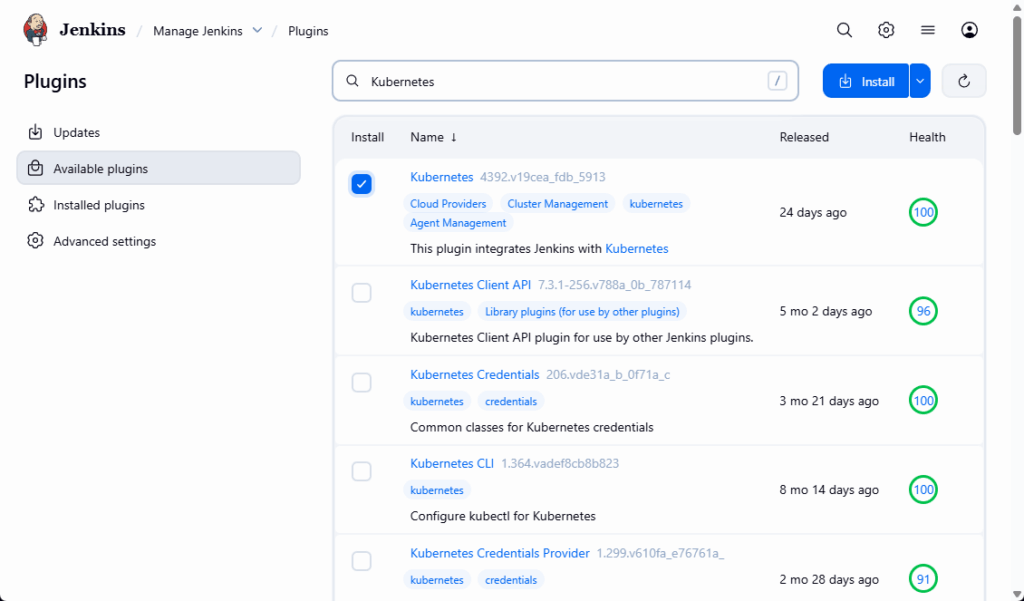
Jenkins’ “TCP port for inbound agents” under Manage Jenkins → Security is disabled by default. We’ll keep that default, because all our agents will connect via WebSocket over HTTPS instead of the legacy TCP agent port.
- Create
jenkinsNamespace + ServiceAccount + Minimal RBAC
We’ll follow a minimal RBAC pattern for Jenkins, scoped to a dedicated jenkins namespace.
On any admin node (for example k8s-1.maksonlee.com), where kubectl already talks to https://k8s.maksonlee.com:6443:
Create jenkins-rbac.yaml:
# jenkins-rbac.yaml

apiVersion: v1
kind: Namespace
metadata:
  name: jenkins
---
apiVersion: v1
kind: ServiceAccount
metadata:
  name: jenkins
  namespace: jenkins
---
apiVersion: v1
kind: Secret
metadata:
  name: jenkins-sa-token
  namespace: jenkins
  annotations:
    kubernetes.io/service-account.name: jenkins
type: kubernetes.io/service-account-token
---
kind: Role
apiVersion: rbac.authorization.k8s.io/v1
metadata:
  name: jenkins
  namespace: jenkins
rules:
  - apiGroups: [""]
    resources: ["pods"]
    verbs: ["create", "delete", "get", "list", "patch", "update", "watch"]
  - apiGroups: [""]
    resources: ["pods/exec"]
    verbs: ["create", "delete", "get", "list", "patch", "update", "watch"]
  - apiGroups: [""]
    resources: ["pods/log"]
    verbs: ["get", "list", "watch"]
  - apiGroups: [""]
    resources: ["events"]
    verbs: ["watch"]
  - apiGroups: [""]
    resources: ["secrets"]
    verbs: ["get"]
---
apiVersion: rbac.authorization.k8s.io/v1
kind: RoleBinding
metadata:
  name: jenkins
  namespace: jenkins
roleRef:
  apiGroup: rbac.authorization.k8s.io
  kind: Role
  name: jenkins
subjects:
  - kind: ServiceAccount
    name: jenkins
namespace: jenkinsApply:
kubectl apply -f jenkins-rbac.yaml

kubectl -n jenkins get sa,secret
kubectl -n jenkins get role,rolebindingThis gives Jenkins (via the ServiceAccount token we’ll use later) just enough permissions to:
- Create/delete/list/watch Pods in the
jenkinsnamespace. - Exec into Pods and read their logs.
- Watch events.
- Read Secrets (for mounting into agent Pods).
No cluster-admin role for Jenkins itself.
- Get the ServiceAccount Token (and Optional CA)
We’ll authenticate Jenkins using the jenkins ServiceAccount.
Still on the admin node:
# Get token (decoded from base64)
TOKEN=$(kubectl -n jenkins get secret jenkins-sa-token \
  -o jsonpath='{.data.token}' | base64 -d)

echo "$TOKEN"Copy this token somewhere safe; we’ll paste it into Jenkins as a credential.
Optional: export the cluster CA
If you want Jenkins to verify the Kubernetes API’s TLS certificate (recommended for anything beyond a throwaway lab):
kubectl -n jenkins get secret jenkins-sa-token \
  -o jsonpath='{.data.ca\.crt}' | base64 -d > jenkins-ca.crt

cat jenkins-ca.crtYou should see a PEM block like:
-----BEGIN CERTIFICATE-----
...
-----END CERTIFICATE-----We’ll use this in the cloud configuration as the Kubernetes server certificate key.
If you prefer to skip TLS verification in a lab, you can skip this step and enable Disable https certificate check in Jenkins instead.
- Add the Token as a Jenkins Credential
On Jenkins:
- Go to Manage Jenkins → Credentials.
- Open (global) or System → Global credentials (unrestricted).
- Click Add Credentials.
- Fill in:
- Kind:
Secret text - Secret: paste the
TOKEN - ID:
k8s-jenkins-token - Description:
ServiceAccount token for jenkins namespace
- Kind:
- Click Create.
This is the credential Jenkins will use to authenticate to the Kubernetes API.
- Configure the Kubernetes Cloud (WebSocket Agents)
Now wire Jenkins to your bare-metal cluster and enable WebSocket agents.
- Go to Manage Jenkins → Clouds.
- Click New cloud.
- Select Kubernetes, set:
- Cloud name:
k8s-baremetal
- Cloud name:
- Click Create.
You’ll see the Kubernetes cloud configuration form.
Core settings
Fill in:
- Name:
k8s-baremetal - Kubernetes URL:
https://k8s.maksonlee.com:6443 - Kubernetes Namespace:
jenkins - Credentials:
k8s-jenkins-token(Secret text) - Jenkins URL:
https://jenkins.maksonlee.com - Jenkins tunnel: leave blank
(We’re not using the TCP agent port; Jenkins’ TCP port remains disabled.)
TLS handling: two options
Option A (recommended, secure): use the cluster CA
- In Kubernetes server certificate key, paste the contents of
jenkins-ca.crt(the PEM block). - Leave Disable https certificate check unchecked.
Jenkins will verify the API server’s certificate with this CA.
Option B (lab only, less secure): skip certificate verification
- Leave Kubernetes server certificate key empty.
- Check Disable https certificate check.
This is simpler but skips TLS verification, which is fine for a personal lab but not recommended for production.
Enable WebSocket agents
At the bottom of the cloud configuration:
- Enable WebSocket.
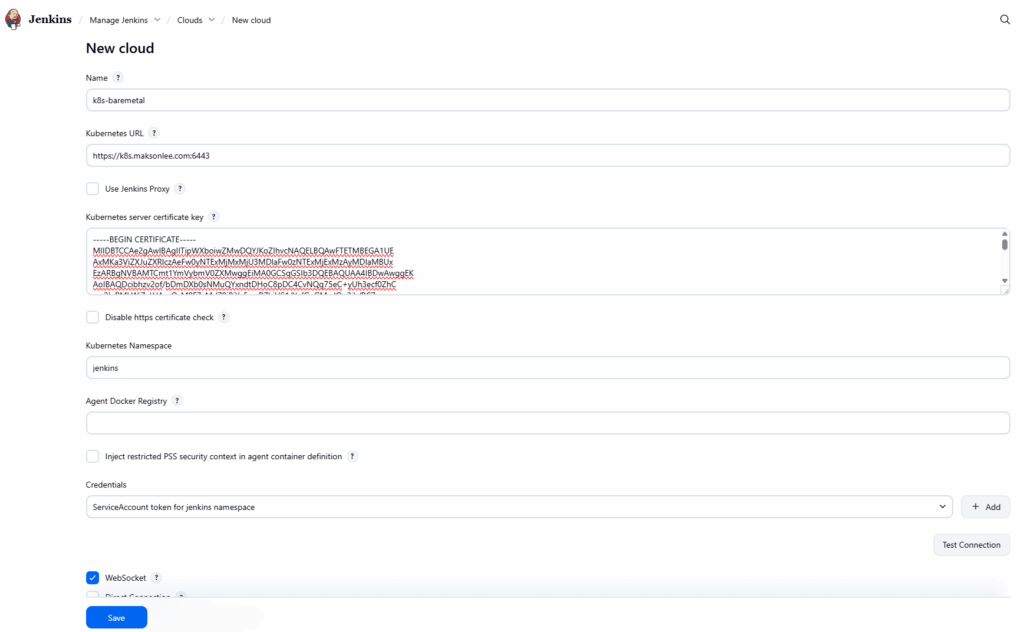
This makes the jnlp container in each Pod connect back to Jenkins over HTTPS/WebSocket instead of a dedicated TCP port.
Click Save.
- Add a Pod Template for Jenkins Agents
- Go to Manage Jenkins → Clouds → k8s-baremetal.
- In the left sidebar, click Pod Templates.
- Click New Pod Template.
Fill in:
- Name:
jnlp-agent - Namespace:
jenkins - Labels:
k8s-agent
(We’ll use this label in the pipeline:agent { label 'k8s-agent' }.)
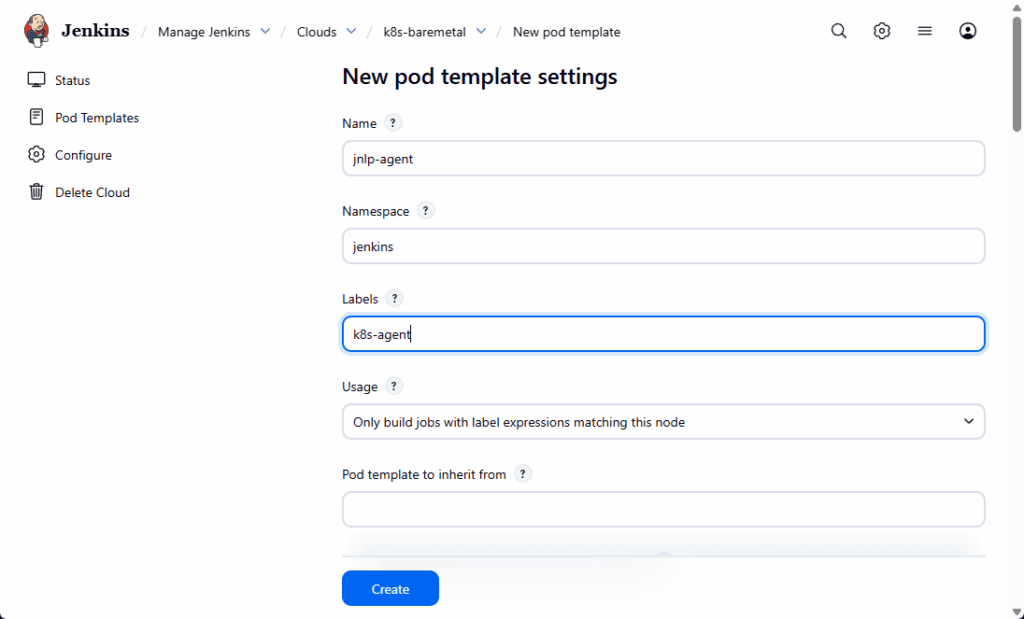
Under Containers:
- Click Add Container.
- Set:
- Name:
ubuntu - Docker image:
ubuntu:24.04 - Command / Arguments: (for example)
sleepand9999999so the container stays alive - Working directory:
/home/jenkins/agent(or default)
- Name:
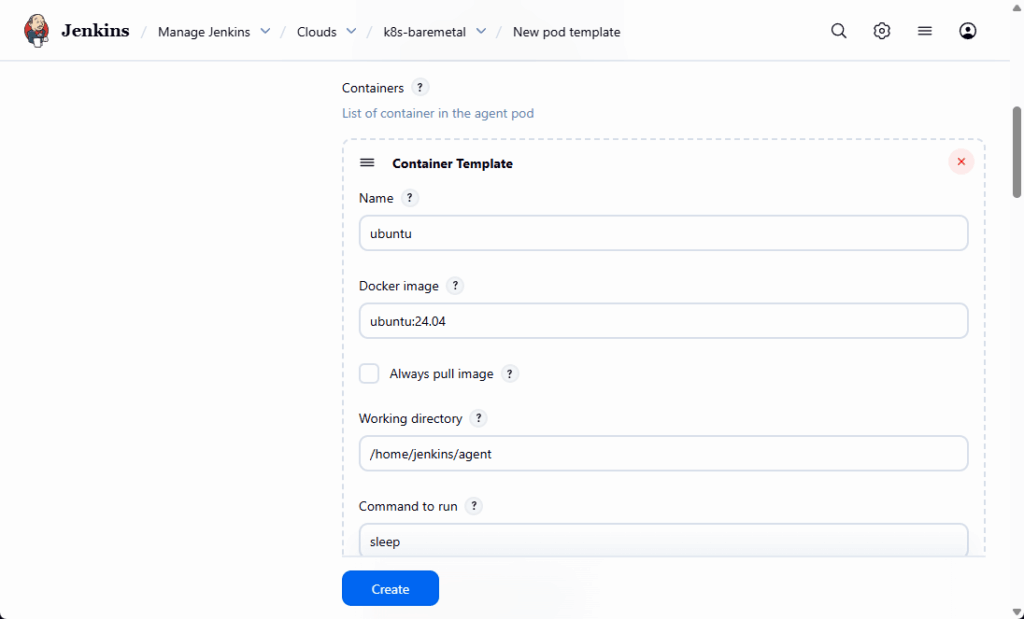
The Kubernetes plugin will also add a jnlp container automatically for the WebSocket agent connection. Your pipeline sh steps will run inside the ubuntu container.
Click Save on the Pod template page.
- If Jenkins Is Behind a Reverse Proxy (WebSocket Support)
In this lab, Jenkins is behind NGINX with TLS terminated by Let’s Encrypt:
- Jenkins itself listens on
127.0.0.1:8080. - NGINX listens on
443and proxies to127.0.0.1:8080.
If you use WebSocket agents (which we do here) and Jenkins is behind a reverse proxy, you must make sure the proxy passes WebSocket upgrade headers. Otherwise, the jnlp container will spam:
Failed to connect: Handshake error.
Waiting X seconds before retryeven though curl https://jenkins.maksonlee.com/login works from inside the pod.
For NGINX, add the following lines inside the location block that proxies to Jenkins:
# Required for Jenkins WebSocket agents
proxy_http_version 1.1;
proxy_set_header Upgrade $http_upgrade;
proxy_set_header Connection "upgrade";
proxy_read_timeout 1h;
proxy_send_timeout 1h;Then:
sudo nginx -t
sudo systemctl reload nginxAt this point, WebSocket agents can connect through the reverse proxy with no extra TCP port.
- Create a Pipeline that Uses the Kubernetes Agent
Now confirm the setup with a simple Jenkins pipeline.
In Jenkins:
- Click New Item.
- Name:
k8s-dynamic-agent-test. - Type: Pipeline.
- Click OK.
Under Pipeline → Definition → Pipeline script, use:
pipeline {
    agent { label 'k8s-agent' }

    stages {
        stage('Hello from Kubernetes') {
            steps {
                container('ubuntu') {
                    sh '''
                        echo "Hello from a dynamic Jenkins agent on the bare-metal HA cluster!"
                        echo "Hostname:"
                        hostname
                        echo "Current directory:"
                        pwd
                    '''
                }
            }
        }
    }
}Click Save, then Build Now.
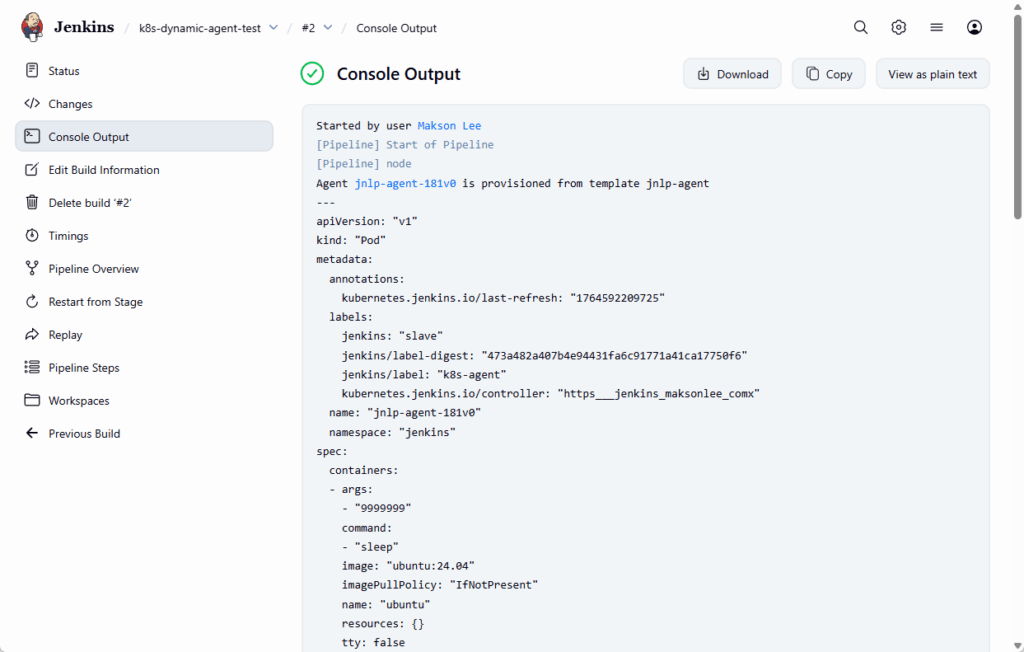
If everything is wired correctly, the build log will look similar to:
- Watch the Agent Pods on the Cluster
While the build is running, on any node (or wherever kubectl is configured):
kubectl get pods -n jenkins -wYou should see a Pod appear:
NAME               READY   STATUS    RESTARTS   AGE
jnlp-agent-c9l4c 2/2 Running 0 20s- One container is
jnlp(the Jenkins WebSocket agent). - One container is
ubuntu(where yourshsteps run).
After the build finishes, the Pod will terminate and disappear.
Did this guide save you time?
Support this site