In my environment, I already had Step CA running as my private PKI bootstrap CA, EJBCA CE running on Ubuntu 24.04 with WildFly and MariaDB, and ThingsBoard CE already exposing MQTT over TLS on mqtt.maksonlee.com:8883.
This guide builds on those existing pieces and focuses on managing device certificates with EJBCA after creating an externally signed IoT device CA.
Related guides
If you have not set up the base components yet, follow these guides first:
Goal
My goal was simple:
- use the existing
step-caroot only once to sign a new EJBCA subordinate CA - then use EJBCA only for normal device certificate operations
- keep Let’s Encrypt only for the MQTT server certificate
- configure ThingsBoard to trust the EJBCA device issuing CA for MQTT client authentication
Final PKI design
After this setup, the trust chain looks like this:
step-ca RootEJBCA IoTDeviceIssuingCA- device certificates
Operationally, after IoTDeviceIssuingCA is created and activated, I use:
- EJBCA for issuing device certificates
- EJBCA for renewing device certificates
- EJBCA for revoking device certificates
The step-ca root stays in the background only as the parent trust anchor.
Why I used the step-ca Root to sign IoTDeviceIssuingCA instead of the step-ca Intermediate
In my setup, I intentionally used the step-ca root to sign the EJBCA subordinate CA IoTDeviceIssuingCA, instead of using the online step-ca intermediate.
The reason is the CA path length in my existing root certificate.
When I checked the root certificate, I got:
sudo openssl x509 -in /etc/step-ca/certs/root_ca.crt -noout -subject -issuer -text | grep -E 'Subject:|Issuer:|CA:TRUE'The important part was:
CA:TRUE, pathlen:1That means this root allows only one CA layer below it.
So this hierarchy is valid:
step-ca RootEJBCA IoTDeviceIssuingCA- device certificates
But this hierarchy would add one CA layer too many:
step-ca Rootstep-ca Intermediate- EJBCA IoTDeviceIssuingCA
- device certificates
- EJBCA IoTDeviceIssuingCA
Because of that, for this IoT PKI design, using the step-ca intermediate to sign the EJBCA issuing CA would not be the right choice.
So I kept the hierarchy simple:
- step-ca Root = top trust anchor
- EJBCA
IoTDeviceIssuingCA= the device issuing CA - ThingsBoard = trusts
IoTDeviceIssuingCA - Let’s Encrypt = only for the MQTT server certificate on
mqtt.maksonlee.com
Prerequisites
This guide assumes:
step-cais already installedEJBCAis already installed and reachable- https://ejbca.maksonlee.com:8443/ejbca/adminweb
- https://ejbca.maksonlee.com:8442/ejbca/ra
ThingsBoardis already serving MQTT TLS- the step-ca root certificate and key are available on the step-ca host at:
/etc/step-ca/certs/root_ca.crt
/etc/step-ca/secrets/root_ca_keyYou should also have these utilities available somewhere convenient:
sudo apt update
sudo apt install -y openssl zip unzipFor MQTT testing from Linux:
sudo apt update
sudo apt install -y mosquitto-clients- (One-time setup): Verify the existing step-ca root
On the step-ca host:
sudo ls -l /etc/step-ca/certs/
sudo ls -l /etc/step-ca/secrets/

sudo openssl x509 -in /etc/step-ca/certs/root_ca.crt -noout -subject -issuer -text | grep -E 'Subject:|Issuer:|CA:TRUE'In my case, the result confirmed:
- the root certificate exists
- the root private key exists
- the root is self-signed
- the root has
CA:TRUE, pathlen:1
That means it can sign one subordinate CA below it, which is exactly what I need for IoTDeviceIssuingCA.
- (One-time setup): Create a crypto token in EJBCA
In EJBCA AdminWeb, go to CA Functions → Crypto Tokens and create a new token.
Use these values:
- Name:
IoTDeviceIssuingCAToken - Type:
SOFT - Auto-activation: enabled
- Use explicit ECC parameters: disabled
- Allow export of private keys: disabled
- Authentication Code: set a strong password
Save it.
After that, open the token and generate these keys:
certSignKey→ RSA 4096crlSignKey→ RSA 4096
Those are enough for this CA.
- (One-time setup): Create the new CA in EJBCA
In EJBCA AdminWeb, go to CA Functions → Certification Authorities and create a new CA.
Use these settings.
General
- CA Name:
IoTDeviceIssuingCA - CA Type:
X.509 CA - Crypto Token:
IoTDeviceIssuingCAToken - Signing Algorithm:
SHA256WithRSA - Description:
ThingsBoard device issuing CA
Key mapping
Use:
- defaultKey →
certSignKey - certSignKey →
certSignKey - alternativeCertSignKey → leave empty
- keyEncryptKey →
- Default key - - testKey →
- Default key -
CA Certificate Data
Use:
Subject DN: CN=IoTDeviceIssuingCA,O=maksonlee.com,C=TW
Signed By: External CA
Certificate Profile: SUBCABecause this CA is externally signed, the validity is not really controlled by this form. The actual validity is determined later when the parent CA signs the CSR.
- (One-time setup): Generate the CA CSR from EJBCA
Still in the CA creation page, scroll to the Externally signed CA creation/renewal section.
Under CA chain certificates, upload the public certificate of the parent CA that will sign this new CA.
In my case, that was the step-ca root certificate:
root_ca.crtThen click Make Certificate Request.
EJBCA generates the CSR and lets you download it. My file looked like this:
IoTDeviceIssuingCA_csr.pemAfter going back to the CA list, EJBCA showed:
IoTDeviceIssuingCA (Waiting for Certificate Response)That is the correct state.
- (One-time setup): Copy the CSR to the step-ca host
From the machine where the CSR was downloaded:
scp IoTDeviceIssuingCA_csr.pem administrator@stepca.maksonlee.com:/tmp/- (One-time setup): Sign the EJBCA CA CSR with the step-ca root
On the step-ca host:
sudo mkdir -p /root/iot-ca
sudo cp /tmp/IoTDeviceIssuingCA_csr.pem /root/iot-ca/
sudo chmod 600 /root/iot-ca/IoTDeviceIssuingCA_csr.pemCreate the extension file:
sudo tee /root/iot-ca/iot-device-subca.ext >/dev/null <<'EOF'
basicConstraints=critical,CA:TRUE,pathlen:0
keyUsage=critical,keyCertSign,cRLSign
subjectKeyIdentifier=hash
authorityKeyIdentifier=keyid,issuer
EOFSign the CSR:
sudo openssl x509 -req \
  -in /root/iot-ca/IoTDeviceIssuingCA_csr.pem \
  -CA /etc/step-ca/certs/root_ca.crt \
  -CAkey /etc/step-ca/secrets/root_ca_key \
  -CAcreateserial \
  -out /root/iot-ca/IoTDeviceIssuingCA.crt \
  -days 3650 \
-extfile /root/iot-ca/iot-device-subca.extVerify it:
sudo openssl x509 -in /root/iot-ca/IoTDeviceIssuingCA.crt -noout -subject -issuer -text | grep -E 'Subject:|Issuer:|CA:TRUE|Path Length Constraint'Expected result:
- issuer = your step-ca root
- subject =
IoTDeviceIssuingCA CA:TRUEpathlen:0
That confirms the CA certificate is correct.
- (One-time setup): Copy the signed CA certificate to a location accessible via
scp
Because the signed CA certificate was under /root, I copied it to the administrator home directory first:
sudo cp /root/iot-ca/IoTDeviceIssuingCA.crt /home/administrator/
sudo chown administrator:administrator /home/administrator/IoTDeviceIssuingCA.crtThen from my workstation:
scp administrator@stepca.maksonlee.com:/home/administrator/IoTDeviceIssuingCA.crt .- (One-time setup): Import the signed CA certificate back into EJBCA
Back in EJBCA AdminWeb:
- open
IoTDeviceIssuingCA - click Edit CA
- go to Externally signed CA creation/renewal
- upload
IoTDeviceIssuingCA.crt - leave Signed CA key as auto-detect unless you have a reason to change it
- click Receive Certificate Response
After that, the CA status becomes:
IoTDeviceIssuingCA (Active)At this point, the CA setup is finished.
- (One-time setup): Create a certificate profile for device certificates
In EJBCA, go to CA Functions → Certificate Profiles, clone ENDUSER, and name the clone:
IoTDeviceCertProfileEdit it and use these settings.
Type
- End Entity
Available Key Algorithms
- RSA only
Available Bit Lengths
- 2048 bits only
Validity
1y
Key Usage
Enable only:
Digital SignatureKey encipherment
Extended Key Usage
Enable only:
Client Authentication
Available CAs
Allow only:
IoTDeviceIssuingCA
Turn off extras you do not need
Disable:
- Subject Alternative Name
- Issuer Alternative Name
- Use Microsoft ObjectSid Security Extension
Then save the profile.
- (One-time setup): Create an end entity profile for devices
In EJBCA, go to RA Functions → End Entity Profiles and add a new profile:
IoTDeviceEEProfileEdit it and configure it like this.
Subject DN
Keep only:
- CN, Common Name
- Required: enabled
- Modifiable: enabled
Turn off or ignore email, SAN, and directory attributes.
Main Certificate Data
Set:
- Default Certificate Profile →
IoTDeviceCertProfile - Available Certificate Profiles →
IoTDeviceCertProfileonly - Default CA →
IoTDeviceIssuingCA - Available CAs →
IoTDeviceIssuingCAonly
Token
Because I wanted a simple EJBCA-only issuance flow, I used:
- Default Token →
PEM file - Available Tokens →
PEM fileonly
End Entity E-mail
Disable it.
Then save the profile.
Enrollment code note
Even in an IoT case, EJBCA may still ask for a password or enrollment code for the initial issuance flow.
In my case, I set it to auto-generated.
That enrollment code is not the long-term device credential. It is only a temporary issuance secret used by EJBCA’s workflow. After issuance, the device authenticates with its private key and certificate.
- (One-time setup): Download
IoTDeviceIssuingCA.crtand configure the target device profile in ThingsBoard
This is a one-time platform task.
Download the issuing CA certificate directly from EJBCA.
In my environment, this worked:
curl -k "https://ejbca.maksonlee.com:8442/ejbca/publicweb/webdist/certdist?cmd=cacert&level=0&issuer=CN%3DIoTDeviceIssuingCA%2CO%3Dmaksonlee.com%2CC%3DTW" -o IoTDeviceIssuingCA.crtNow configure ThingsBoard:
- go to Profiles → Device profiles
- open the target profile. In my case, it is
temp-humidity - go to Device provisioning
- select X.509 Certificates Chain
In the Certificate in PEM format field, paste:
IoTDeviceIssuingCA.crt
Do not paste the MQTT server certificate there.
That field is for the device certificate issuing CA, not the MQTT server TLS certificate.
For X.509 chain auto-provisioning, I use one device profile per issuing CA certificate.
In this guide, I enabled Create new devices in the target device profile provisioning settings. Because of that, I did not need to manually create the ThingsBoard device before testing the certificate flow.
For the regular expression, ThingsBoard applies it to the Common Name value itself, not to the full subject DN string.
In my case, the device certificate Common Name is simply the device name, such as SN-000001, so I used:
(.+)That makes ThingsBoard use the full Common Name value as the device name.
So a certificate with:
CN=SN-000001becomes the ThingsBoard device name:
SN-000001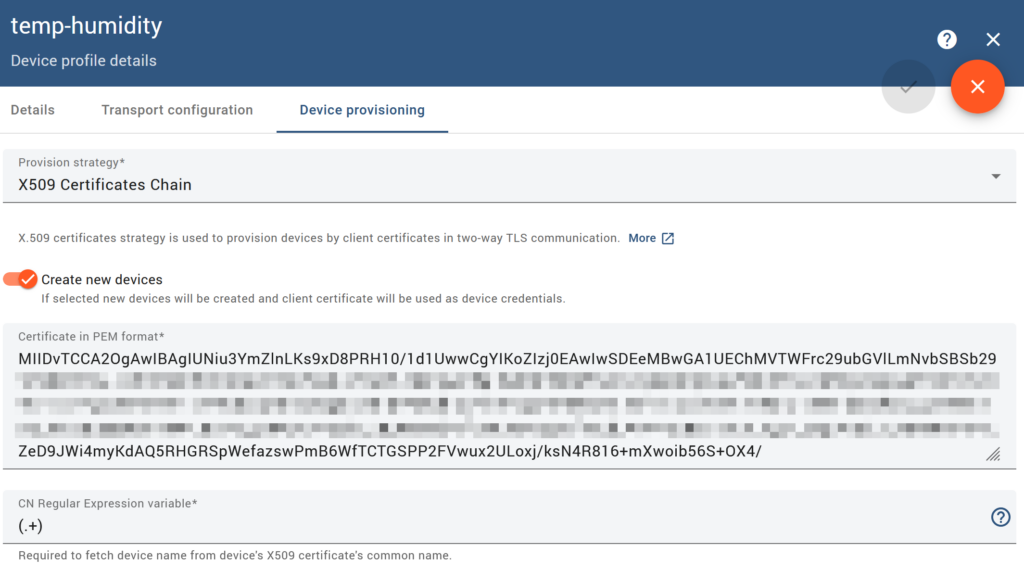
- (Per-device workflow): Issue the first device certificate in RA Web
In RA Web:
- go to Enroll → Make New Request
- select:
- Certificate Type →
IoTDeviceEEProfile - Key-pair generation →
By the CA
- Certificate Type →
For the first device, I used:
- Username →
SN-000001 - Common Name →
SN-000001
For the second device, I used:
- Username →
SN-000002 - Common Name →
SN-000002
Then I went to the confirmation section and clicked Download PEM.
That is the important part:
in this workflow, Download PEM is the issuance step itself.
There is no separate pending request object that I later had to approve or retrieve.
- (Per-device workflow): Verify that the device entries were created
In RA Web:
- go to Search → Search for End Entities
I could see entries such as:
SN-000001SN-000002
with:
- CA =
IoTDeviceIssuingCA - profile =
IoTDeviceEEProfile / IoTDeviceCertProfile - status =
Generated
That confirmed issuance was successful.
- (Per-device workflow): Understand what happens if you lose the downloaded PEM bundle
If I lose the original PEM bundle downloaded from EJBCA, I should not assume that I can download the same bundle again.
In my setup:
- I can still search for the issued certificate later in RA Web
- I can still open the certificate details page
- I can still see options such as Download as PEM, Download as DER, and Download as PKCS#7
- I can also click Show public key(s), but that only shows the public key, not the private key
What I should not assume is that EJBCA can give me the original private key again.
EJBCA does have a key recovery feature, but I did not enable or use it in this guide. So for this setup, if I lose the originally downloaded device PEM bundle, the practical recovery path is:
- revoke the old certificate if needed
- issue a new certificate
- reprovision the device with the new credential bundle
Because of that, save the original downloaded PEM bundle immediately and securely.
- (Per-device workflow): Use the downloaded bundle directly, or split it if your device software needs separate files, and test MQTT client certificate authentication
In my environment, the file downloaded from EJBCA in Step 12, such as SN-000001.pem, already contains:
- the device private key
- the device certificate
- the
IoTDeviceIssuingCAcertificate - the root CA certificate
So I treat SN-000001.pem as the original device credential bundle.
Because I configured IoTDeviceIssuingCA.crt in the target ThingsBoard device profile, ThingsBoard already had the issuing CA certificate needed to validate the device certificate. In my environment, that meant I did not need to send a separate client certificate chain file, the device certificate file plus the matching private key was sufficient.
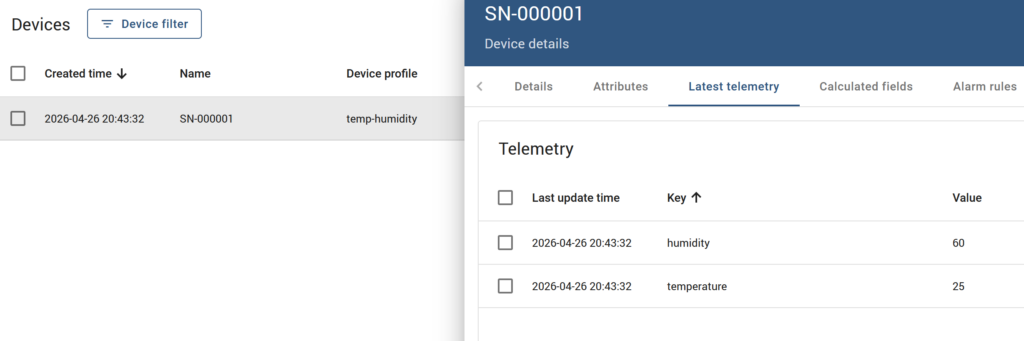
Because I enabled Create new devices in the target device profile in Step 11, I did not need to manually create the device in ThingsBoard before this test.
On the first successful MQTT connection, ThingsBoard can automatically create the device using the certificate CN as the device name.
My ThingsBoard MQTT endpoint was already:
mqtt.maksonlee.com:8883Publish temperature and humidity telemetry using the bundle directly
mosquitto_pub -d \
  --cafile /etc/ssl/certs/ca-certificates.crt \
  -h mqtt.maksonlee.com \
  -p 8883 \
  -t "v1/devices/me/telemetry" \
  --cert SN-000001.pem \
  --key SN-000001.pem \
-m '{"temperature":25,"humidity":60}'That worked in my environment.
Why --cafile is still needed
The --cafile /etc/ssl/certs/ca-certificates.crt part is used to validate the MQTT server certificate for mqtt.maksonlee.com, which is issued by Let’s Encrypt.
It is not used to validate the device certificate.
So in this command:
--cafile /etc/ssl/certs/ca-certificates.crt= trust the MQTT server--cert SN-000001.pemand--key SN-000001.pem= present the device identity
Split the bundle only if your device software needs separate files
If your device or TLS library requires separate files, you can extract them from SN-000001.pem.
Extract deviceKey.pem
openssl pkey -in SN-000001.pem -out deviceKey.pemExtract deviceCert.pem
openssl x509 -in SN-000001.pem -out deviceCert.pemThen test with split files like this:
mosquitto_pub -d \
  --cafile /etc/ssl/certs/ca-certificates.crt \
  -h mqtt.maksonlee.com \
  -p 8883 \
  -t "v1/devices/me/telemetry" \
  --key deviceKey.pem \
  --cert deviceCert.pem \
-m '{"temperature":25,"humidity":60}'So in my environment, both methods worked:
- direct bundle:
--cert SN-000001.pem --key SN-000001.pem
- split files:
--cert deviceCert.pem --key deviceKey.pem
A successful result looks like this:
CONNACK (0)- successful publish
- clean disconnect
If everything is correct:
- the MQTT server certificate is validated normally
- the device presents its client certificate
- ThingsBoard maps the device certificate CN to the device name
- telemetry is accepted
Final result
After this setup:
- step-ca root signed the EJBCA device CA once
- EJBCA handles the normal device certificate lifecycle
- ThingsBoard trusts
IoTDeviceIssuingCA - Let’s Encrypt remains only for the MQTT server certificate
SN-000001.pemcan be used directly for MQTT client certificate authentication inmosquitto_pubdeviceKey.pem+deviceCert.pemalso worked in my environment
That gives me a practical IoT PKI flow where EJBCA is the operational device CA, while the step-ca root remains the trust anchor above it.
Did this guide save you time?
Support this site