In my previous post,
I used:
- Ubuntu 24.04 Server autoinstall
- NoCloud datasource over HTTPS
- Nginx + SSI on
nocloud.maksonlee.com - Guided single-disk ZFS layout (
layout: { name: zfs, match: { size: largest } })
This time we’re going one step further:
Install Ubuntu 24.04 on ZFS root with a 2-disk mirror (RAID-1) using Autoinstall, where the actual disk names are passed via URL.
Key ideas:
- The hostname still comes from the
<HOST>in the URL. - The two disks also come from the URL (
disk1,disk2), e.g.sda/sdbornvme0n1/nvme1n1. - Autoinstall runs guided ZFS on
disk1, then a smalllate-commandsscript:- clones the partition table from
disk1→disk2 - attaches partition 2 as the mirror leg for
bpool - attaches partition 4 as the mirror leg for
rpool
- clones the partition table from
- The script works for both SATA-style names (
sda,sdb) and NVMe (nvme0n1,nvme1n1) by automatically choosing2/4vsp2/p4.
ZFS in 60 Seconds (Why Bother Mirroring Root?)
Very short version:
- ZFS checksums every block and can self-heal if one side of a mirror is corrupted.
- Snapshots + clones make upgrades much safer: roll back entire OS datasets in seconds.
- Compression (lz4/zstd) often speeds up I/O and saves space.
- Send/receive gives you efficient incremental backups and replication.
With a mirror:
- You can lose one disk and still boot.
- A weekly/monthly scrub can automatically find and repair latent errors.
This post is about wiring that into Autoinstall + NoCloud in a clean, repeatable way.
URL Design: Encode Host + Disk1 + Disk2
We’ll use this URL pattern for the zr1 seed:
https://nocloud.maksonlee.com/zr1/<HOST>/<DISK1>/<DISK2>/
Examples:
- For a VM with two SATA disks:
autoinstall ds="nocloud-net;s=https://nocloud.maksonlee.com/zr1/zfstest/sda/sdb/"- For a VM with two NVMe disks:
autoinstall ds="nocloud-net;s=https://nocloud.maksonlee.com/zr1/zfstest/nvme0n1/nvme1n1/"Cloud-init will fetch:
.../user-data.../meta-data
So both must match the same prefix /zr1/<HOST>/<DISK1>/<DISK2>/.
We’ll extract:
host_id→ hostname / instance-iddisk1,disk2→ become/dev/<disk1>and/dev/<disk2>in the autoinstall script
- Nginx: NoCloud Routes for
zr1
Only the zr1-specific bits are shown here. Existing b/ and z/ seeds from previous posts can stay as they are.
    # zr1 user-data: /zr1/<HOST>/<DISK1>/<DISK2>/user-data
    location ~ ^/zr1/(?<host_id>[A-Za-z0-9._-]+)/(?<disk1>[A-Za-z0-9._-]+)/(?<disk2>[A-Za-z0-9._-]+)/user-data$ {
        default_type text/plain;
        ssi on; ssi_types *;
        try_files /zr1/_user.ssi =404;
        add_header Cache-Control "no-store";
    }

    # zr1 meta-data: same prefix as user-data
    location ~ ^/zr1/(?<host_id>[A-Za-z0-9._-]+)/(?<disk1>[A-Za-z0-9._-]+)/(?<disk2>[A-Za-z0-9._-]+)/meta-data$ {
        default_type text/plain;
        ssi on; ssi_types *;
        try_files /zr1/_meta.ssi =404;
        add_header Cache-Control "no-store";
}Directory layout:
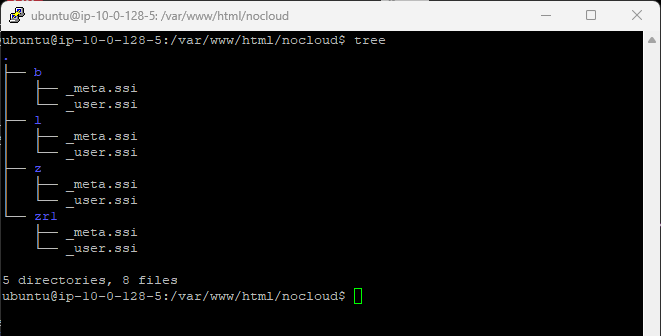
zr1/_meta.ssi: Instance ID Only
/var/www/html/nocloud/zr1/_meta.ssi:
instance-id: <!--# echo var="host_id" -->Same pattern as the previous posts: instance-id comes from the <HOST> segment in the URL.
zr1/_user.ssi: ZFS Root + Disk1/Disk2 Mirror
This is the core of the post.
We:
- Build a normal autoinstall document (
#cloud-config+autoinstall:). - Use guided ZFS layout (
layout: name: zfs) on/dev/<disk1>. - Use
late-commandsto:- clone the partition table from
/dev/<disk1>to/dev/<disk2> - attach partition 2 as a mirror for
bpool - attach partition 4 as a mirror for
rpool
- clone the partition table from
- Auto-handle NVMe vs non-NVMe naming (
p2vs2).
/var/www/html/nocloud/zr1/_user.ssi:
#cloud-config
autoinstall:
  version: 1

  identity:
    hostname: <!--# echo var="host_id" -->
    username: ubuntu
    password: "$6$PWguV961aHQjVEUh$EbowTJLSSunVj2zejKxIlS9A6iRBoG8J8XKnTukaTvtyW5QUzK.XQDFv9nEDyBpSpEOmQGMteP5ucnBBI6YsV0"

  timezone: Asia/Taipei
  locale: en_US.UTF-8
  keyboard:
    layout: us

  ssh:
    install-server: true
    allow-pw: true

  apt:
    primary:
      - arches: [default]
        uri: http://archive.ubuntu.com/ubuntu/

  storage:
    layout:
      name: zfs
      match:
        path: /dev/<!--# echo var="disk1" -->

  user-data:
    preserve_hostname: false
    package_update: true
    packages:
      - htop
    runcmd:
      - [bash, -lc, "lsb_release -a || true"]
      - [bash, -lc, "lsblk -f"]

  late-commands:
- [curtin, in-target, --target=/target, --, bash, -euxc, 'DISK1=/dev/<!--# echo var="disk1" -->; DISK2=/dev/<!--# echo var="disk2" -->; if [[ "$DISK2" == *nvme* || "$DISK2" == *mmcblk* ]]; then PSEP="p"; else PSEP=""; fi; if ! lsblk -dn "$DISK2" >/dev/null 2>&1; then echo "WARNING: $DISK2 not present, skipping mirror setup"; exit 0; fi; echo "Copying partition table from $DISK1 to $DISK2..."; sgdisk --zap-all "$DISK2"; sgdisk --backup=/tmp/d1.gpt "$DISK1"; sgdisk --load-backup=/tmp/d1.gpt "$DISK2"; sgdisk --randomize-guids "$DISK2"; partprobe "$DISK2"; echo "Attaching ${DISK2}${PSEP}2 to bpool as mirror..."; zpool attach -f bpool "${DISK1}${PSEP}2" "${DISK2}${PSEP}2"; echo "Attaching ${DISK2}${PSEP}4 to rpool as mirror..."; zpool attach -f rpool "${DISK1}${PSEP}4" "${DISK2}${PSEP}4"; zpool status']What this script is actually doing
Conceptually:
- Let:
$DISK1 = /dev/<disk1>(first disk from URL)$DISK2 = /dev/<disk2>(second disk from URL)
- Determine if we need
pNsuffix (fornvme0n1p2) orN(forsda2):- for NVMe/mmc →
PSEP="p" - for others →
PSEP=""
- for NVMe/mmc →
- Then:
- Clone the partition table from
$DISK1to$DISK2. - Attach partition 2 on
$DISK2as mirror leg forbpool. - Attach partition 4 on
$DISK2as mirror leg forrpool.
- Clone the partition table from
The result is exactly the same as a “hand-crafted ZFS mirror pool”, but you:
- re-use Ubuntu’s guided ZFS layout (correct
bpool/rpool/datasets), - and use a tiny, easy-to-read
late-commandsblock to add mirroring.
- Find Your Disk Names (One-Time Interactive Boot)
Before you can use the zr1 URL pattern:
https://nocloud.maksonlee.com/zr1/<HOST>/<DISK1>/<DISK2>/
you need to know what the installer sees as <DISK1> and <DISK2>
(sda / sdb, nvme0n1 / nvme1n1, etc).
Do this once per machine type:
- Boot the Ubuntu 24.04 Server ISO normally
Don’t addautoinstallords=yet. Just boot into the regular installer. - When you’re at the first installer screen (language/keyboard),
switch to a shell on another TTY:
Ctrl+Alt+F2- In the shell, list disks:
lsblk -d -o NAME,SIZE,MODELExample:
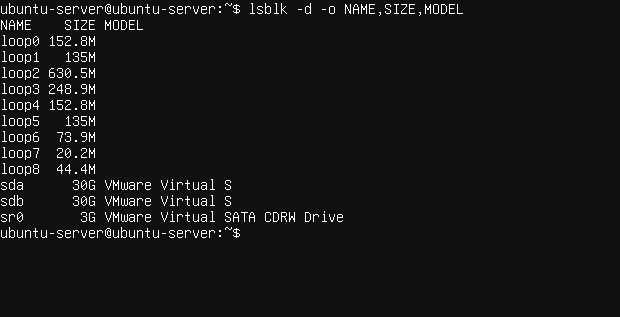
- Decide which two disks you want to mirror as root.
For example:- VM:
sda+sdb - NVMe box:
nvme0n1+nvme1n1
- VM:
- GRUB: Boot the Installer with ds= for
zr1
At the Ubuntu 24.04 Server installer GRUB menu:
- Press
eon the entry you want to boot. - Find the
linuxline. - Append a
ds=parameter with your chosen host and disk names.
Example for SATA disks:
autoinstall ds="nocloud-net;s=https://nocloud.maksonlee.com/zr1/zfstest/sda/sdb/"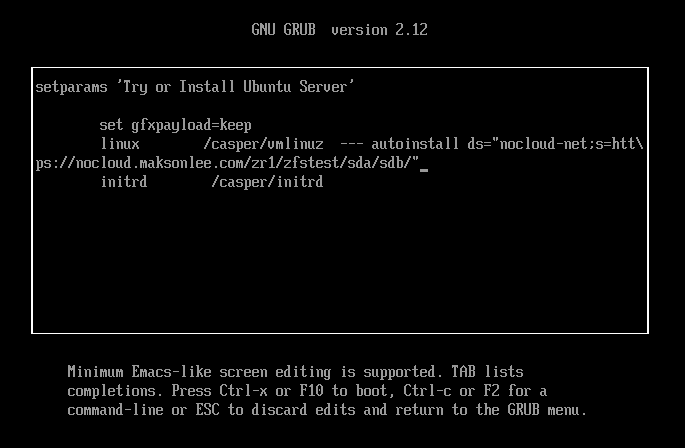
Example for NVMe disks:
autoinstall ds="nocloud-net;s=https://nocloud.maksonlee.com/zr1/zfstest/nvme0n1/nvme1n1/"- Preflight: Curl the NoCloud Endpoints Before Booting
Double-check your endpoints before you actually autoinstall anything:
# meta-data: should show "instance-id: zfstest"
curl -s https://nocloud.maksonlee.com/zr1/zfstest/sda/sdb/meta-data

# user-data: should render hostname: zfstest and disk1/disk2 correctly
curl -s https://nocloud.maksonlee.com/zr1/zfstest/sda/sdb/user-dataIf both look right, you’re safe to boot the installer with that ds= string.
- Verifying the Result: ZFS Mirror on Root
After the installation completes and you boot into the new system:
- Disks and Partitions
lsblk -o NAME,SIZE,TYPE,MOUNTPOINTSYou should see something like (for 30G test disks):
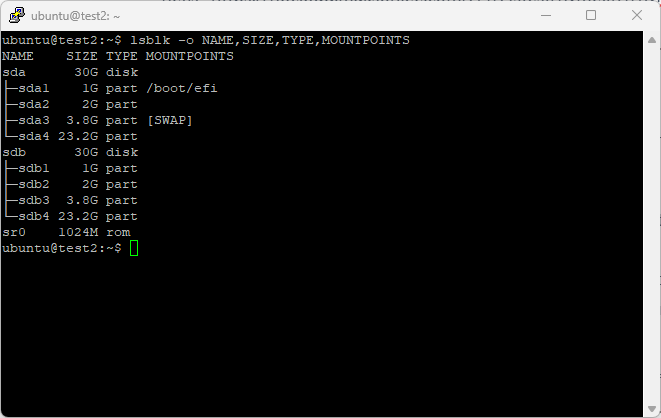
And both GPTs match:
sudo sgdisk -p /dev/sda
sudo sgdisk -p /dev/sdb
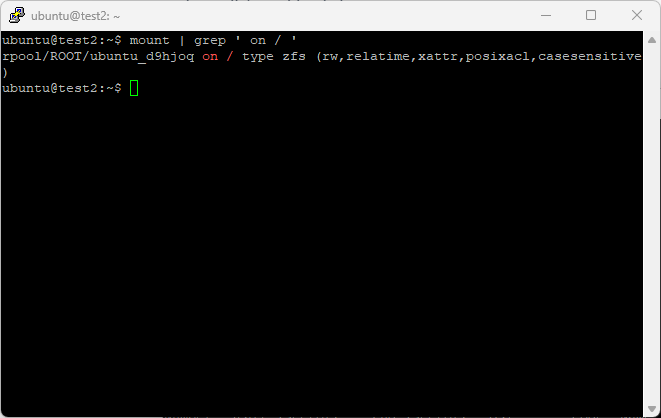
- Confirm Root on ZFS
mount | grep ' on / 'Example:
- Check ZFS Pools are Mirrored
zpool statusExpected:
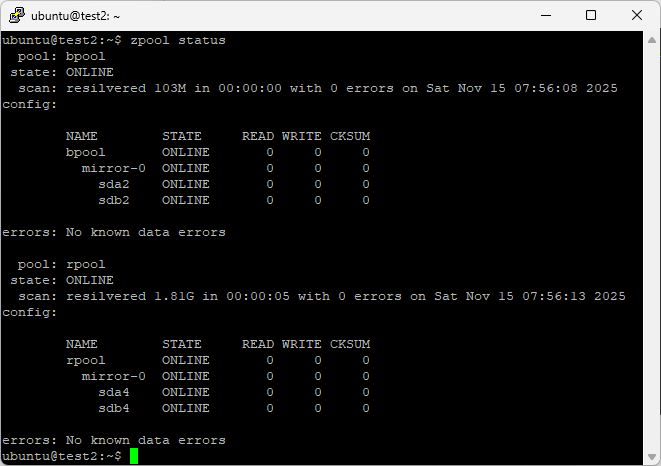
ZFS calls the vdev mirror-0 — that’s effectively your RAID-1:
bpool = mirror(sda2, sdb2)rpool = mirror(sda4, sdb4)
Did this guide save you time?
Support this site