In the previous post,
we already:
- Installed a single-node Ceph v19 cluster with
cephadm - Created a CephFS filesystem named
cephfs - Created a CephX client user
client.cephfs - Saved its key into
/etc/ceph/client.cephfs.secreton the Ceph node
In this post, we’ll connect that existing CephFS to Proxmox VE 9 and use it as one of the storages.
Typical use cases for CephFS in Proxmox:
- ISO images
- LXC templates
- VZDump backups
- Snippets
- “Import” content for the VM Import wizard
CephFS is not for VM disks in Proxmox — use Ceph RBD for VM disks instead.
Lab Overview
- Ceph node
- Hostname:
ceph.maksonlee.com - IP:
192.168.0.81 - Managed with
cephadm - CephFS:
cephfs - CephX user:
client.cephfs - Secret file:
/etc/ceph/client.cephfs.secret
- Hostname:
- Proxmox node
- Hostname: pve
.maksonlee.com - IP:
192.168.0.11 - Proxmox VE 9.0.3 (nested on KVM)
ceph-commonis already installed by Proxmox (no manualapt installneeded)
- Hostname: pve
Goal:
Add cephfs as a CephFS storage named cephfs-pve in Proxmox, and upload an ISO image into it.
- Confirm CephFS and the Client Key (Ceph Node)
On the Ceph node, we can confirm CephFS and see the key files:
sudo cephadm shell -- ceph fs lsname: cephfs, metadata pool: cephfs.cephfs.meta, data pools: [cephfs.cephfs.data ]sudo ls /etc/ceph/*/etc/ceph/ceph.client.admin.keyring /etc/ceph/ceph.client.cephfs.keyring \
/etc/ceph/ceph.conf /etc/ceph/ceph.pub /etc/ceph/client.cephfs.secretWe only need the raw key stored in client.cephfs.secret:
sudo cat /etc/ceph/client.cephfs.secretAQDCwBlp...redacted...==Copy that line somewhere safe. We’ll paste it into the Proxmox UI as the Secret Key.
- Add CephFS Storage in the Proxmox Web UI
Open the Proxmox Web UI at:
https://pve.maksonlee.com:8006
In the left tree:
- Click Datacenter.
- Go to Datacenter → Storage.
- Click Add → CephFS.
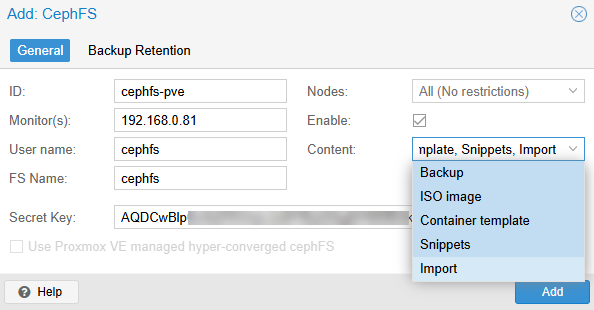
Click Add.
Proxmox will:
- Create a
cephfs: cephfs-pveentry in/etc/pve/storage.cfg - Save your key into
/etc/pve/priv/ceph/cephfs-pve.secret - Mount CephFS under
/mnt/pve/cephfs-pve on the node
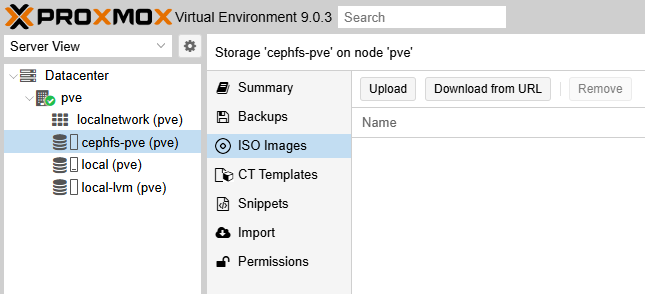
- Verify the New CephFS Storage
Back in the Proxmox tree you should now see:
- cephfs-pve (pve) listed as a storage, next to
localandlocal-lvm
Click cephfs-pve and you’ll see tabs like:
- Upload an ISO Image to CephFS
Now we’ll actually put something on this storage.
- In the left tree, click cephfs-pve → ISO Images.
- Click Upload.
You’ll see an upload dialog:
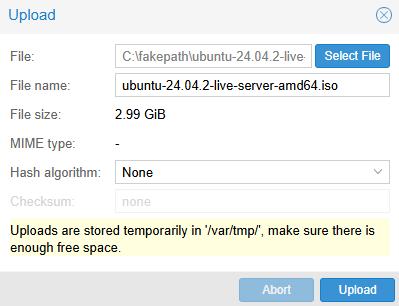
Choose your ISO file (for example ubuntu-24.04.2-live-server-amd64.iso) and click Upload.
Proxmox will:
- Temporarily store the upload in
/var/tmpon the node - Then move it into the CephFS path (e.g.
/mnt/pve/cephfs-pve/template/iso/)
Make sure /var/tmp and the CephFS filesystem both have enough free space.
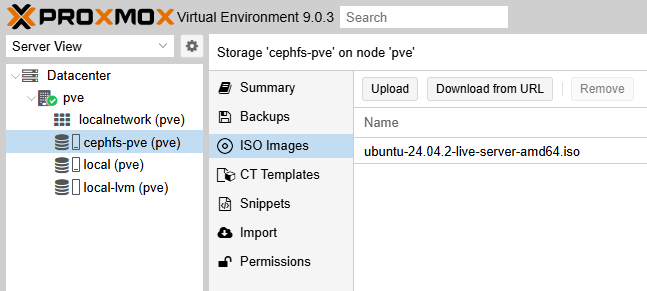
After the upload finishes, the ISO appears in the list:
Did this guide save you time?
Support this site