This post extends my previous Step CA deployment:
Here we add SSH short-lived certificate login using:
- Keycloak OIDC for authentication
- Keycloak groups → SSH certificate principals (via a Step CA SSH template)
- Server-side allowlists (per-host, per-login-account) using
AuthorizedPrincipalsFile
What you’ll build
Users will:
- Run
step ssh login <your-keycloak-email> - Browser redirects to Keycloak for authentication
- Step CA issues a 1-hour SSH user certificate
- Users SSH to servers without passwords (certificate auth)
Servers will:
- Trust the Step CA SSH User CA public key (
TrustedUserCAKeys) - Allow only specific principals to log in as a specific Linux account (
AuthorizedPrincipalsFile)
Lab context
- Step CA:
https://stepca.maksonlee.com(Ubuntu 24.04, systemd, userstep,STEPPATH=/etc/step-ca) - Keycloak:
https://keycloak.maksonlee.com(realm:maksonlee.com) - Target OS: Ubuntu 24.04 servers
- Target login account on servers:
administrator
Access rules (example policy):
ssh-zabbix-admin→ can SSH asadministratoronly tozabbix.maksonlee.comssh-jenkins-admin→ can SSH asadministratoronly tojenkins.maksonlee.comssh-k8s-admin→ can SSH asadministratoronly tok8s-1.maksonlee.com,k8s-2.maksonlee.com,k8s-3.maksonlee.com
The key concept (fixing common confusion)
When people say “a server trusts your SSH User CA”, they do not mean trusting your personal SSH key.
They mean:
- Step CA holds an SSH User CA private key (kept only on the CA)
- Servers install the matching SSH User CA public key and reference it via
TrustedUserCAKeys - Users authenticate to Keycloak → Step CA signs the user’s SSH key → user gets a short-lived SSH certificate
- Access control happens via:
- Step CA template decides what principals go into the certificate (from Keycloak groups)
- Each server decides which principals may log in as
administrator(viaAuthorizedPrincipalsFile)
Verify Step CA is healthy
On the CA host:
sudo systemctl status step-ca --no-pager
Use this command directly:
sudo curl --cacert /etc/step-ca/certs/root_ca.crt https://stepca.maksonlee.com/health
# {"status":"ok"}
Part 1 — Enable SSH signing in step-ca (existing CA)
- Backup
ca.json
sudo cp -a /etc/step-ca/config/ca.json \
  /etc/step-ca/config/ca.json.$(date +%F-%H%M%S).bak
- Generate SSH CA keypairs (host + user)
Create a directory:
sudo mkdir -p /etc/step-ca/ssh
sudo chown -R step:step /etc/step-ca/ssh
sudo chmod 700 /etc/step-ca/ssh
Generate keys (reuse the existing password file from the previous post):
# SSH Host CA (optional for later host certs)
sudo -u step -H env STEPPATH=/etc/step-ca \
  step crypto keypair \
  /etc/step-ca/ssh/ssh_host_ca_key.pub \
  /etc/step-ca/ssh/ssh_host_ca_key \
  --password-file /etc/step-ca/password.txt

# SSH User CA (used to sign user login certs)
sudo -u step -H env STEPPATH=/etc/step-ca \
  step crypto keypair \
  /etc/step-ca/ssh/ssh_user_ca_key.pub \
  /etc/step-ca/ssh/ssh_user_ca_key \
  --password-file /etc/step-ca/password.txt
Lock down permissions (avoid wildcards here):
sudo chmod 600 /etc/step-ca/ssh/ssh_host_ca_key /etc/step-ca/ssh/ssh_user_ca_key
sudo chmod 644 /etc/step-ca/ssh/ssh_host_ca_key.pub /etc/step-ca/ssh/ssh_user_ca_key.pub
sudo chown step:step /etc/step-ca/ssh/ssh_host_ca_key* /etc/step-ca/ssh/ssh_user_ca_key*
Verify:
sudo ls -l /etc/step-ca/ssh
- Enable SSH in
/etc/step-ca/config/ca.json
Edit:
sudo vi /etc/step-ca/config/ca.json
Add the top-level ssh section:
"ssh": {
  "hostKey": "/etc/step-ca/ssh/ssh_host_ca_key",
  "userKey": "/etc/step-ca/ssh/ssh_user_ca_key"
},
Set global SSH duration bounds under authority.claims:
"minUserSSHCertDuration": "5m",
"maxUserSSHCertDuration": "1h",
"defaultUserSSHCertDuration": "1h"
Validate JSON:
sudo jq . /etc/step-ca/config/ca.json >/dev/null && echo OK
Restart:
sudo systemctl restart step-ca
sudo systemctl status step-ca --no-pager
Health check:
sudo curl --cacert /etc/step-ca/certs/root_ca.crt https://stepca.maksonlee.com/health
# {"status":"ok"}
Part 2 — Keycloak: groups + OIDC client
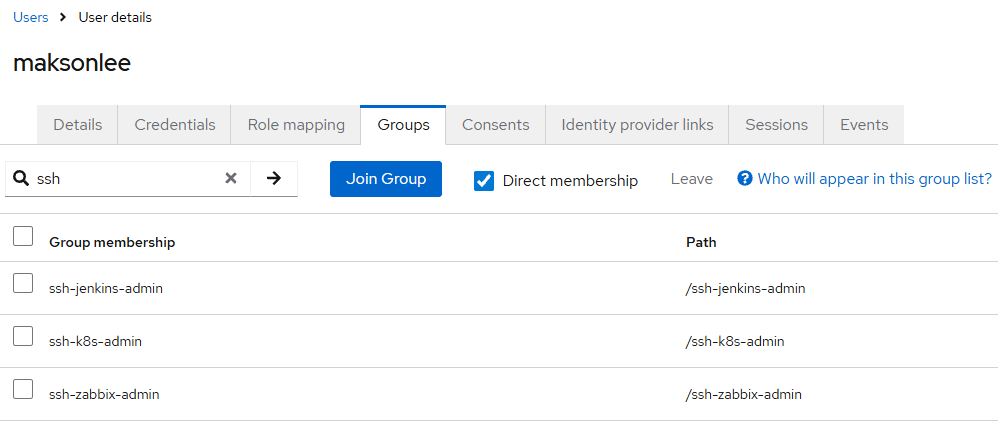
- Create groups (these become principals)
In realm maksonlee.com, create groups:
ssh-zabbix-adminssh-jenkins-adminssh-k8s-admin
Add users to groups as needed.
- Create OIDC client
step-ca-ssh
Keycloak → Clients → Create client:
- Client ID:
step-ca-ssh - Client authentication: On (confidential client)
- Standard flow: On
Redirect URIs (critical):
http://127.0.0.1:10000/*
Copy the client secret (you’ll use it in Step CA):
- <YOUR_CLIENT_SECRET>
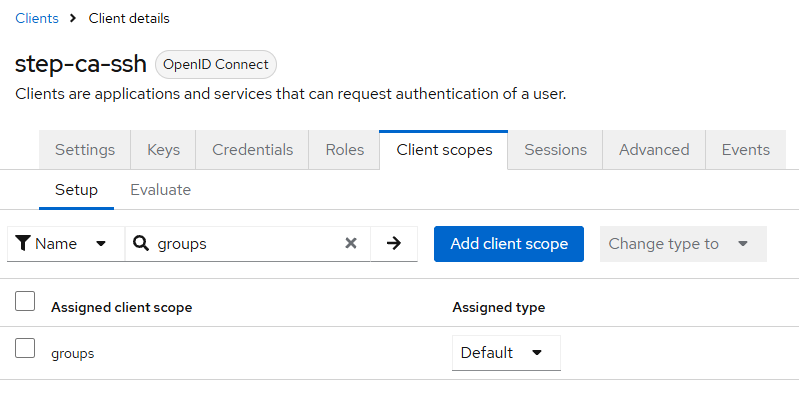
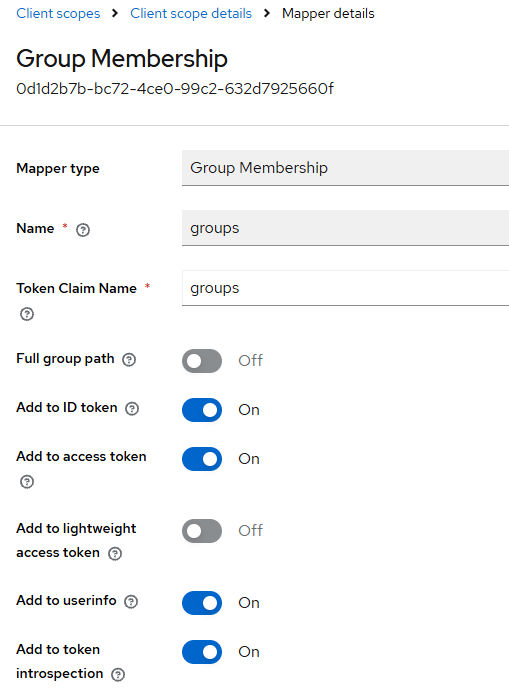
- Add “groups” claim to the ID token
Ensure the ID token includes group membership as:
- claim name:
groups
(Keycloak typically uses a Group Membership mapper.)
Part 3 — Step CA: OIDC provisioner + SSH template (groups → principals)
- Create the SSH template file
sudo -u step -H mkdir -p /etc/step-ca/templates/certs/ssh
sudo -u step -H vi /etc/step-ca/templates/certs/ssh/oidc-groups.tpl
Paste:
{
  "type": {{ toJson .Type }},
  "keyId": {{ toJson .KeyID }},

  {{- $allowed := list "ssh-zabbix-admin" "ssh-jenkins-admin" "ssh-k8s-admin" -}}

  {{- $g := .Token.groups -}}
  {{- $groups := list -}}
  {{- if kindIs "string" $g -}}
    {{- $groups = splitList " " $g -}}
  {{- else if kindIs "slice" $g -}}
    {{- $groups = $g -}}
  {{- end -}}

  {{- $selected := list -}}
  {{- range $p := $allowed -}}
    {{- if has $p $groups -}}
      {{- $selected = append $selected $p -}}
    {{- end -}}
  {{- end -}}

  {{- if eq (len $selected) 0 -}}
    {{- fail "No allowed SSH principals in token groups" -}}
  {{- end -}}

  "principals": {{ toJson ($selected | uniq) }},
  "criticalOptions": {{ toJson .CriticalOptions }},
  "extensions": {{ toJson .Extensions }}
}
- Add the Keycloak OIDC provisioner in
ca.json
Edit:
sudo vi /etc/step-ca/config/ca.json
Under authority.provisioners, add:
{
  "type": "OIDC",
  "name": "keycloak",
  "clientID": "step-ca-ssh",
  "clientSecret": "<YOUR_CLIENT_SECRET>",
  "configurationEndpoint": "https://keycloak.maksonlee.com/realms/maksonlee.com/.well-known/openid-configuration",
  "listenAddress": "127.0.0.1:10000",
  "claims": {
    "enableSSHCA": true,
    "maxUserSSHCertDuration": "1h",
    "defaultUserSSHCertDuration": "1h"
  },
  "options": {
    "ssh": {
      "templateFile": "templates/certs/ssh/oidc-groups.tpl"
    }
  }
}
Validate + restart:
sudo jq . /etc/step-ca/config/ca.json >/dev/null && echo OK
sudo systemctl restart step-ca
sudo systemctl status step-ca --no-pager
Part 4 — Windows 11 client: install Step CLI, bootstrap, login, verify principals
- Install Step CLI on Windows 11
Use official install methods (Winget or Scoop).
winget install Smallstep.step
- Get the Root CA fingerprint from
roots.pem(PowerShell 7 only)
This gets the fingerprint directly from the Step CA endpoint:
Open PowerShell 7 (pwsh) and run:
(Invoke-WebRequest -Uri "https://stepca.maksonlee.com/roots.pem" -SkipCertificateCheck).Content | step certificate fingerprint
Example output:
4d62351126a3cfb7f5f02394edab9611afb86194a569b169f80fa37fe53d7b3f
- Bootstrap the CA
PowerShell:
step ca bootstrap --ca-url https://stepca.maksonlee.com --fingerprint 4d62351126a3cfb7f5f02394edab9611afb86194a569b169f80fa37fe53d7b3f
- Install the Root CA into Windows trust store (recommended)
step certificate install "$env:USERPROFILE\.step\certs\root_ca.crt"
- Ensure ssh-agent is running
PowerShell (Admin):
Set-Service -Name ssh-agent -StartupType Automatic
Start-Service ssh-agent
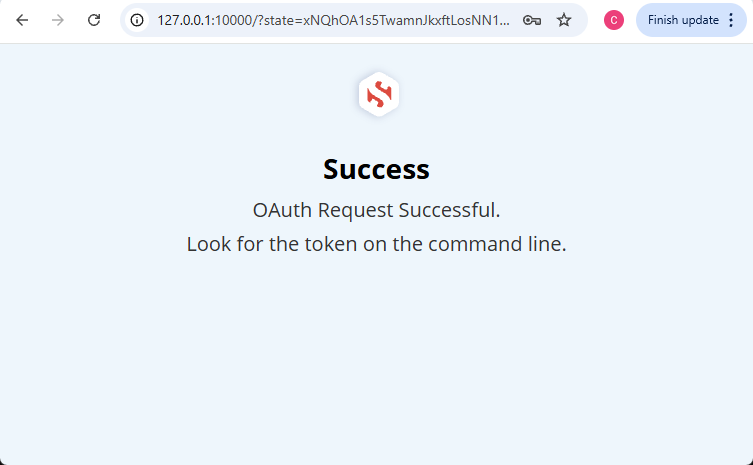
- Login (OIDC → Keycloak → Step CA issues cert)
step ssh login maksonlee@maksonlee.com
Choose:
- keycloak (OIDC) [client: step-ca-ssh]
- Verify principals in the SSH certificate
Confirm a cert exists:
ssh-add -L | Select-String cert
Inspect principals:
$cert = (ssh-add -L | Select-String cert | Select-Object -First 1).Line
$cert | Out-File -Encoding ascii $env:TEMP\step-cert.pub
ssh-keygen -L -f $env:TEMP\step-cert.pub
Look for:
Valid: from ... to ...Principals:containing one or more of:ssh-zabbix-adminssh-jenkins-adminssh-k8s-admin
- Logout (optional)
step ssh logout
Part 5 — Configure Ubuntu servers to trust Step CA SSH user certificates
Now we configure each server to:
- Trust the Step CA SSH User CA public key
- Allow only specific principals to log in as
administrator
- Generate the OpenSSH-formatted SSH User CA public key (on the Step CA host)
sudo -u step -H env STEPPATH=/etc/step-ca \
  step crypto key format --ssh /etc/step-ca/ssh/ssh_user_ca_key.pub \
  --out /tmp/step_ssh_user_ca.pub -f

ssh-keygen -l -f /tmp/step_ssh_user_ca.pub
- Copy + install it on each Ubuntu server
# copy
sudo scp /tmp/step_ssh_user_ca.pub \
  administrator@jenkins.maksonlee.com:/tmp/step_ssh_user_ca.pub

# install
ssh administrator@jenkins.maksonlee.com \
  'sudo install -m 0644 -o root -g root /tmp/step_ssh_user_ca.pub /etc/ssh/step_ssh_user_ca.pub && \
   ssh-keygen -l -f /etc/ssh/step_ssh_user_ca.pub'
(Repeat this for zabbix.maksonlee.com, k8s-1/2/3.maksonlee.com.)
- Configure sshd to trust the CA and use per-user principal allowlists
Edit:
sudo vi /etc/ssh/sshd_config
Add:
TrustedUserCAKeys /etc/ssh/step_ssh_user_ca.pub
AuthorizedPrincipalsFile /etc/ssh/auth_principals/%u
Create the directory:
sudo mkdir -p /etc/ssh/auth_principals
sudo chown root:root /etc/ssh/auth_principals
sudo chmod 0755 /etc/ssh/auth_principals
Restart SSH:
sudo systemctl restart ssh
- Per-host allowlists for the
administratoraccount
Create /etc/ssh/auth_principals/administrator on each host.
- jenkins.maksonlee.com
echo "ssh-jenkins-admin" | sudo tee /etc/ssh/auth_principals/administrator >/dev/null
sudo chmod 0644 /etc/ssh/auth_principals/administrator
- zabbix.maksonlee.com
echo "ssh-zabbix-admin" | sudo tee /etc/ssh/auth_principals/administrator >/dev/null
sudo chmod 0644 /etc/ssh/auth_principals/administrator
- k8s-1 / k8s-2 / k8s-3
On each node:
echo "ssh-k8s-admin" | sudo tee /etc/ssh/auth_principals/administrator >/dev/null
sudo chmod 0644 /etc/ssh/auth_principals/administrator
- Test from Windows 11
First, login to mint a fresh cert:
step ssh login maksonlee@maksonlee.com
Then test SSH:
ssh administrator@jenkins.maksonlee.com
Expected behavior:
- If your cert contains
ssh-jenkins-admin, login succeeds without a password. - If not, SSH fails with
Permission denied (publickey).
Did this guide save you time?
Support this site