In this post, we combine and simplify the following two guides into a single-node Ceph test environment:
- 🔗 How to Install Ceph Squid v19 RGW S3 on Bare Metal Ubuntu 24.04
- 🔗 How to Add HAProxy with SSL Termination and Load Balancing for Ceph RGW and Dashboard
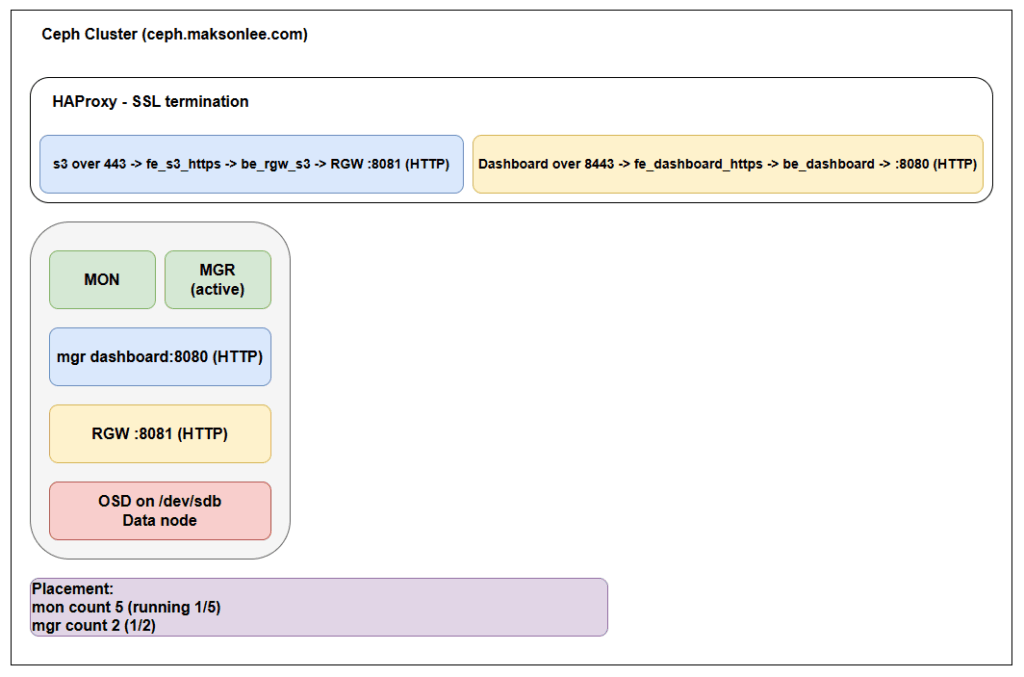
This setup is ideal for quick testing and internal development. All services, Ceph MON, MGR, OSD, RGW, Dashboard, and HAProxy, run on a single Ubuntu 24.04 node (ceph.maksonlee.com) with proper SSL using Let’s Encrypt (DNS challenge).
Host Overview
| Hostname | IP Address | DNS | Roles |
|---|---|---|---|
| ceph | 192.168.0.81 | ceph.maksonlee.com | MON, MGR, OSD, RGW, Dashboard, HAProxy, Certbot |
- Install and Bootstrap Ceph
sudo apt update
sudo apt install -y cephadm
sudo cephadm bootstrap \
--mon-ip 192.168.0.81 \
--initial-dashboard-user admin \
--initial-dashboard-password admin123- Disable SSL on Dashboard (Handled by HAProxy)
sudo cephadm shell -- ceph config set mgr mgr/dashboard/ssl false
sudo cephadm shell -- ceph mgr module disable dashboard
sudo cephadm shell -- ceph mgr module enable dashboardDashboard will now be served over HTTP on port 8080.
- Configure for Single Node + Replica = 1
sudo cephadm shell -- ceph config set global osd_crush_chooseleaf_type 0
sudo cephadm shell -- ceph config set global osd_pool_default_size 1
sudo cephadm shell -- ceph config set global osd_pool_default_min_size 1- Add OSD
Assuming /dev/sdb is your available disk:
sudo cephadm shell -- ceph orch daemon add osd ceph:/dev/sdb- Deploy RGW on Port 8081
sudo cephadm shell -- ceph orch apply rgw default --placement="ceph" --port=8081- Create an S3 User
sudo cephadm shell -- radosgw-admin user create \
  --uid="myuser" \
--display-name="My User"- Install HAProxy and Certbot
sudo add-apt-repository ppa:vbernat/haproxy-3.2 -y
sudo apt update
sudo apt install haproxy=3.2.* certbot python3-certbot-dns-cloudflare- Generate SSL Certificate
mkdir -p ~/.secrets/certbot
vi ~/.secrets/certbot/cloudflare.inidns_cloudflare_api_token = YOUR_CLOUDFLARE_API_TOKENchmod 600 ~/.secrets/certbot/cloudflare.iniRequest the certificate:
sudo certbot certonly \
  --dns-cloudflare \
  --dns-cloudflare-credentials ~/.secrets/certbot/cloudflare.ini \
-d ceph.maksonlee.comPrepare for HAProxy:
sudo mkdir -p /etc/haproxy/certs/
sudo bash -c "cat /etc/letsencrypt/live/ceph.maksonlee.com/fullchain.pem \
  /etc/letsencrypt/live/ceph.maksonlee.com/privkey.pem \
  > /etc/haproxy/certs/ceph.maksonlee.com.pem"
sudo chmod 600 /etc/haproxy/certs/ceph.maksonlee.com.pem- Configure HAProxy
Edit /etc/haproxy/haproxy.cfg:
# S3 over 443
frontend fe_s3_https
        bind *:443 ssl crt /etc/haproxy/certs/ceph.maksonlee.com.pem
        mode http
        default_backend be_rgw_s3

# Dashboard over 8443
frontend fe_dashboard_https
        bind *:8443 ssl crt /etc/haproxy/certs/ceph.maksonlee.com.pem
        mode http
        default_backend be_dashboard

backend be_rgw_s3
        mode http
        server rgw1 192.168.0.81:8081 check

backend be_dashboard
        mode http
server ceph1 192.168.0.81:8080 check- Automate Certificate Renewal
sudo tee /etc/letsencrypt/renewal-hooks/deploy/reload-haproxy.sh > /dev/null <<EOF
#!/bin/bash
cat /etc/letsencrypt/live/ceph.maksonlee.com/fullchain.pem \
    /etc/letsencrypt/live/ceph.maksonlee.com/privkey.pem \
    > /etc/haproxy/certs/ceph.maksonlee.com.pem
systemctl reload haproxy
EOF

sudo chmod +x /etc/letsencrypt/renewal-hooks/deploy/reload-haproxy.sh- Final Test
Install s3cmd on a client:
sudo apt install -y s3cmd
s3cmd --configureUse:
- S3 Endpoint:
https://ceph.maksonlee.com:443 - Use HTTPS: Yes
- Access Key / Secret Key: from previous step
Create and test:
echo "hello" > hello.txt
s3cmd mb s3://testbucket
s3cmd put hello.txt s3://testbucket/
s3cmd ls
s3cmd get s3://testbucket/hello.txtDid this guide save you time?
Support this site