
By default, Keycloak allows any authenticated user to access any client in a realm. In production, we often want to restrict that, for example, only users with a specific role should be able to log into a system like Gerrit.
This guide shows how to achieve that using a clean, modular approach with subflows, while preserving the default login logic.
Goal
- Only users with realm role
gerrit-accesscan log into the Gerrit client - All other users are denied before any token is issued
1. Create a Realm Role
In the Keycloak admin console:
- Go to Realm roles → Create role.
- Set:
- Role name:
gerrit-access
- Role name:
- Click Save.
This role will serve as the gate for accessing Gerrit.
2. Assign Role to Users or Groups
Assign the gerrit-access role to whoever should be allowed into Gerrit.
Assign to individual users
- Go to Users → <user> → Role mappings → Assign role.
- Search for and select
gerrit-access. - Click Assign.
Assign to a group
- Go to Groups → <group> → Role mappings → Assign role.
- Search for and select
gerrit-access. - Click Assign.
Any user that has this role (directly or via a group) will be allowed to log into Gerrit once the flow is in place.
3. Duplicate the Built-in Browser Flow
We’ll create a copy of the default browser login flow so we can customize it without touching the global default.
- Go to Authentication → Flows.
- Find the
browserflow. - Click Duplicate.
- Set:
- New flow name:
restricted-browser-gerrit
- New flow name:
- Click Save.
You now have an editable copy of the default browser login flow.
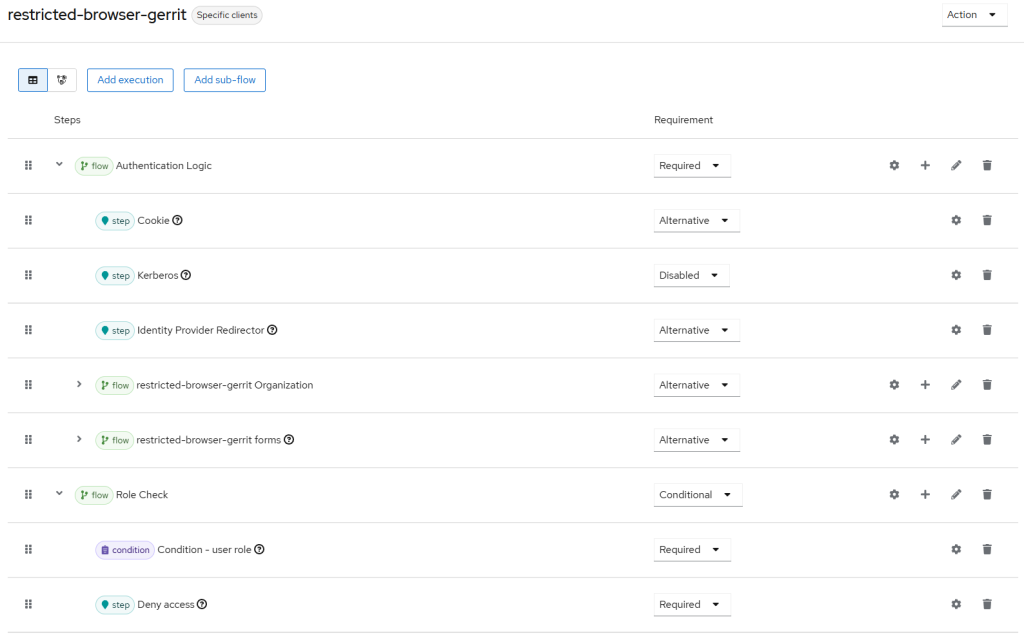
4. Move All Existing Executions into a Sub-flow
Inside the restricted-browser-gerrit flow:
- Still under Authentication → Flows → restricted-browser-gerrit:
- Click Add sub-flow.
- Set:
- Name:
Authentication Logic - Flow type:
Generic - Requirement:
Required
- Name:
- Click Save.
- Move all existing executions from the top level into the
Authentication Logicsub-flow.
Note (tested on Keycloak 26.4.6):
In my experience, drag-and-drop in the Keycloak Authentication Flow UI is quite tricky. If you create the new Authentication Logic sub-flow and then add a dummy sub-flow or execution under it (and expand it), it becomes much easier to drag other executions into that sub-flow. Once everything is in place, you can simply delete the dummy entry.
5. Add a Role Check Sub-flow
- Still in
restricted-browser-gerrit, click Add sub-flow:- Name:
Role Check - Flow type:
Generic - Requirement:
Conditional
- Name:
- Inside the
Role Checksubflow:- Click Add condition
- Select:
Condition – user role - Requirement:
Required - Configure:
- Role:
gerrit-access - Negate output: ON
- Role:
- Select:
- Click Add execution
- Select:
Deny access - Requirement:
Required
- Select:
- Click Add condition
6. Assign Flow to the Gerrit Client
Finally, we bind this custom flow to the Gerrit client only, so the rest of the realm can keep using the default browser flow.
- Go to Clients → gerrit.
- Click the Advanced tab.
- Under Authentication flow overrides:
- Browser Flow: select
restricted-browser-gerrit
- Browser Flow: select
- Click Save.
Now, when users log into the Gerrit client, Keycloak will use your restricted flow. Other clients can still use the standard browser flow.
7. Final Flow Structure
Hi, thank you for this nice article!
But how do I move existing executions into a new subflow? Drag and drop wont let me do that…
Kind regards
In my experience, drag-and-drop in the Keycloak Authentication Flow UI is quite tricky. If you create a new sub-flow and then add a dummy sub-flow or execution under it (and expand it), it becomes much easier to drag other executions into that sub-flow. After everything is in place, you can simply delete the dummy entry.