
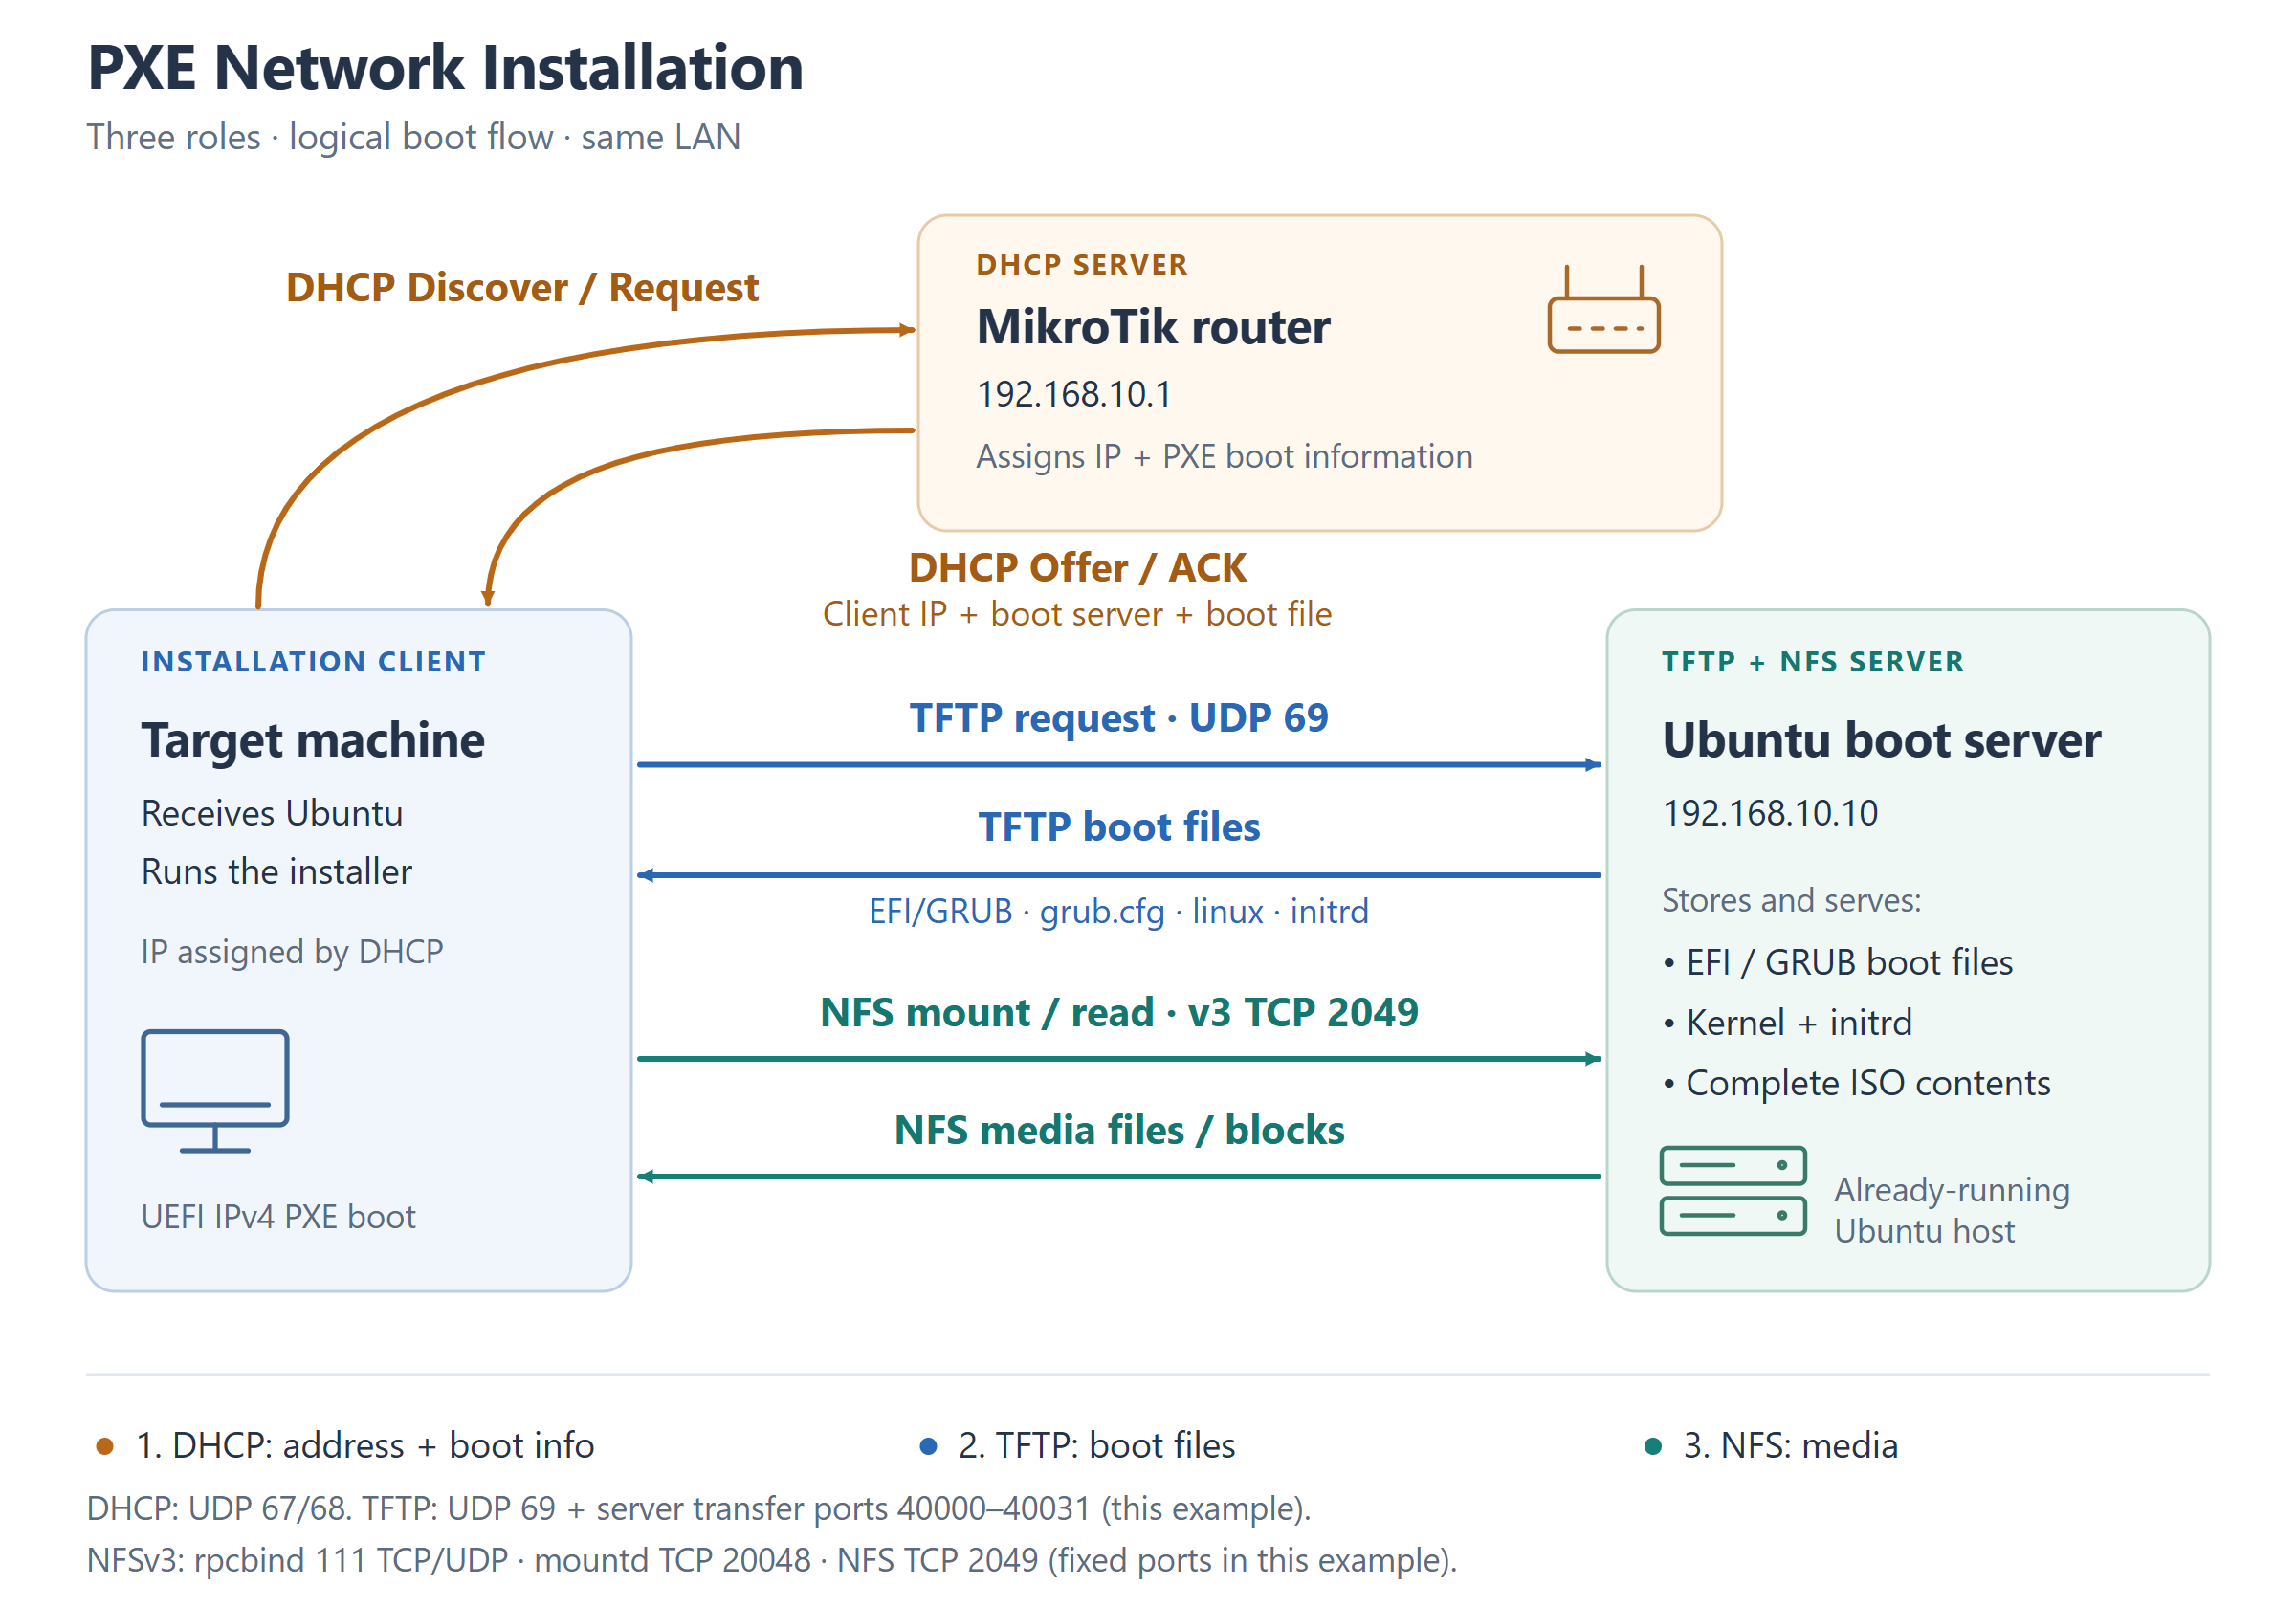
PXE lets a machine start the Ubuntu installer over the network without a USB drive. This setup has three roles:
- Target machine: The computer or VM where Ubuntu will be installed.
- MikroTik router: Assigns the target an IP address through DHCP and tells it which boot server and file to use.
- Ubuntu boot server: An existing Ubuntu host that serves boot files through TFTP and installation media through read-only NFS.
The installer runs on the target machine. Disk selection, partitioning, and installation are interactive.
Environment
- Router and DHCP server: MikroTik RouterOS 7,
192.168.10.1. - LAN:
192.168.10.0/24; server and target on the same wired LAN or VLAN. - Ubuntu boot server: Ubuntu Server 26.04.1 LTS, fixed IP
192.168.10.10, interfaceeno1. - Installation ISO: Ubuntu Server 26.04.1 LTS, amd64.
- Target machine: amd64 with UEFI IPv4 network boot.
Replace the example addresses and interface name throughout. Reserve the server’s IP in DHCP or assign a static address outside the dynamic pool. The server needs sudo access, Internet access for downloads, and space for both the ISO and its extracted contents.
NFS keeps the installation media on the server. The target still uses RAM for the kernel, initramfs, installer, writable overlay, and caches. This guide uses a UEFI amd64 boot file; BIOS and ARM clients need different boot files and DHCP selection rules.
1. Install packages on the Ubuntu boot server
Run on: Ubuntu boot server.
sudo apt update
sudo apt install curl gnupg ubuntu-keyring dnsmasq-base nfs-kernel-server nfs-common rpcbind

ip -br addressIdentify the interface that owns 192.168.10.10. Use that interface in the TFTP configuration below. If the address belongs to br0, use the bridge rather than its physical member interface.
dnsmasq-base supplies the daemon binary. The dedicated configuration and service below keep PXE separate from any dnsmasq instances used by libvirt or other services.
2. Prepare the Ubuntu ISO and netboot files
Run on: Ubuntu boot server.
Use the ISO and netboot archive from the same Ubuntu release directory. Keep this step and the next step in the same Bash session so the variables remain available.
mkdir -p ~/pxe-download
cd ~/pxe-download

pxe_base=https://releases.ubuntu.com/26.04.1
iso=ubuntu-26.04.1-live-server-amd64.iso
netboot=ubuntu-26.04.1-netboot-amd64.tar.gz

curl -fL --retry 3 -o SHA256SUMS "$pxe_base/SHA256SUMS"
curl -fL --retry 3 -o SHA256SUMS.gpg "$pxe_base/SHA256SUMS.gpg"

gpgv --keyring /usr/share/keyrings/ubuntu-archive-keyring.gpg \
SHA256SUMS.gpg SHA256SUMSContinue only if gpgv reports a good signature and exits successfully. Then download and verify the ISO:
curl -fL --retry 3 --continue-at - -o "$iso" "$pxe_base/$iso"
grep ' \*ubuntu-26.04.1-live-server-amd64.iso$' SHA256SUMS | sha256sum -c -Expected result:
ubuntu-26.04.1-live-server-amd64.iso: OKDownload and extract the netboot archive:
curl -fL --retry 3 --continue-at - -o "$netboot" "$pxe_base/$netboot"

mkdir -p netboot
tar -xzf "$netboot" -C netboot --no-same-owner
find netboot -type f -name bootx64.efiThe signed SHA256SUMS covers the ISO, but does not list the netboot archive. The next step checks the archive’s kernel and initrd against the verified ISO.
3. Copy the boot files and installation media
Run on: Ubuntu boot server.
Locate the directory containing bootx64.efi:
mapfile -t bootfiles < <(find netboot -type f -name bootx64.efi)
test "${#bootfiles[@]}" = 1 || { echo 'Expected one bootx64.efi'; exit 1; }
netroot=$(dirname "${bootfiles[0]}")Compare the kernel and initrd, then copy the boot files and complete ISO contents. Use a local filesystem such as ext4 or XFS for the NFS directory:
sudo install -d -m 0755 /etc/ubuntu-pxe \
  /srv/ubuntu-pxe/tftp /srv/ubuntu-pxe/nfs/26.04.1
mkdir -p iso-check
(
  set -e
  sudo mount -o loop,ro,nosuid,nodev,noexec "$iso" iso-check
  trap 'sudo umount iso-check' EXIT
  cmp "$netroot/linux" iso-check/casper/vmlinuz
  cmp "$netroot/initrd" iso-check/casper/initrd
  sudo cp -a "$netroot/." /srv/ubuntu-pxe/tftp/
  sudo cp -a iso-check/. /srv/ubuntu-pxe/nfs/26.04.1/
  sudo chown -R root:root /srv/ubuntu-pxe/tftp /srv/ubuntu-pxe/nfs
  sudo chmod -R a+rX /srv/ubuntu-pxe/tftp /srv/ubuntu-pxe/nfs
  sudo test -f /srv/ubuntu-pxe/nfs/26.04.1/.disk/casper-uuid-generic
  sudo test -f /srv/ubuntu-pxe/nfs/26.04.1/casper/install-sources.yaml
  sudo test -f /srv/ubuntu-pxe/nfs/26.04.1/casper/ubuntu-server-minimal.ubuntu-server.installer.generic.squashfs
  echo 'Kernel and initrd match; complete installation media copied.'
)Both cmp commands should be silent. If either fails, check the release versions before continuing. Copying iso-check/. includes the hidden .disk directory used to identify matching media. Keep it and all squashfs layers.
The resulting layout includes:
/srv/ubuntu-pxe/
├── tftp/
│   ├── bootx64.efi
│   ├── grubx64.efi
│   ├── linux
│   ├── initrd
│   └── grub/
│       └── grub.cfg
└── nfs/
    └── 26.04.1/
        ├── .disk/
        │   └── casper-uuid-generic
        ├── casper/
        │   ├── install-sources.yaml
        │   ├── ubuntu-server-minimal.squashfs
        │   ├── ubuntu-server-minimal.ubuntu-server.squashfs
        │   ├── ubuntu-server-minimal.ubuntu-server.installer.squashfs
        │   └── ubuntu-server-minimal.ubuntu-server.installer.generic.squashfs
└── remaining ISO files and directories4. Configure the TFTP service
Run on: Ubuntu boot server.
dnsmasq serves TFTP only in this setup. Its DNS and DHCP functions are disabled. MikroTik provides DHCP, and the LAN’s existing DNS settings stay in use.
MikroTik also supports TFTP. Here, Ubuntu serves the EFI/GRUB files, kernel, and initrd so the boot files and NFS media stay on one server.
Create a dedicated account for the TFTP process:
getent passwd pxe-tftp >/dev/null || sudo adduser --system --no-create-home --group pxe-tftpCreate /etc/ubuntu-pxe/dnsmasq.conf:
port=0
interface=eno1
except-interface=lo
bind-dynamic
no-dhcpv4-interface=eno1
no-dhcpv6-interface=eno1

enable-tftp=eno1
tftp-root=/srv/ubuntu-pxe/tftp
tftp-port-range=40000,40031
user=pxe-tftp
group=pxe-tftp
pid-file=
log-facility=-In this dnsmasq configuration, port=0 disables DNS, the no-dhcp* options disable DHCP, and enable-tftp enables TFTP on eno1. The fixed transfer-port range is used in the firewall rules below.
Create /etc/systemd/system/ubuntu-pxe-tftp.service:
[Unit]
Description=Ubuntu PXE TFTP boot files on LAN
Wants=network-online.target
After=network-online.target

[Service]
Type=simple
ExecStart=/usr/sbin/dnsmasq --keep-in-foreground --conf-file=/etc/ubuntu-pxe/dnsmasq.conf
Restart=on-failure
RestartSec=3
NoNewPrivileges=true
ProtectSystem=strict
ProtectHome=true
PrivateTmp=true

[Install]
WantedBy=multi-user.targetThe service binds UDP port 69, then drops to the pxe-tftp account.
5. Export the installation media over NFS
Run on: Ubuntu boot server.
Ubuntu’s live boot system, Casper, mounts the media using NFSv3 over TCP. Check existing exports first; restarting NFS later will also affect their clients:
sudo exportfs -vEnable NFSv3 and assign mountd a fixed port in NFS configuration. Port 20048 must be available:
sudo install -d -m 0755 /etc/nfs.conf.d /etc/exports.d
sudo tee /etc/nfs.conf.d/ubuntu-pxe.conf >/dev/null <<'EOF'
[nfsd]
vers3 = y
tcp = y

[mountd]
port = 20048
EOFCreate a read-only export restricted to the installation LAN:
sudo tee /etc/exports.d/ubuntu-pxe.exports >/dev/null <<'EOF'
/srv/ubuntu-pxe/nfs/26.04.1 192.168.10.0/24(ro,sync,subtree_check,root_squash)
EOFroot_squash maps client root to the anonymous user. The permissions from step 3 let that user read the media. Keep the exported files unchanged during installation.
6. Create the GRUB boot menu
Run on: Ubuntu boot server.
Replace /srv/ubuntu-pxe/tftp/grub/grub.cfg with:
set default=0
set timeout=-1

menuentry 'Install Ubuntu Server 26.04.1 LTS over NFS (manual installation)' {
    set gfxpayload=keep
    linux /linux boot=casper ip=dhcp netboot=nfs nfsroot=192.168.10.10:/srv/ubuntu-pxe/nfs/26.04.1 ---
    initrd /initrd
}

menuentry 'Return to firmware' {
    exit
}
set timeout=-1 waits for a selection. The kernel and initrd paths are relative to the TFTP root. boot=casper starts the live environment, ip=dhcp configures networking, and netboot=nfs selects the media export in nfsroot. Use the server’s numeric IPv4 address.
This release’s Casper NFS helper uses NFSv3 over TCP. Leave out toram so the media stays on NFS.
7. Start and verify the boot-server services
Run on: Ubuntu boot server.
Check the TFTP configuration and unit before starting it:
(
  set -e
  sudo dnsmasq --test --conf-file=/etc/ubuntu-pxe/dnsmasq.conf
  sudo systemd-analyze verify /etc/systemd/system/ubuntu-pxe-tftp.service
)Resolve any reported error before continuing. If UFW is already active, allow the installation LAN to reach TFTP and the NFSv3 services:
sudo ufw status
sudo ufw allow from 192.168.10.0/24 to 192.168.10.10 port 69 proto udp
sudo ufw allow from 192.168.10.0/24 to 192.168.10.10 port 40000:40031 proto udp
sudo ufw allow from 192.168.10.0/24 to 192.168.10.10 port 111 proto tcp
sudo ufw allow from 192.168.10.0/24 to 192.168.10.10 port 111 proto udp
sudo ufw allow from 192.168.10.0/24 to 192.168.10.10 port 20048 proto tcp
sudo ufw allow from 192.168.10.0/24 to 192.168.10.10 port 2049 proto tcpTFTP starts on UDP 69 and transfers files through UDP 40000–40031. NFSv3 uses rpcbind on port 111, mountd on TCP 20048, and NFS on TCP 2049. UDP 111 allows the initrd helper’s portmapper fallback. Apply equivalent rules on other firewalls; restrict access to the installation LAN.
Start the services and reload the exports. Restart NFS so the new daemon settings take effect:
(
  set -e
  sudo systemctl daemon-reload
  sudo systemctl enable --now ubuntu-pxe-tftp.service rpcbind.service nfs-server.service
  sudo exportfs -ra
  sudo systemctl restart nfs-server.service
  for unit in ubuntu-pxe-tftp.service rpcbind.service nfs-server.service; do
    systemctl is-active --quiet "$unit"
    echo "$unit: active"
  done
)The loop should report all three services as active. Then check the export and RPC registrations:
sudo exportfs -v
rpcinfo -p 192.168.10.10
sudo ss -lunp | grep ':69 '
cat /proc/fs/nfsd/versionsCheck for the read-only LAN export, NFS v3 on TCP 2049, mount v3 on TCP 20048, and +3 in the versions file.
Run on: another Ubuntu or Debian machine on the installation LAN. Test access to the media:
sudo apt install nfs-common
sudo mkdir -p /mnt/ubuntu-pxe-check
(
  set -e
  sudo mount -t nfs -o ro,vers=3,proto=tcp,mountproto=tcp,nolock \
    192.168.10.10:/srv/ubuntu-pxe/nfs/26.04.1 /mnt/ubuntu-pxe-check
  trap 'sudo umount /mnt/ubuntu-pxe-check' EXIT
  findmnt /mnt/ubuntu-pxe-check
  test -r /mnt/ubuntu-pxe-check/.disk/casper-uuid-generic
  test -r /mnt/ubuntu-pxe-check/casper/install-sources.yaml
  test -r /mnt/ubuntu-pxe-check/casper/ubuntu-server-minimal.ubuntu-server.installer.generic.squashfs
  echo 'NFSv3 media is readable from the installation LAN.'
)8. Configure MikroTik DHCP for PXE
Run on: MikroTik router (RouterOS terminal).
Inspect the existing network entry and save its settings before changing the boot fields:
/ip dhcp-server network print detail where address="192.168.10.0/24"
/ip dhcp-server network export file=dhcp-network-before-pxeConfirm that the entry is for 192.168.10.0/24. Keep its original next-server and boot-file-name values for restoring later.
Set the boot server and file on that entry:
/ip dhcp-server network set [find where address="192.168.10.0/24"] next-server=192.168.10.10 boot-file-name=bootx64.efi
/ip dhcp-server network print detail where address="192.168.10.0/24"Confirm these fields in the output:
next-server=192.168.10.10 boot-file-name="bootx64.efi"These RouterOS fields supply the boot-server address (siaddr) and file name. Separate custom options 66 and 67 are unnecessary here. The existing gateway, DNS, and address pool stay unchanged.
9. Boot the target machine into the Ubuntu installer
Run on: Target machine.
- Connect its wired network interface to the installation LAN.
- Open the firmware’s one-time boot menu and select the UEFI IPv4 network-boot entry.
- Check that it receives a DHCP address and loads the GRUB menu.
- Select Install Ubuntu Server 26.04.1 LTS over NFS (manual installation).
- Wait for the Ubuntu installer’s language-selection screen.
Continue with the normal Ubuntu installation. Review the target disk before confirming storage changes, then boot from that disk after installation.
To check the media source, open a shell from the installer’s help menu and inspect:
cat /proc/cmdline
findmnt -T /cdromLook for netboot=nfs and the intended nfsroot in the command line, with the NFS export mounted at /cdrom. Keep the boot server running until installation finishes.
In my boot test, a diskless OVMF/KVM VM with 2 GiB RAM and two vCPUs reached the language-selection screen with /cdrom mounted read-only over NFSv3.
Disable PXE
On MikroTik, restore the original boot-field values recorded in step 8. If both fields were originally unset, clear them:
/ip dhcp-server network set [find where address="192.168.10.0/24"] next-server="" boot-file-name=""On Ubuntu, stop the dedicated TFTP service and withdraw this guide’s NFS export after all installations have finished:
sudo systemctl disable --now ubuntu-pxe-tftp.service
sudo rm /etc/exports.d/ubuntu-pxe.exports
sudo exportfs -raThis keeps the media files and other NFS exports. To enable PXE again, recreate the export, reload it, and start the TFTP service.