This post documents a working setup to log in to EJBCA RA Web using Keycloak as an OpenID Connect (OIDC) provider. Users authenticate in Keycloak, EJBCA validates the returned JWT (signature via JWKS and issuer/audience expectations), then EJBCA maps a JWT role claim to an EJBCA role for authorization inside RA Web.
This Post Is Based On
Environment (example)
- Keycloak base URL:
https://keycloak.maksonlee.com - Keycloak realm:
maksonlee.com - EJBCA RA Web:
https://ejbca.maksonlee.com:8442/ejbca/ra
Keycloak:
- Client (OIDC):
ejbca-ra - Client role:
ejbca-admin
EJBCA:
- Trusted OAuth Provider name:
keycloak - Role mapping target:
Super Administrator Role(example)
What EJBCA actually does with “Audience” (important)
EJBCA appends Audience into the OIDC scope parameter (Keycloak provider type)
In EJBCA CE, the Admin Web OAuth login flow builds the Keycloak authorization URL using scope, client_id, redirect_uri, and state.
For Keycloak, EJBCA does not send a separate audience query parameter in the authorization request. Instead, when “audience check” is enabled, EJBCA appends the configured Audience value to the scope parameter:
- scope=openid <Audience>
This behavior is visible in EJBCA source code:
modules/admin-gui/src/org/ejbca/ui/web/admin/AdminLoginMBean.java → addParametersToUrl(...)
Why this matters (and why “scope name must match client id” is the safe choice)
In this guide we use Keycloak Audience mapper: “Included Client Audience”.
That creates a practical requirement:
If you set EJBCA Audience = xxx, then Keycloak must satisfy both:
- There must be a Client Scope named
xxx
(because EJBCA requestsscope=openid xxx, so Keycloak must recognize that scope and apply the mappers in it) - The access token
audclaim must containxxx
With Included Client Audience, the value added toaudis a Client ID.
So you must have a Keycloak client whose Client ID is alsoxxx, otherwise you cannot addxxxintoaudusing this mapper type.
The simplest way to avoid mismatch is to use one string everywhere:
- Keycloak Client ID =
ejbca-ra - Keycloak Client Scope name =
ejbca-ra - Audience mapper adds client audience =
ejbca-ra - EJBCA Audience =
ejbca-ra
- Create the Keycloak client (
ejbca-ra)
Keycloak → Clients → Create client
General settings
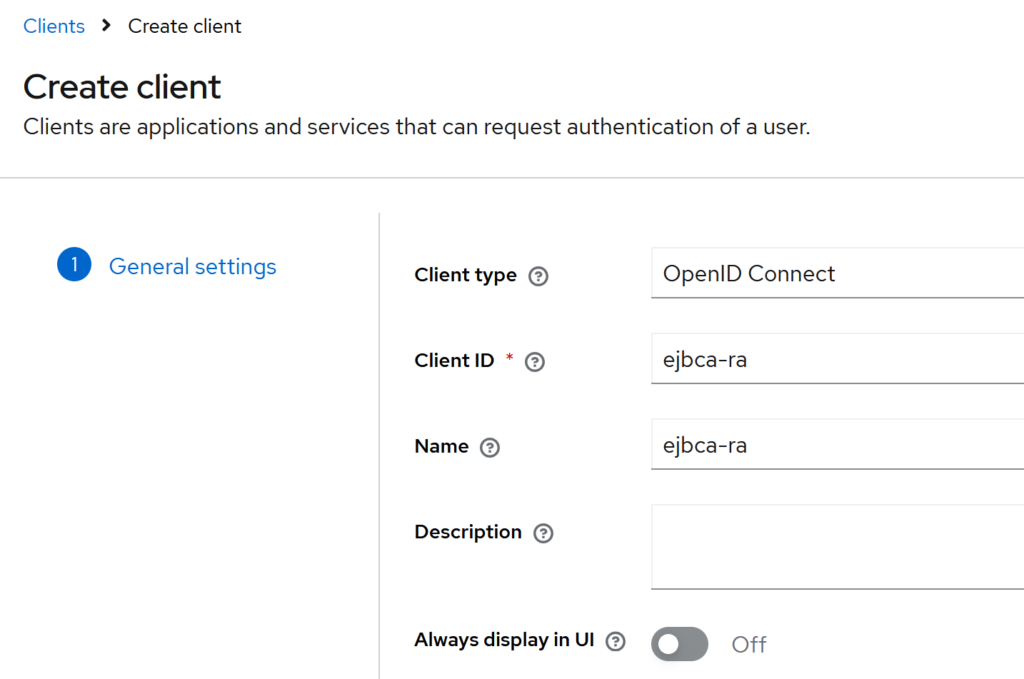
- Client type: OpenID Connect
- Client ID:
ejbca-ra - Name:
ejbca-ra - Description: (leave empty)
- Always display in UI: Off
Click Next.
Capability config
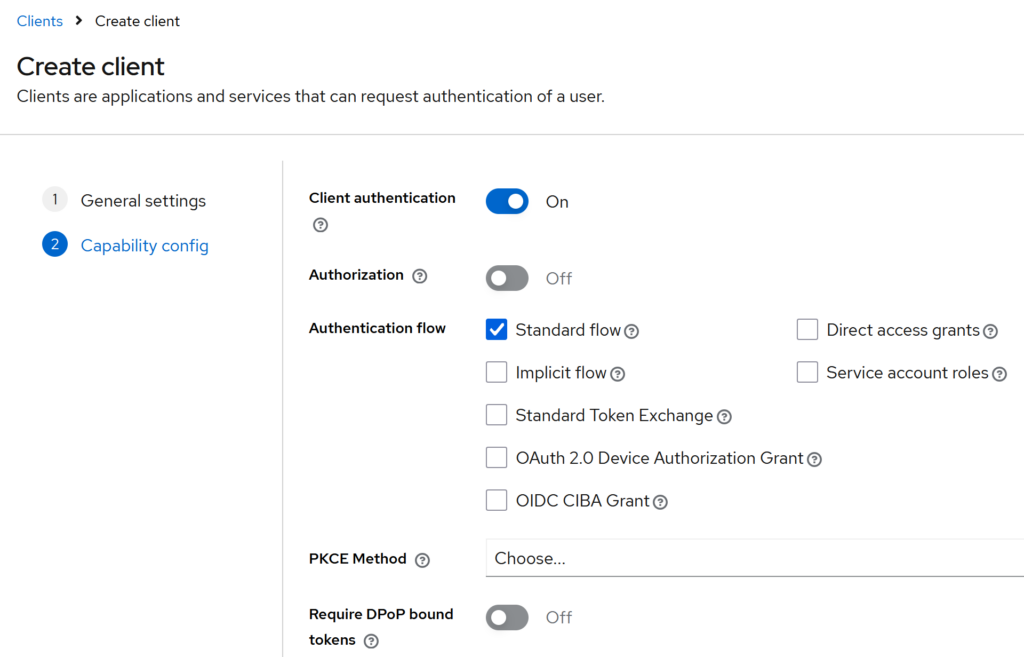
- Client authentication: On
- Authorization: Off
Under Authentication flow, enable only:
- ✅ Standard flow
Keep everything else unchecked (default).
Click Next.
Login settings
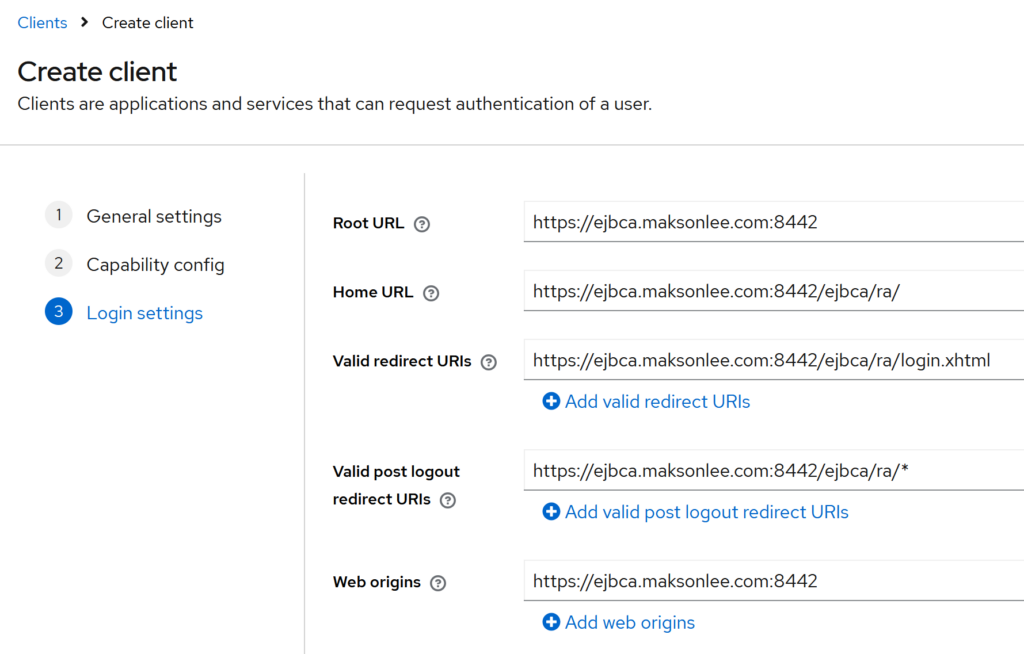
- Root URL:
https://ejbca.maksonlee.com:8442 - Home URL:
https://ejbca.maksonlee.com:8442/ejbca/ra/ - Valid redirect URIs:
https://ejbca.maksonlee.com:8442/ejbca/ra/login.xhtml
- Valid post logout redirect URIs:
https://ejbca.maksonlee.com:8442/ejbca/ra/*
- Web origins:
https://ejbca.maksonlee.com:8442
Click Save.
After the client is created, copy the client secret:
Keycloak → Clients → ejbca-ra → Credentials → Client secret
- Create a client role, assign it to your user, and emit it as
roles
Note: This guide uses client roles (assigned under the ejbca-ra client), not realm roles. Keycloak does not emit client roles as a simple top-level roles claim by default, so we add a mapper to output roles: ["ejbca-admin", ...] for EJBCA role mapping.
Create a client role (ejbca-admin)
Keycloak → Clients → ejbca-ra → Roles → Create role
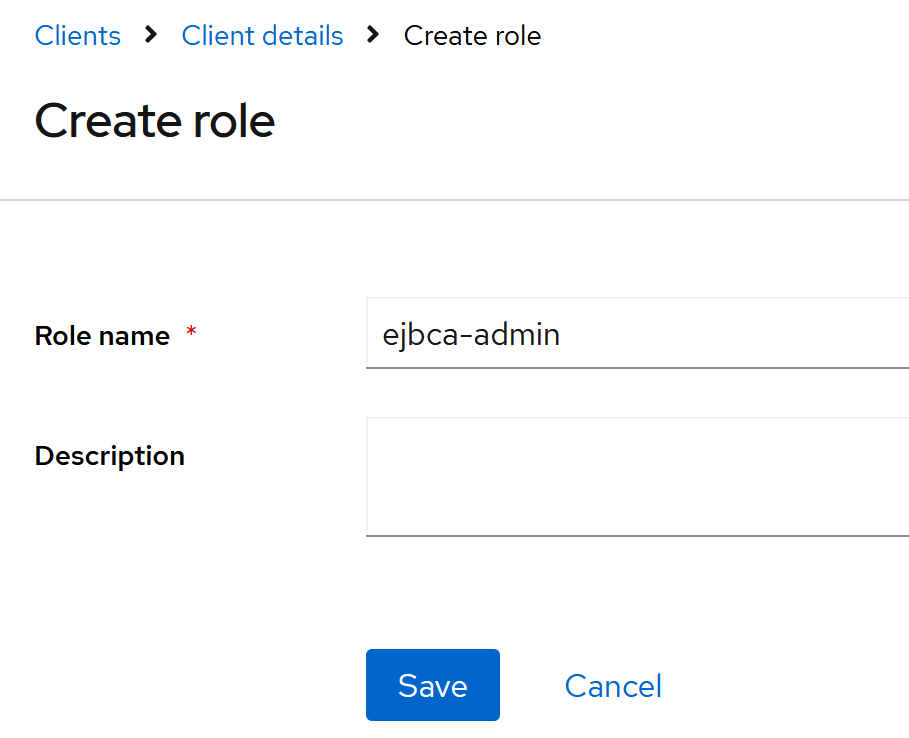
- Role name:
ejbca-admin - Description: (leave empty)
Click Save.
Assign the role to your user
Keycloak → Users → maksonlee → Role mapping
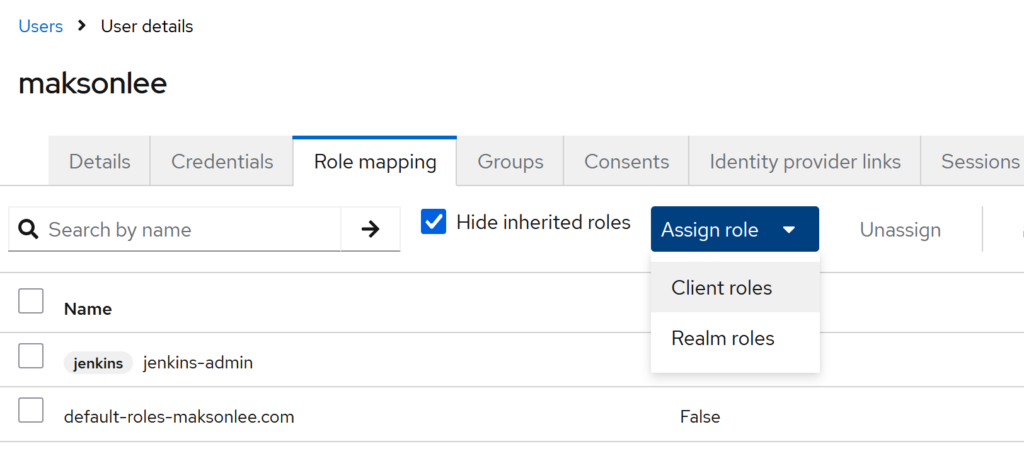
- Click Assign role → choose Client roles
- Search
ejbca-admin - Select
ejbca-admin(Client ID:ejbca-ra) - Click Assign
Emit a top-level roles claim (change only Token Claim Name)
Keycloak → Clients → ejbca-ra → Client scopes → ejbca-ra-dedicated→ Mappers → Add mapper
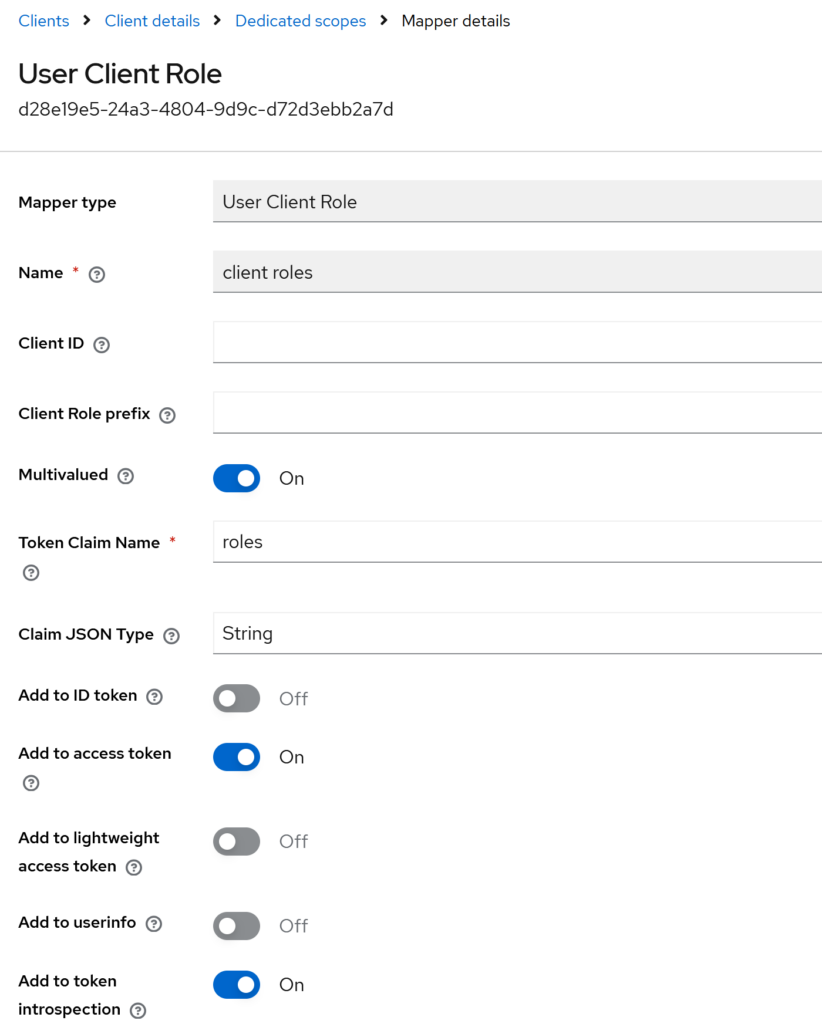
Create the mapper, then change only:
- Token Claim Name:
roles
Leave everything else as default.
After saving, the access token includes:
"roles": ["ejbca-admin", ...]- Add a client scope (
ejbca-ra), create an Audience mapper, then attach the scope to the client
This step creates a client scope named ejbca-ra, adds an Audience mapper named aud, and attaches the scope to the client as Default.
Create a client scope (ejbca-ra)
Keycloak → Client scopes → Create client scope
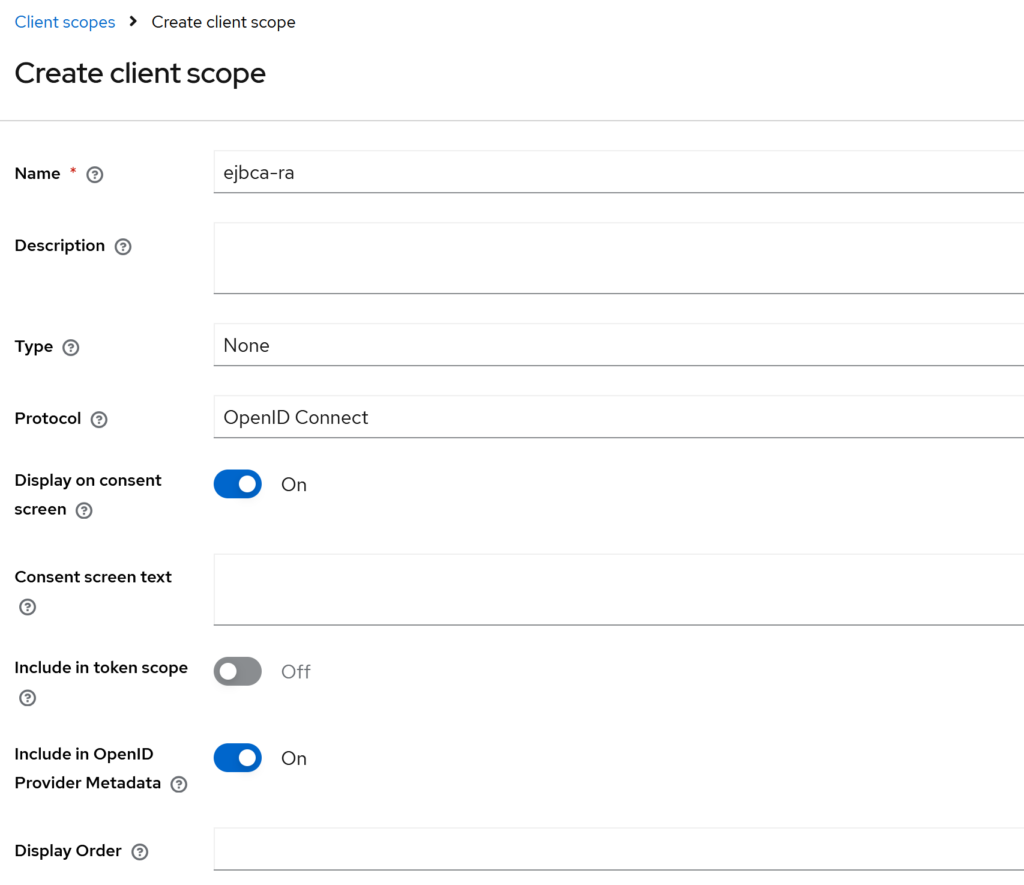
- Name:
ejbca-ra - Description: (leave empty)
- Type:
None - Protocol:
OpenID Connect - Display on consent screen: On
- Include in token scope: Off
- Include in OpenID Provider Metadata: On
- Display Order: (leave empty)
Save.
Add an Audience mapper (aud) into the client scope
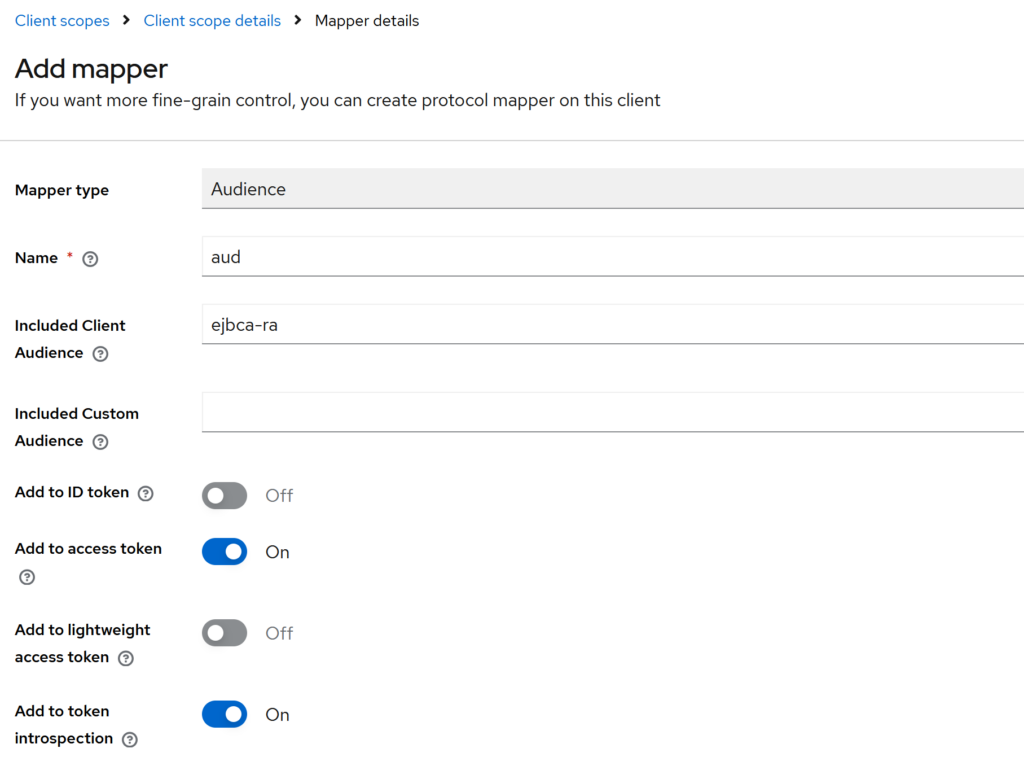
Keycloak → Client scopes → ejbca-ra → Mappers → Add mapper
- Mapper type:
Audience - Name:
aud - Included Client Audience:
ejbca-ra - Included Custom Audience: (leave empty)
Keep these toggles:
- Add to ID token: Off
- Add to access token: On
- Add to lightweight access token: Off
- Add to token introspection: On
Save.
Attach the client scope to the client (ejbca-ra)
Keycloak → Clients → ejbca-ra → Client scopes → Add client scope
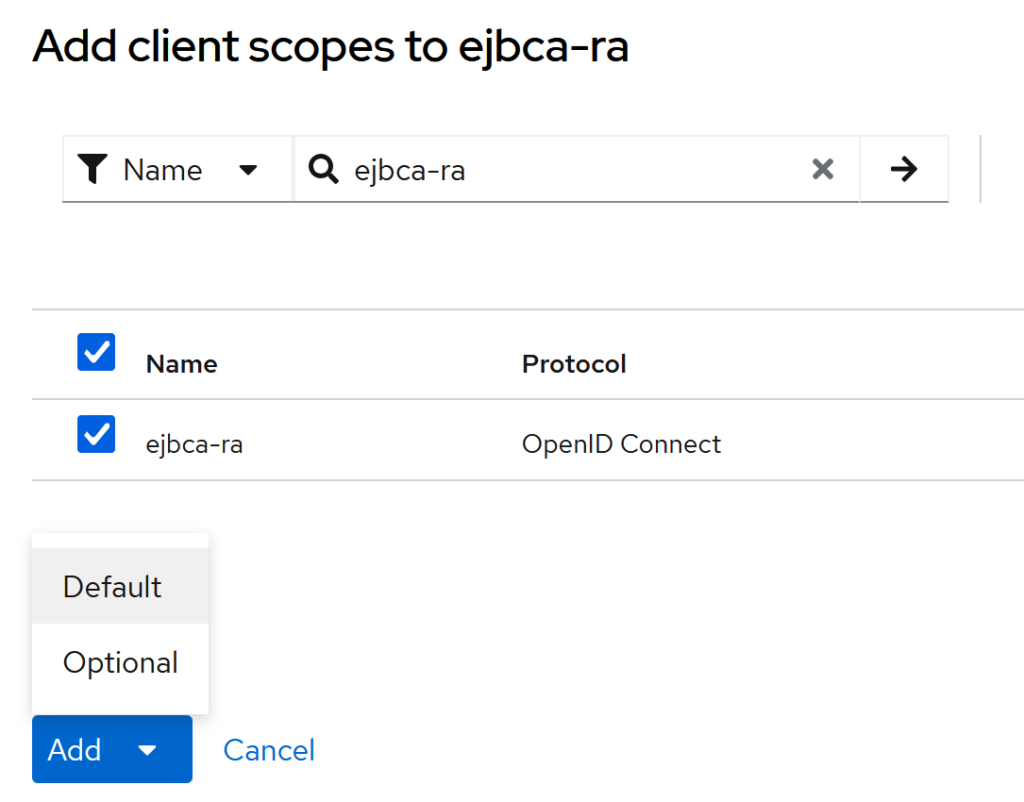
Search ejbca-ra, select it, click Add, then choose:
- Default
- Add the Trusted OAuth Provider in EJBCA
EJBCA Admin Web → System Configuration → Trusted OAuth Providers → Add
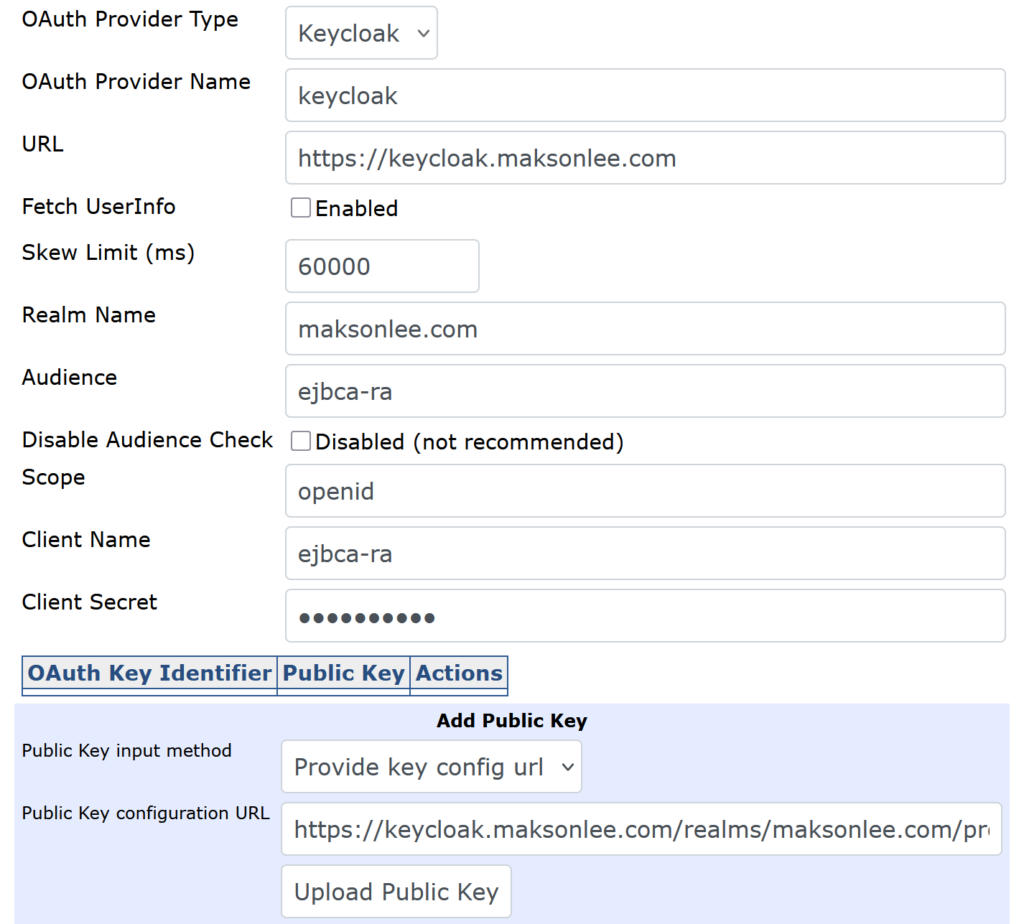
Fill it like this:
- OAuth Provider Type: Keycloak
- OAuth Provider Name:
keycloak - URL:
https://keycloak.maksonlee.com - Realm Name:
maksonlee.com - Audience:
ejbca-ra - Scope:
openid - Client Name:
ejbca-ra - Client Secret: (paste the Keycloak client secret)
Public key / JWKS
- Public Key input method: Provide key config url
- Public Key configuration URL:
https://keycloak.maksonlee.com/realms/maksonlee.com/protocol/openid-connect/certs
Click Upload Public Key, then Save.
- Map Keycloak role to an EJBCA role
EJBCA Admin Web → System Functions → Roles and Access Rules → Super Administrator Role → Members

Add a new member row:
- Match with: OAuth 2 JWT: Roles (“roles”) claim
- OAuth Provider:
keycloak - Match Operator: Equal, case sens.
- Match Value:
ejbca-admin
Click Add, then Save.
- Test
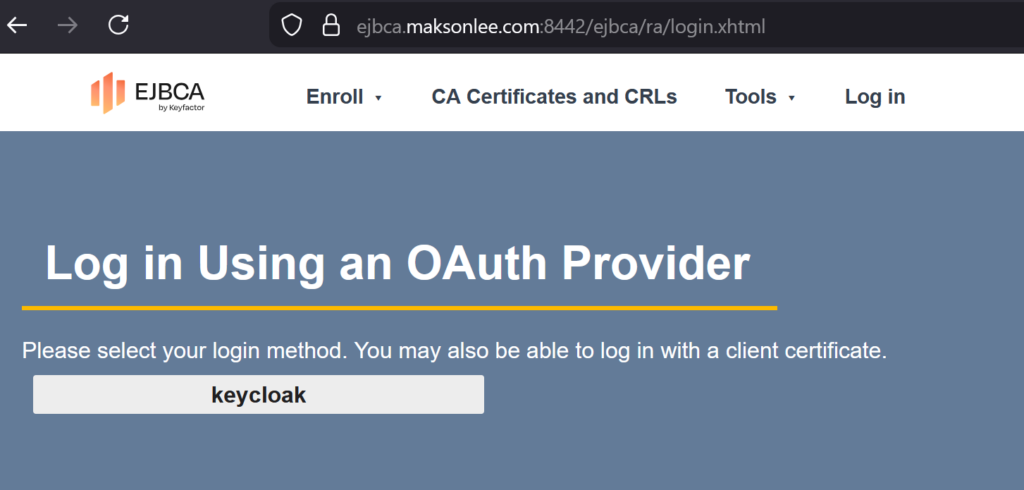
Open RA Web:
https://ejbca.maksonlee.com:8442/ejbca/ra
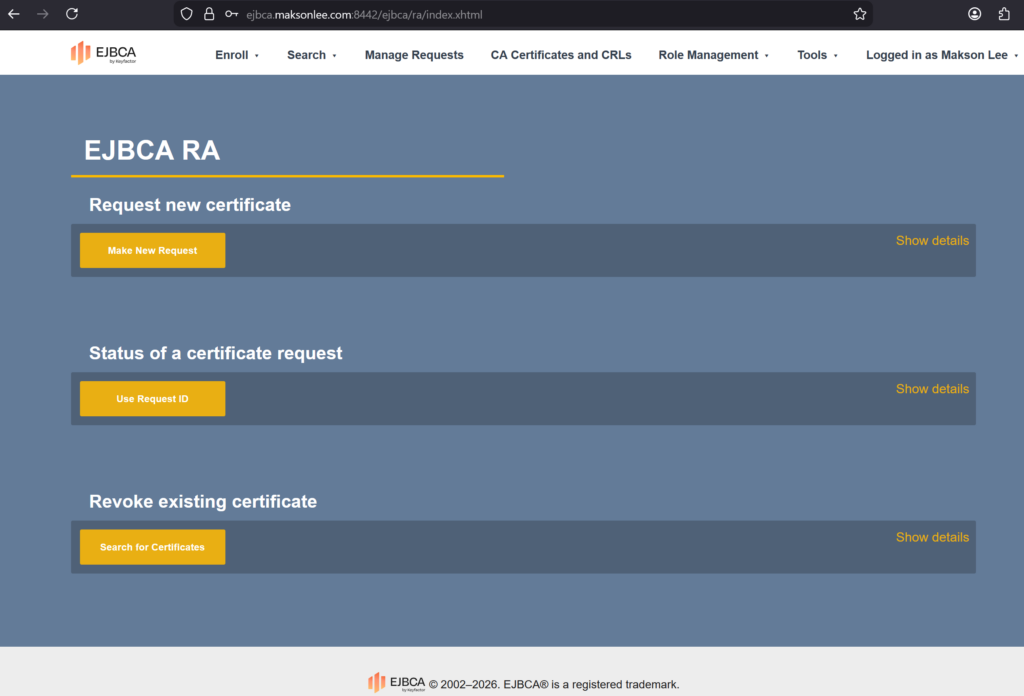
Choose the OAuth provider (keycloak) and log in. If everything is correct, you should land in RA Web with permissions granted by the mapped EJBCA role.
Did this guide save you time?
Support this site