This post shows how to enroll a self-hosted PostgreSQL (Ubuntu 24.04, PostgreSQL 16) into an existing Teleport Community Edition cluster using Teleport’s Web UI PostgreSQL wizard, while keeping PostgreSQL’s server TLS certificate managed by Step CA (ACME v2) and Certbot.
Key idea: two directions of trust
- Teleport → PostgreSQL (server identity): Teleport’s Database Service must trust the CA that signed the PostgreSQL server certificate (Step CA root/intermediate).
- PostgreSQL → Teleport (client identity): PostgreSQL must trust Teleport’s DB client CA so it can verify the short-lived client certificates presented during
tsh db connect.
This post is based on
Design goals
- Teleport is internal-only (LAN/VPN). Web UI:
https://teleport.maksonlee.com - PostgreSQL host:
artifactory.maksonlee.com - PostgreSQL server TLS is issued and auto-renewed by Step CA + Certbot
- Human DB access is enforced via Teleport Database Access (short-lived client certs + audit)
Lab context
- OS: Ubuntu 24.04 (noble)
- Teleport Proxy:
teleport.maksonlee.com:443 - Step CA:
https://stepca.maksonlee.com - PostgreSQL: 16 (
/etc/postgresql/16/main) - PostgreSQL hostname:
artifactory.maksonlee.com
What you’ll build
- A Teleport Database resource for PostgreSQL
- PostgreSQL server certificate issued by Step CA via ACME + Certbot (standalone / HTTP-01)
- PostgreSQL client-certificate authentication that trusts Teleport DB client CA (mTLS)
- A Teleport role for database access (wildcard for quick testing)
- Test access using an existing Teleport user
Prerequisites
- Step CA ACME provisioner is already enabled (ACME directory reachable)
artifactory.maksonlee.comresolves correctly in your internal DNS- During Certbot issuance/renewal (standalone / HTTP-01), TCP/80 must be reachable on the PostgreSQL host
- You have a Teleport admin user to run
tctlon the Teleport server and to complete the Web UI wizard - A client machine has
tshandpsqlinstalled for testing
- Install packages on the PostgreSQL host
On artifactory.maksonlee.com:
sudo apt update
sudo apt install -y certbot curl ca-certificates openssl- Trust Step CA on the Teleport Database Service host (artifactory)
Where to run this: artifactory.maksonlee.com (in this lab, it runs both PostgreSQL and the Teleport Database Service).
Download the Step CA root certificate(s) and install them into the OS trust store:
# Note: Use -k only for the initial bootstrap (when the host does not yet trust Step CA).
sudo curl -kfsS https://stepca.maksonlee.com/roots.pem -o /tmp/stepca-roots.pem
openssl x509 -in /tmp/stepca-roots.pem -noout -subject -issuer -fingerprint -sha256

sudo install -m 0644 /tmp/stepca-roots.pem \
  /usr/local/share/ca-certificates/stepca-root-ca.crt

sudo update-ca-certificates- Issue a PostgreSQL server certificate from Step CA (ACME v2) using Certbot (standalone)
Run on artifactory.maksonlee.com:
sudo certbot certonly --standalone -n \
  -d artifactory.maksonlee.com \
  --cert-name postgres-internal \
  --server https://stepca.maksonlee.com/acme/acme-internal/directory \
--agree-tos --email admin@maksonlee.comExpected output paths:
/etc/letsencrypt/live/postgres-internal/fullchain.pem/etc/letsencrypt/live/postgres-internal/privkey.pem
Note (short-lived server certificate): In this lab, the PostgreSQL server certificate is intentionally short-lived (48 hours). The lifetime is enforced by Step CA (ACME provisioner policy). Certbot will renew it automatically (we run certbot renew daily), so the server certificate stays fresh without manual work.
(Optional) Verify the current certificate validity (start/end):
sudo openssl x509 -in /etc/letsencrypt/live/postgres-internal/fullchain.pem -noout -startdate -enddateExample output:
notBefore=Jan 30 10:18:21 2026 GMT
notAfter=Feb 1 10:19:21 2026 GMT- Place the Step CA–issued PostgreSQL server certificate and key where PostgreSQL can read them securely
PostgreSQL requires tight permissions on private keys.
Copy the certificate and key as postgres-owned files:
sudo install -o postgres -g postgres -m 0644 \
  /etc/letsencrypt/live/postgres-internal/fullchain.pem \
  /var/lib/postgresql/16/main/server.crt

sudo install -o postgres -g postgres -m 0600 \
  /etc/letsencrypt/live/postgres-internal/privkey.pem \
/var/lib/postgresql/16/main/server.key- Create a DB access role (wildcard, for quick testing) before running the UI wizard
Teleport’s PostgreSQL wizard may temporarily add db_users / db_names traits to the user running the wizard so it can complete the “Test Connection” step.
To keep the flow clean, create the wildcard DB role first and assign it to the setup user (e.g., teleport-admin) before you run the wizard.
On the Teleport server, create db.yaml:
cat > db.yaml <<'EOF'
kind: role
version: v8
metadata:
  name: db
spec:
  allow:
    db_labels:
      "*": "*"
    db_users: ["*"]
    db_names: ["*"]
EOFApply it:
sudo tctl create -f db.yamlAssign it in the Web UI:
- Go to Management → Users
- Click your setup user (example:
teleport-admin) - Edit Roles
- Add role:
db - Save
(You can also assign it to your final test user teleport-test now, or later.)
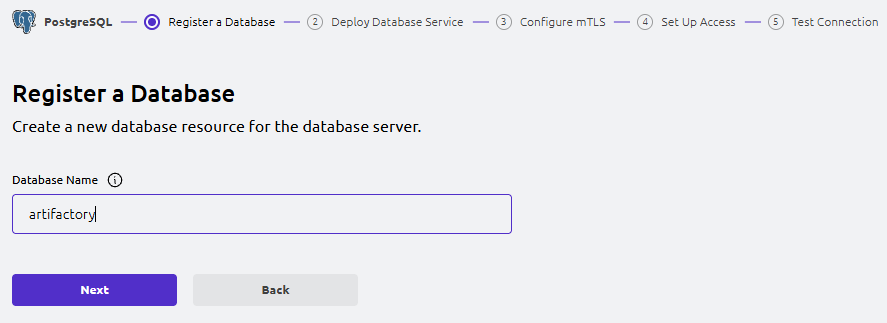
- Teleport Web UI: Register a Database (wizard Step 1)
In the Web UI, go to:
- Add New → PostgreSQL
- Register a Database
Add New → PostgreSQL
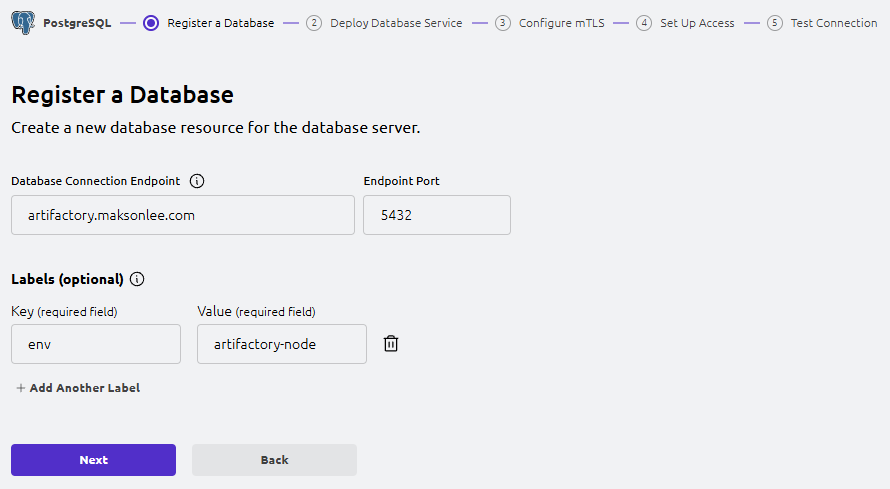
Fill in:
- Database Name:
artifactory - Database Connection Endpoint:
artifactory.maksonlee.com - Endpoint Port:
5432 - Labels:
- Key: env
- Value: artifactory-node
Click Next.
Use a stable DNS name even for local databases (recommended)
Because the PostgreSQL server certificate includes artifactory.maksonlee.com in its SAN, register the database in Teleport using the same hostname so TLS hostname verification succeeds.
Because PostgreSQL runs on the same host as the Teleport Database Service, map the hostname to loopback:
# On the Teleport Database Service host
echo "127.0.0.1 artifactory.maksonlee.com" | sudo tee -a /etc/hosts

# Verify name resolution
getent hosts artifactory.maksonlee.com- Teleport Web UI: Deploy Database Service (wizard Step 2)
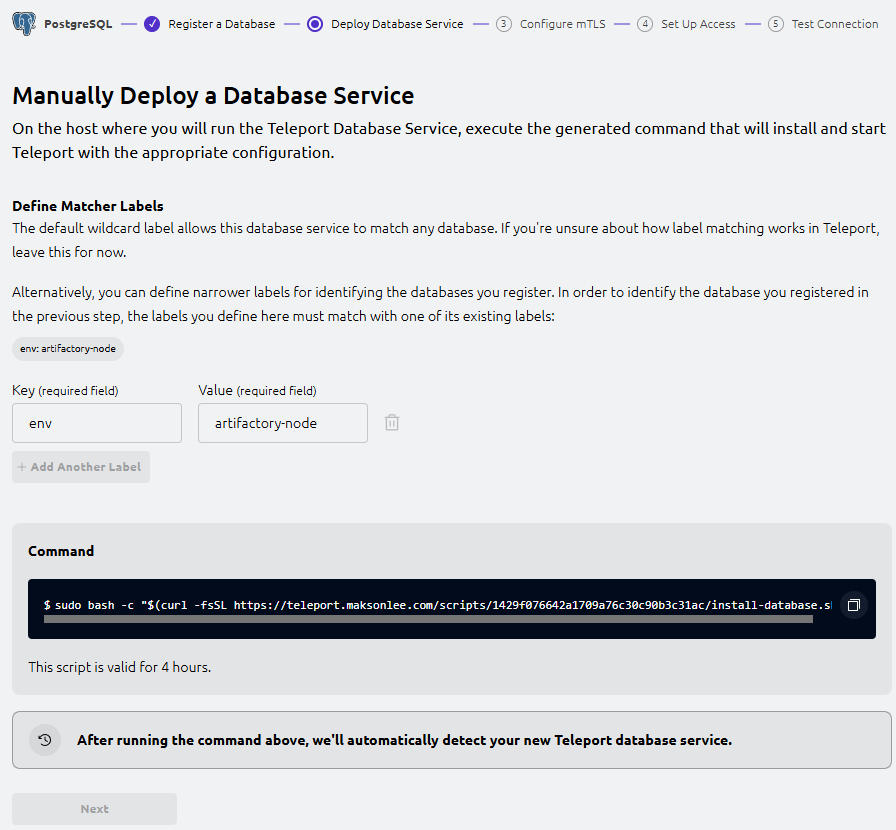
The wizard shows “Manually Deploy a Database Service” and generates a command similar to:
sudo bash -c "$(curl -fsSL https://teleport.maksonlee.com/scripts/<id>/install-database.sh)"Run the exact command shown in your UI on artifactory.maksonlee.com.
Verify the service:
sudo systemctl status teleport --no-pager
sudo cat /etc/teleport.yamlOnce the UI detects the Database Service, click Next.
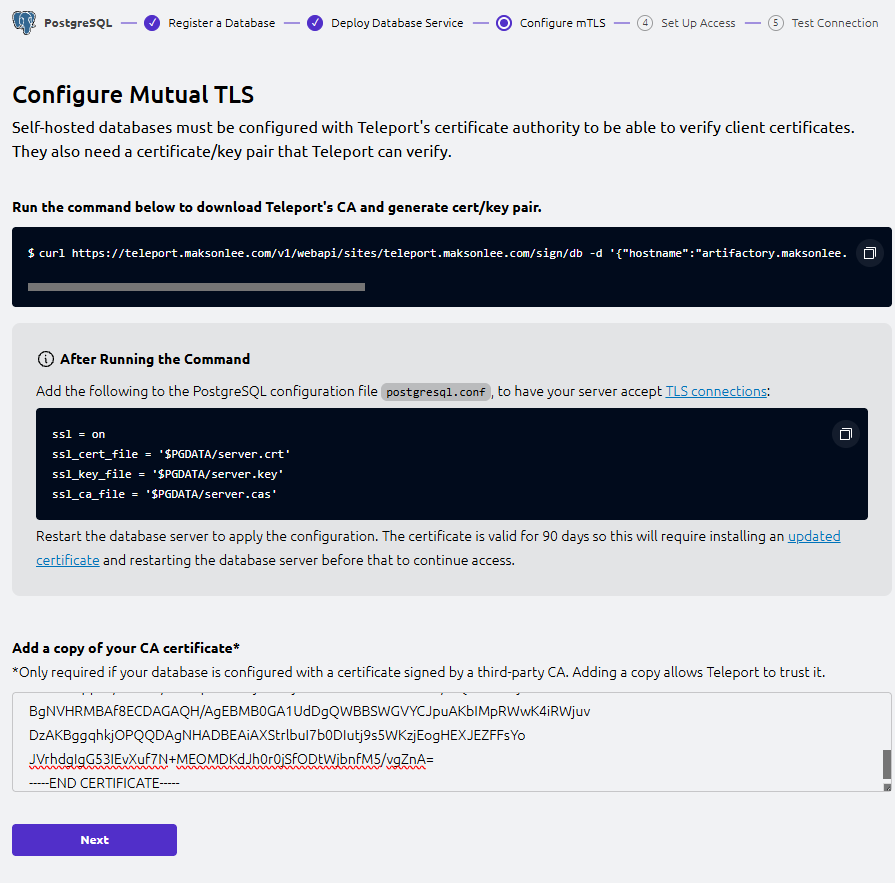
- Teleport Web UI: Configure Mutual TLS (wizard Step 3)
This step configures mTLS between Teleport’s Database Service and PostgreSQL:
- Teleport issues short-lived client certificates for humans (via
tsh) - PostgreSQL must trust Teleport’s DB client CA
- Teleport Database Service must trust Step CA to verify the PostgreSQL server cert
Run the wizard’s “download CA + generate cert/key” command
On artifactory.maksonlee.com, run the exact curl ... /sign/db ... command shown in the UI.
This generates a bundle including:
server.cas(CA bundle for verifying Teleport DB client certs)server.crt/server.key(Teleport-signed server cert/key)
We keep Step CA as the issuer for PostgreSQL’s server identity, so we only need server.cas from this output.
Note on $PGDATA: The wizard uses $PGDATA as a placeholder for PostgreSQL’s data directory (data_directory). On Ubuntu (PostgreSQL 16 packages), this is typically /var/lib/postgresql/16/main. Verify the exact path on your host with:
sudo -u postgres psql -tAc "show data_directory;"Install server.cas for PostgreSQL to use:
sudo install -o postgres -g postgres -m 0644 server.cas \
/var/lib/postgresql/16/main/server.casAdd the database server CA certificate (Step CA) in the UI
In the UI text box “Add a copy of your CA certificate”, paste the Step CA Root (and intermediate if you use one) in PEM format:
-----BEGIN CERTIFICATE-----
...
-----END CERTIFICATE-----This allows Teleport Database Service to trust and verify the PostgreSQL server certificate chain.
Click Next.
- Update postgresql.conf for TLS
If you are still using the default Ubuntu “snakeoil” certificate paths, they look like:
ssl = on
ssl_cert_file = '/etc/ssl/certs/ssl-cert-snakeoil.pem'
ssl_key_file = '/etc/ssl/private/ssl-cert-snakeoil.key'Update it to:
- Use the Step CA-issued server cert/key (from Step 4)
- Use Teleport’s client CA bundle
server.cas(from Step 8)
Edit:
sudo -u postgres vi /etc/postgresql/16/main/postgresql.confSet:
ssl = on

# Step CA-issued server identity
ssl_cert_file = '/var/lib/postgresql/16/main/server.crt'
ssl_key_file  = '/var/lib/postgresql/16/main/server.key'

# Trust Teleport DB client CA for client-certificate auth
ssl_ca_file = '/var/lib/postgresql/16/main/server.cas'Restart PostgreSQL:
sudo systemctl restart postgresql- Teleport Web UI: Set Up Access (wizard Step 4)
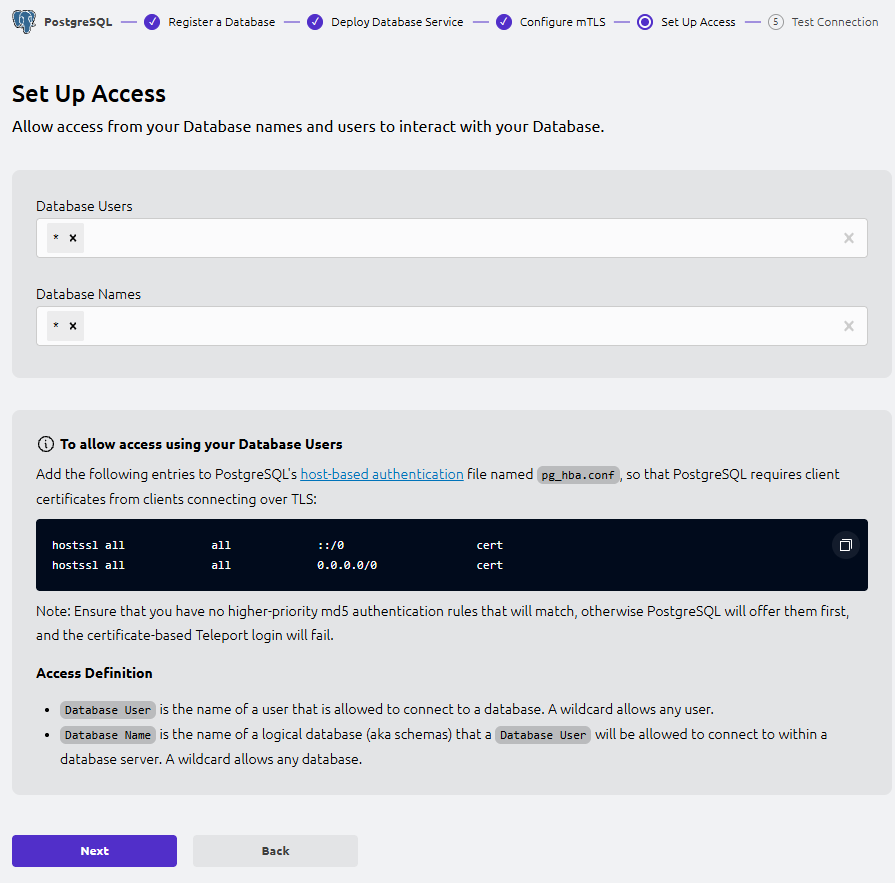
This step defines which DB users (--db-user) and DB names (--db-name) Teleport will allow for database access.
- Database Users: allowed DB usernames (e.g.
artifactory,postgres).*means any DB user. - Database Names: allowed PostgreSQL database names (e.g.
artifactory,postgres).*means any DB name.
For quick testing, set both to *.
Update pg_hba.conf (keep password logins; add the UI rules as-is)
The UI shows these pg_hba.conf rules:
hostssl all  all  ::/0        cert
hostssl all all 0.0.0.0/0 certIn this lab, password logins must remain enabled (for the application and break-glass access).
We do not use the wizard’s broad ::/0 and 0.0.0.0/0 cert rules. Instead, we enable certificate authentication only for localhost by adding a dedicated rule above the existing localhost password rule:
hostssl all  all  127.0.0.1/32  cert
host all all 127.0.0.1/32 scram-sha-256Important (first-match wins): pg_hba.conf is evaluated top-to-bottom.
hostssl rules apply only to SSL/TLS connections, so Teleport (which connects with TLS) can use certificate authentication on 127.0.0.1, while the existing non-SSL localhost rule preserves password-based access.
Edit:
sudo -u postgres vi /etc/postgresql/16/main/pg_hba.confReload PostgreSQL:
sudo systemctl reload postgresqlClick Next.
- Teleport Web UI: Test Connection (wizard Step 5)
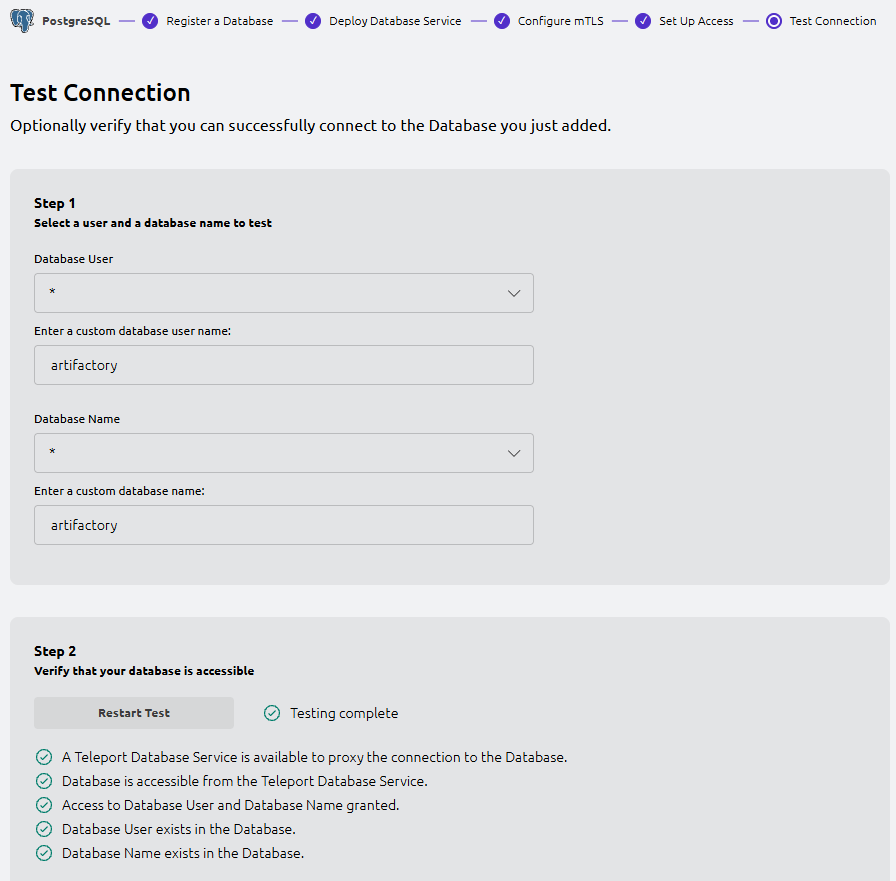
In the UI, pick a database user and database name to test (or keep the defaults) and run the test.
You should see checks like:
- A Teleport Database Service is available to proxy the connection
- Database is accessible from the Teleport Database Service
- Access to Database User and Database Name granted
- Database User exists in the Database
- Database Name exists in the Database
- Test database access via Teleport from a client machine
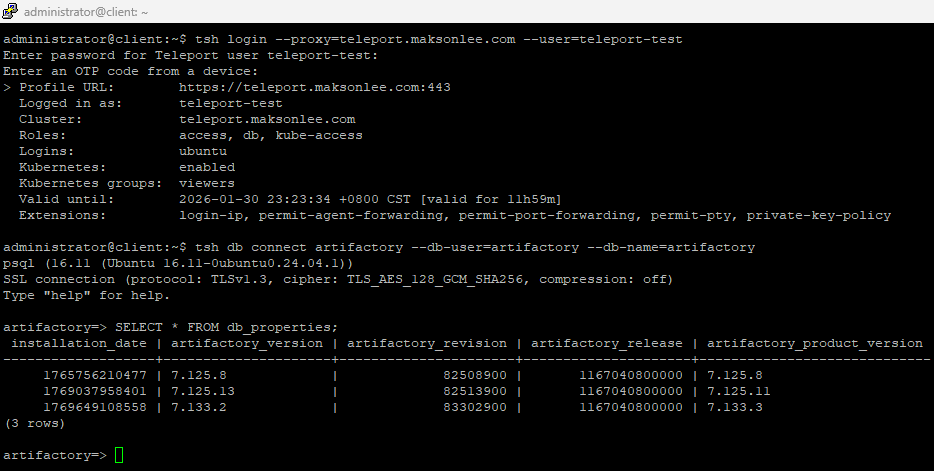
Login as your test user (example: teleport-test):
tsh login --proxy=teleport.maksonlee.com --user=teleport-testConnect (example):
tsh db connect artifactory --db-user=artifactory --db-name=artifactoryYou should land in psql without typing a database password (Teleport is using short-lived client certificates).
- Auto-renew: reload PostgreSQL after Certbot renews the Step CA-issued cert
If the host has multiple Certbot-managed certificates (e.g., one from Let’s Encrypt and one from Step CA), make the deploy hook run only when the PostgreSQL certificate (postgres-internal) is renewed. Certbot exposes the renewed certificate path via the RENEWED_LINEAGE environment variable.
Create a Certbot deploy hook on the PostgreSQL host:
sudo tee /etc/letsencrypt/renewal-hooks/deploy/90-postgres.sh >/dev/null <<'EOF'
#!/usr/bin/env bash
set -euo pipefail

# Only act on the PostgreSQL cert (cert-name: postgres-internal)
if [[ "${RENEWED_LINEAGE:-}" != "/etc/letsencrypt/live/postgres-internal" ]]; then
  exit 0
fi

install -o postgres -g postgres -m 0644 \
  "$RENEWED_LINEAGE/fullchain.pem" \
  /var/lib/postgresql/16/main/server.crt

install -o postgres -g postgres -m 0600 \
  "$RENEWED_LINEAGE/privkey.pem" \
  /var/lib/postgresql/16/main/server.key

systemctl reload postgresql
EOF

sudo chmod +x /etc/letsencrypt/renewal-hooks/deploy/90-postgres.shDry-run renewal (test only this Step CA-managed certificate and force the Step CA ACME directory):
sudo certbot renew --cert-name postgres-internal --dry-run \
--server https://stepca.maksonlee.com/acme/acme-internal/directorySummary
You now have:
- PostgreSQL server TLS issued/renewed by Step CA (ACME v2) + Certbot (standalone)
- PostgreSQL configured to trust Teleport DB client CA (
server.cas) for client-certificate authentication - Teleport Database Service deployed using the Web UI wizard
- A wildcard
dbrole for quick testing, assigned to the setup user and/or test user - Human DB access via
tsh db connectwith audit and centralized access control
Did this guide save you time?
Support this site