This is the reverse of my previous migration (VMware Workstation → KVM). The safe, repeatable flow is:
Shutdown the VM → identify the active disk → flatten qcow2 backing chain → convert to a single-file VMDK → copy to Windows via scp → create a VMware VM using the existing disk → keep existing VMDK format → (optional) keep the original MAC → fix netplan to the new interface name.
This post is based on
Lab context
- Source host: Ubuntu 24.04 + KVM/libvirt
- Tools:
virsh,qemu-img - Source disk: qcow2 (may be overlay + backing file)
- Destination host: Windows 10/11 + VMware Workstation Pro
- Destination disk: VMDK (single file)
Example VM used in this post:
- VM name:
backstage - Active disk:
/var/lib/libvirt/images/backstage.2026-01-18T12:41 - Backing file:
/var/lib/libvirt/images/backstage.qcow2 - Export target:
/tmp/backstage.vmdk(so a normal user can scp it)
- Shut down the KVM VM
Always shut down the VM before converting disks.
sudo virsh shutdown backstage
sudo virsh domstate backstageYou want:
shut off- Identify the active disk path
sudo virsh domblklist backstage --detailsExample:
Type   Device   Target   Source
------------------------------------------------------------------------------
 file   disk     vda      /var/lib/libvirt/images/backstage.2026-01-18T12:41
file cdrom sda -So the active disk is:
- /var/lib/libvirt/images/backstage.2026-01-18T12:41
- Check whether the qcow2 has a backing file (overlay)
In KVM/libvirt, seeing a qcow2 with a backing file often means you are running on a qcow2 overlay. In practice, that overlay is frequently created by snapshots (or by “base image + overlay” workflows). The key point for migration is the same: the VM’s latest state is split across multiple files, so you should flatten it before converting.
Check the qcow2 metadata:
sudo qemu-img info /var/lib/libvirt/images/backstage.2026-01-18T12:41If you see backing file: ..., your VM is using an overlay backed by a base image. Export safely by flattening first.
- Flatten to a standalone qcow2
Flatten the VM disk into a self-contained qcow2:
sudo su -
qemu-img convert -p -O qcow2 \
  /var/lib/libvirt/images/backstage.2026-01-18T12:41 \
/tmp/backstage-flat.qcow2Verify it’s standalone (no backing file):
qemu-img info /tmp/backstage-flat.qcow2- Convert the flattened qcow2 to a single-file VMDK
Convert to a VMware Workstation-friendly monolithicSparse VMDK:
qemu-img convert -p -f qcow2 -O vmdk \
  -o subformat=monolithicSparse,compat6 \
  /tmp/backstage-flat.qcow2 \
  /tmp/backstage.vmdk
chmod 0644 /tmp/backstage.vmdkVerify:
qemu-img info /tmp/backstage.vmdk
ls -l /tmp/backstage.vmdkYou should see:
create type: monolithicSparse- permissions like
-rw-r--r--(0644), which means it’s readable by normal users
- Copy the VMDK to Windows using scp
From your Windows host (PowerShell):
cd D:\
scp administrator@cdlee-miniu.maksonlee.com:/tmp/backstage.vmdk .The first time, you may be prompted to accept the host key. After transfer, you’ll have:
- D:\backstage.vmdk
- Create a VMware Workstation VM using the existing VMDK
In VMware Workstation Pro:
- File → New Virtual Machine
- Choose Custom (advanced)
- Select I will install the operating system later
- Pick the correct Guest OS type/version
- On Select a Disk, choose:
- Use an existing virtual disk
- Browse to:
D:\backstage.vmdk- Finish the wizard
- When prompted “Convert existing virtual disk to newer format?”
VMware may show a popup:
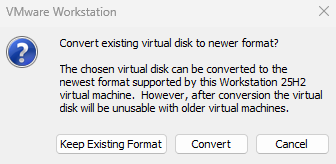
Choose:
- Keep Existing Format
Reason: it’s not required for a disk you just imported, and converting can reduce compatibility with older VMware versions. You can convert later if you actually need it.
- Move the VMDK into the VM folder
It’s cleaner to keep the VM config files and disk together. For example:
- D:\Virtual Machines\backstage\backstage.vmdk
Move it:
New-Item -ItemType Directory -Force "D:\Virtual Machines\backstage" | Out-Null
Move-Item "D:\backstage.vmdk" "D:\Virtual Machines\backstage\backstage.vmdk"Re-attach the disk using the UI only:
- VM is powered off
- Edit virtual machine settings
- Select Hard Disk
- If it points to the old path, click Remove (remove from VM, do not delete files)
- Click Add…
- Hard Disk → Next
- Choose SATA (or keep the default you used)
- Choose Use an existing virtual disk
- Select
D:\Virtual Machines\backstage\backstage.vmdk - Finish → OK
- Keep the original MAC address
If you rely on DHCP reservations or firewall rules tied to MAC, you can set the VMware NIC MAC to match the original.
In VMware Workstation:
- Edit virtual machine settings
- Network Adapter
- Advanced…
- Enter the original MAC in MAC Address
- OK → OK
Warning: do not run two machines on the same LAN with the same MAC.
- Fix networking inside the guest (netplan interface name changed)
After moving from KVM to VMware, the Linux NIC name often changes. Netplan may still reference the old interface name from KVM, so the VM boots without networking.
Inside the guest:
- Check the actual interface name:
ip -br link- Open netplan:
sudo vi /etc/netplan/50-cloud-init.yaml- Update the interface name under
ethernets:to match what you saw inip -br link, then apply:
sudo netplan apply- Verify your NIC has an IP:
ip a
ip route- Remove QEMU Guest Agent and Install VMware Tools
After moving the VM from KVM to VMware, the QEMU guest agent is no longer useful. On VMware, you should run VMware Tools (on Ubuntu: open-vm-tools) for clean shutdown, time sync, better network handling, and smoother console experience.
Remove QEMU guest agent:
sudo apt purge qemu-guest-agent
sudo apt autoremoveInstall VMware Tools (open-vm-tools):
sudo apt update
sudo apt install open-vm-toolsEnable and verify:
sudo systemctl enable --now open-vm-tools
systemctl status open-vm-tools(Optional) reboot once after install:
sudo rebootDid this guide save you time?
Support this site