This post extends
and shows how to add Amazon EBS as persistent storage using the AWS EBS CSI driver.
You’ll end up with:
- A StorageClass that dynamically provisions encrypted gp3 EBS volumes.
- A PVC and a test Pod that writes data to
/data/out.txton an EBS volume. - Automatic cleanup of the underlying EBS volume when you delete the PVC (because we use
reclaimPolicy: Delete).
Prerequisites
You already have:
- The 3-node self-managed cluster on EC2 from the previous post:
- k8s-aws-1.maksonlee.com (10.0.128.7)
- k8s-aws-2.maksonlee.com (10.0.128.8)
- k8s-aws-3.maksonlee.com (10.0.128.9)
- All nodes are EC2 instances in the same region & AZ, running Ubuntu 24.04.
- Kubernetes v1.34 installed via apt.
kubectlcontext pointing at the cluster.awsCLI configured with permissions to create IAM roles and instance profiles.- Helm 3 installed on
k8s-aws-1(you already used it for Traefik; if not, install it as in the previous post).
EBS CSI driver supports all Kubernetes versions supported by Kubernetes/EKS, including ARM64 (Graviton) nodes.
- Create an IAM Role and Instance Profile for the EBS CSI Driver
The EBS CSI driver needs permission to create, attach, and delete EBS volumes. We’ll give those permissions to the EC2 instances via an instance profile, so the driver simply uses the node’s IAM role.
On your management machine (where aws CLI is configured), run:
# 1. Create an IAM role for EC2 instances
aws iam create-role \
  --role-name K8sEBSRole \
  --assume-role-policy-document '{
    "Version": "2012-10-17",
    "Statement": [
      {
        "Effect": "Allow",
        "Principal": {
          "Service": "ec2.amazonaws.com"
        },
        "Action": "sts:AssumeRole"
      }
    ]
  }'

# 2. Attach the AWS-managed policy for the EBS CSI driver
aws iam attach-role-policy \
  --role-name K8sEBSRole \
  --policy-arn arn:aws:iam::aws:policy/service-role/AmazonEBSCSIDriverPolicy

# 3. Create an instance profile
aws iam create-instance-profile \
  --instance-profile-name K8sEBSProfile

# 4. Add the role into the instance profile
aws iam add-role-to-instance-profile \
  --instance-profile-name K8sEBSProfile \
--role-name K8sEBSRoleThis gives any EC2 instance that uses K8sEBSProfile the right permissions for the EBS CSI driver.
Attach the instance profile to your Kubernetes nodes
If you already launched the three nodes, attach the profile to each instance:
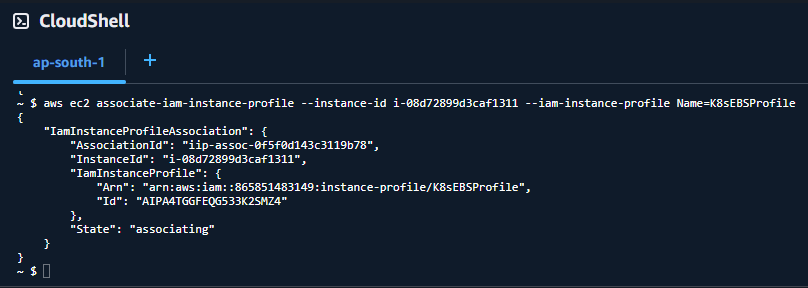
# Example – repeat for all three instances
aws ec2 associate-iam-instance-profile \
  --instance-id i-xxxxxxxxxxxxxxxxx \
--iam-instance-profile Name=K8sEBSProfileReplace i-xxxxxxxxxxxxxxxxx with the instance IDs for:
- k8s-aws-1
- k8s-aws-2
- k8s-aws-3
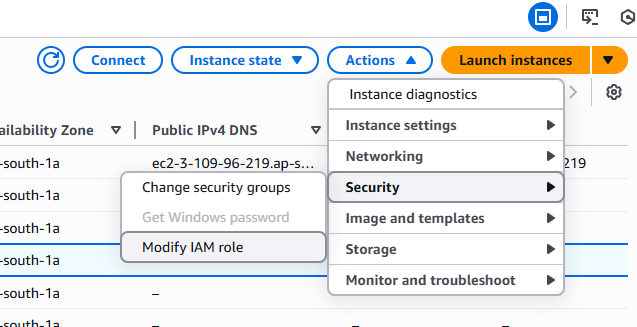
You can do this from the console instead if you prefer (EC2 → Instances → Actions → Security → Modify IAM role).
After attaching, either:
- Reboot the nodes, or
- Restart any components that might cache metadata credentials (usually a reboot is easiest in a lab).
- Install the AWS EBS CSI Driver (Helm)
On k8s-aws-1 (with kubectl and Helm configured):
# If Helm isn't installed yet, do it (otherwise skip)
curl https://raw.githubusercontent.com/helm/helm/main/scripts/get-helm-3 | bash

# Add the EBS CSI Helm repo
helm repo add aws-ebs-csi-driver https://kubernetes-sigs.github.io/aws-ebs-csi-driver
helm repo update

# Install the driver into kube-system
helm upgrade --install aws-ebs-csi-driver \
  --namespace kube-system \
aws-ebs-csi-driver/aws-ebs-csi-driverCheck that the driver pods are running:
kubectl get pods -n kube-system -l app.kubernetes.io/name=aws-ebs-csi-driverYou should see controller and node pods in Running state.

- Create a StorageClass for Encrypted gp3 EBS
Create ebs-sc.yaml:
# ebs-sc.yaml
apiVersion: storage.k8s.io/v1
kind: StorageClass
metadata:
  name: ebs-sc
provisioner: ebs.csi.aws.com
parameters:
  type: gp3
  encrypted: "true"
reclaimPolicy: Delete
allowVolumeExpansion: true
volumeBindingMode: WaitForFirstConsumerApply it:
kubectl apply -f ebs-sc.yaml
kubectl get storageclassNotes:
type: gp3– uses modern gp3 volumes by default (cheaper and flexible IOPS/throughput).encrypted: "true"– EBS volumes are created as encrypted (using default KMS key unless you override it).reclaimPolicy: Delete– when you delete the PVC, the PV and underlying EBS volume are deleted.volumeBindingMode: WaitForFirstConsumer– the volume is created in the same AZ as the node where the first Pod using it is scheduled, which is required because EBS volumes are AZ-scoped.
- Create a PVC
Create ebs-claim.yaml:
# ebs-claim.yaml
apiVersion: v1
kind: PersistentVolumeClaim
metadata:
  name: ebs-claim
spec:
  accessModes:
    - ReadWriteOnce
  storageClassName: ebs-sc
  resources:
    requests:
storage: 4GiApply:
kubectl apply -f ebs-claim.yaml
kubectl get pvcYou should see:
STATUS: PendingSTORAGECLASS:ebs-sc
After you start a Pod that uses this PVC, Kubernetes will create a 4 GiB gp3 EBS volume in the same AZ as the node where the Pod is scheduled. You’ll then see that volume in the AWS console.
- Run a Test Pod That Writes to the EBS Volume
Create ebs-app.yaml:
# ebs-app.yaml
apiVersion: v1
kind: Pod
metadata:
  name: ebs-app
spec:
  containers:
  - name: app
    image: ubuntu:20.04
    command: ["/bin/bash"]
    args: ["-c", "apt-get update >/dev/null 2>&1 || true; while true; do date -u >> /data/out.txt; sleep 5; done"]
    volumeMounts:
    - name: persistent-storage
      mountPath: /data
  volumes:
  - name: persistent-storage
    persistentVolumeClaim:
claimName: ebs-claimApply:
kubectl apply -f ebs-app.yaml
kubectl get pods ebs-appWait until the Pod is Running, then:
kubectl exec -it ebs-app -- tail -n 5 /data/out.txtYou should see timestamps being appended every 5 seconds.
This confirms:
- The Pod can mount the EBS-backed volume at
/data. - Data written there is persistent (not lost when the container restarts).
To see persistence across Pod recreation:
# Delete the Pod (PVC stays)
kubectl delete pod ebs-app

# Recreate the Pod
kubectl apply -f ebs-app.yaml

# After it’s Running again:
kubectl exec -it ebs-app -- tail -n 10 /data/out.txtYou’ll see old + new timestamps in the same file: the volume was reattached to the new Pod, using the same PVC.
- Cleanup (Optional)
If this was just a test:
# Delete the test Pod and PVC
kubectl delete pod ebs-app
kubectl delete pvc ebs-claim

# Optionally delete the StorageClass
kubectl delete storageclass ebs-scBecause the StorageClass used reclaimPolicy: Delete, the underlying EBS volume will also be deleted automatically when you delete the PVC.
Did this guide save you time?
Support this site