This is a tiny delta to my previous guide (HTTPS + Nginx + SSI already working).
The focus here is switching user-data to ZFS root while keeping everything else the same.
ZFS in 60 Seconds (Why Use It)
- Copy-on-write + checksums detect silent corruption (and self-heal on mirrors/RAIDZ).
- Instant snapshots/clones for safe upgrades and quick rollback.
- Transparent compression (e.g.,
lz4) often saves space and improves I/O. - Send/receive for fast, incremental backups and replication.
This post uses guided single-disk ZFS via Autoinstall. For mirrors/RAIDZ, use a custom curtin storage stanza.
Minimal Nginx Changes (showing only the two routes)
    # /{b|z}/{ID}/user-data  (SSI expands hostname from named capture)
    location ~ ^/(?<seed>b|z)/(?<host_id>[A-Za-z0-9._-]+)/user-data$ {
        default_type text/plain;
        ssi on; ssi_types *;
        try_files /$seed/_user.ssi =404;
        add_header Cache-Control "no-store";
    }

    # /{b|z}/{ID}/meta-data  (shared block for all seeds)
    location ~ ^/(?<seed>b|z)/(?<host_id>[A-Za-z0-9._-]+)/meta-data$ {
        default_type text/plain;
        ssi on; ssi_types *;
        try_files /$seed/_meta.ssi =404;
        add_header Cache-Control "no-store";
}Directory layout now includes the z/ seed:
/var/www/html/nocloud/
├── b/
│   ├── _meta.ssi
│   └── _user.ssi
└── z/
    ├── _meta.ssi
└── _user.ssiz/_meta.ssi (minimal)
instance-id: <!--# echo var="host_id" -->z/_user.ssi (ZFS Autoinstall user-data)
Same structure as before; the functional change is storage.layout: name: zfs with match: { size: largest }.
Still using SSI to inject <ID> into hostname.
#cloud-config
autoinstall:
  version: 1
  identity:
    hostname: <!--# echo var="host_id" -->
    username: ubuntu
    password: "$6$PWguV961aHQjVEUh$EbowTJLSSunVj2zejKxIlS9A6iRBoG8J8XKnTukaTvtyW5QUzK.XQDFv9nEDyBpSpEOmQGMteP5ucnBBI6YsV0"
  timezone: Asia/Taipei
  locale: en_US.UTF-8
  keyboard: { layout: us }
  ssh:
    install-server: true
    allow-pw: true
  apt:
    primary: [{ arches: [default], uri: http://archive.ubuntu.com/ubuntu/ }]
  storage:
    layout:
      name: zfs
      match: { size: largest }
  user-data:
    preserve_hostname: false
    package_update: true
    packages: [htop]
    runcmd:
      - [bash, -lc, "lsb_release -a || true"]
- [bash, -lc, "lsblk -f"]GRUB Kernel Argument
At the installer’s GRUB screen, press e and append (replace <ID>):
autoinstall ds="nocloud-net;s=https://nocloud.maksonlee.com/z/<ID>/"Example:
autoinstall ds="nocloud-net;s=https://nocloud.maksonlee.com/z/zfstest/"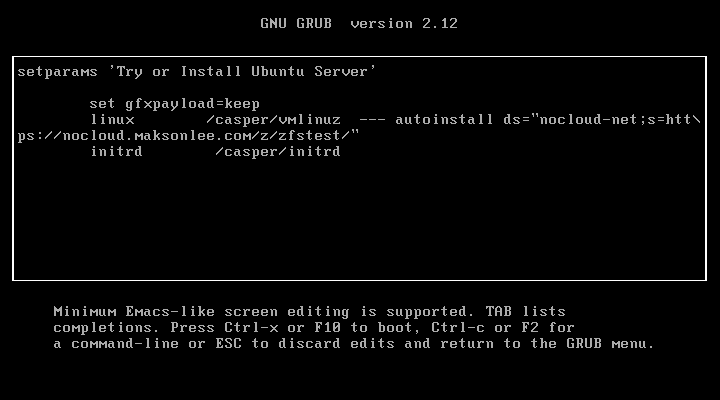
Preflight Checks
# meta-data (should render instance-id: zfstest)
curl -s https://nocloud.maksonlee.com/z/zfstest/meta-data

# user-data (hostname should render as zfstest)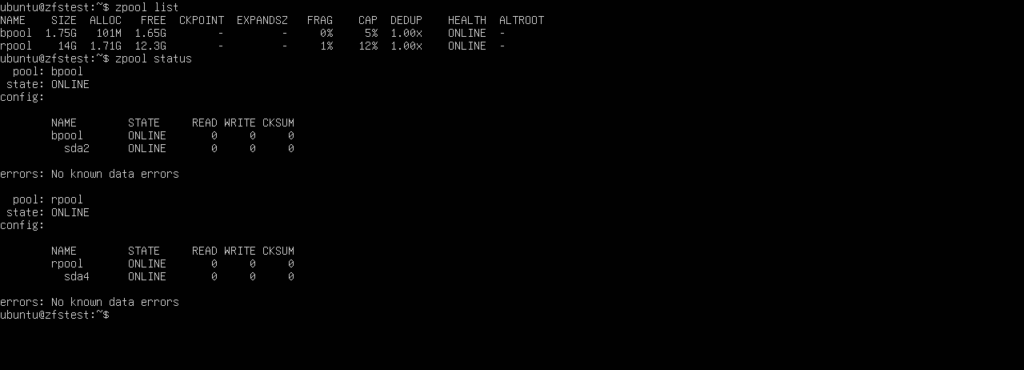
curl -s https://nocloud.maksonlee.com/z/zfstest/user-dataVerify ZFS Root After Installation
zpool list
zpool status
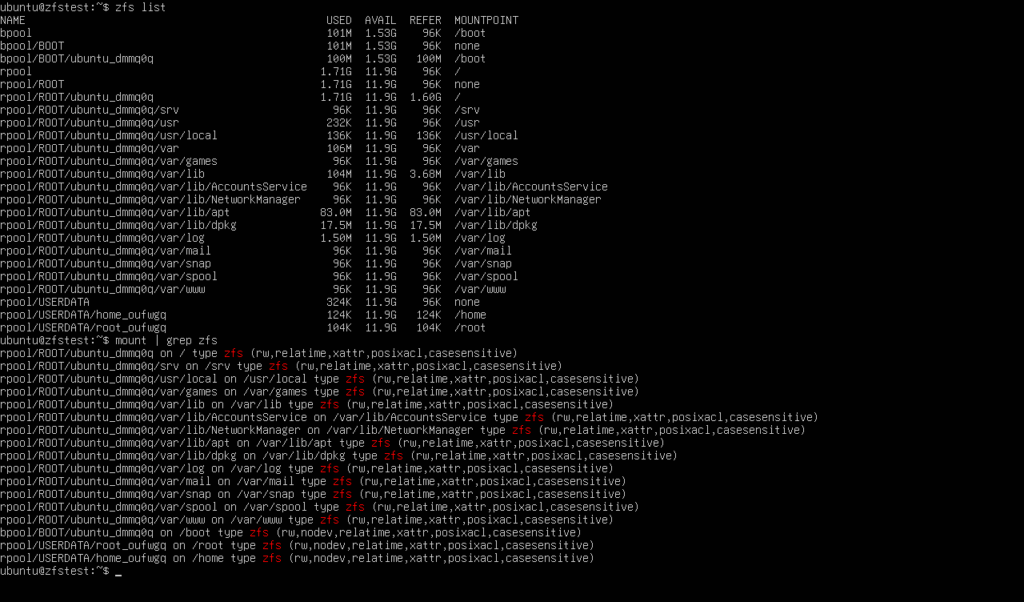
zfs list
mount | grep zfsYou should see rpool and ZFS datasets mounted at /.
ZFS Basic Commands – Cheat Sheet (add to your toolbox)
# Health / capacity / live I/O
zpool status
zpool list
zpool iostat -v 1

# Datasets & mount properties
zfs list -o name,mountpoint,used,avail
zfs get -r mountpoint,canmount,compression rpool bpool

# Snapshots (create, list, rollback)
zfs snapshot rpool/ROOT/ubuntu_$(hostname)@pre-change
zfs list -t snapshot
zfs rollback rpool/ROOT/ubuntu_$(hostname)@pre-change

# Send/receive (estimate, full, incremental)
zfs send -nPv rpool/ROOT/ubuntu_$(hostname)@pre-change      # estimate only
zfs send rpool/USERDATA/home_*@pre-change | zfs receive backup/USERDATA/home_*
zfs send -I @t1 rpool/data@t2 | zfs receive backup/data

# Common per-dataset tuning
zfs set compression=zstd atime=off rpool/data

# Backup pool (cold storage) suggested flags
zfs set primarycache=metadata atime=off backup

# Why /etc/fstab is almost empty on ZFS
findmnt -t zfs
zfs get mountpoint,canmount rpool/ROOT/ubuntu_$(hostname)

# Monthly scrub (Ubuntu has systemd timers)
sudo systemctl enable --now zpool-scrub-monthly@rpool.timer
sudo systemctl enable --now zpool-scrub-monthly@bpool.timerDid this guide save you time?
Support this site