This guide connects Zabbix 7.4 at https://zabbix.maksonlee.com to Keycloak at https://keycloak.maksonlee.com (realm maksonlee.com) using SAML 2.0, and enables Just-in-Time (JIT) provisioning so users are created automatically on first login.
You’ll configure:
- Keycloak: a SAML client + clean mappers via a dedicated client scope (username, email, groups)
- Zabbix: SAML authentication + JIT provisioning (default role/groups)
- Optional hardening: sign Zabbix AuthnRequests and require client signatures in Keycloak
- File permissions hardening: keep private keys readable by Zabbix, but not writable by the web user
What we’ll build
- Sign-in to Zabbix via Keycloak (SAML 2.0)
- JIT user creation: on first login, Zabbix creates a normal user and assigns role + groups
- Clean attribute delivery from Keycloak:
usernameemail- group list as multi-valued
member
- Optional security:
- Zabbix signs AuthnRequests / Logout requests
- Keycloak requires client signatures
Prerequisites
- Zabbix 7.4 web frontend:
https://zabbix.maksonlee.com
- Keycloak realm:
maksonlee.comathttps://keycloak.maksonlee.com
- Admin access to both
- Shell access to the Zabbix server
Default SAML certificate paths (Zabbix frontend)
Unless overridden in ui/conf/zabbix.conf.php, Zabbix reads SAML material from:
ui/conf/certs/sp.key— SP private key (used when Zabbix signs AuthnRequest / Logout)ui/conf/certs/sp.crt— SP certificate (public; import into Keycloak if you require client signatures)ui/conf/certs/idp.crt— IdP certificate (Keycloak realm signing cert used to verify assertions)
On Ubuntu/Debian, that resolves to:
- /usr/share/zabbix/ui/conf/certs/
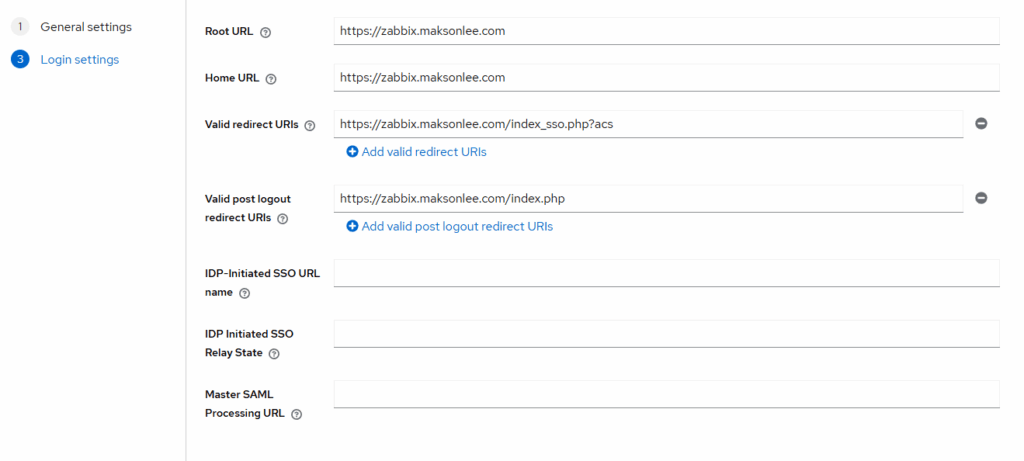
- Keycloak — create the SAML client
Clients → Create client
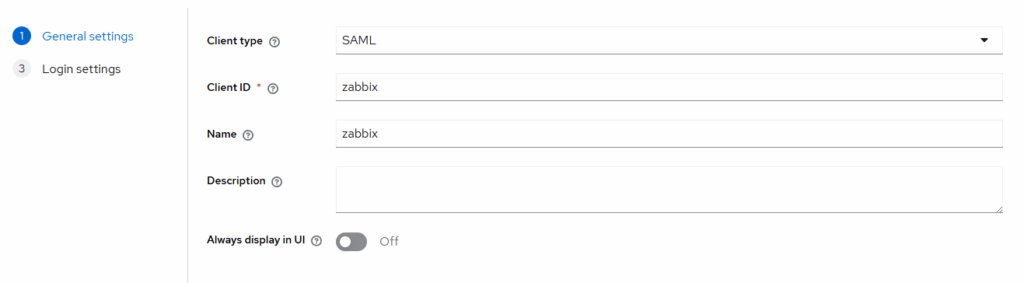
Settings:
- Name ID format: transient
- Sign Assertions: On
- Force POST binding: Off
Advanced:
- Logout Service Redirect Binding URL: https://zabbix.maksonlee.com/index_sso.php?sls
- Keycloak — add mappers via a dedicated client scope
Clients → zabbix → Client scopes
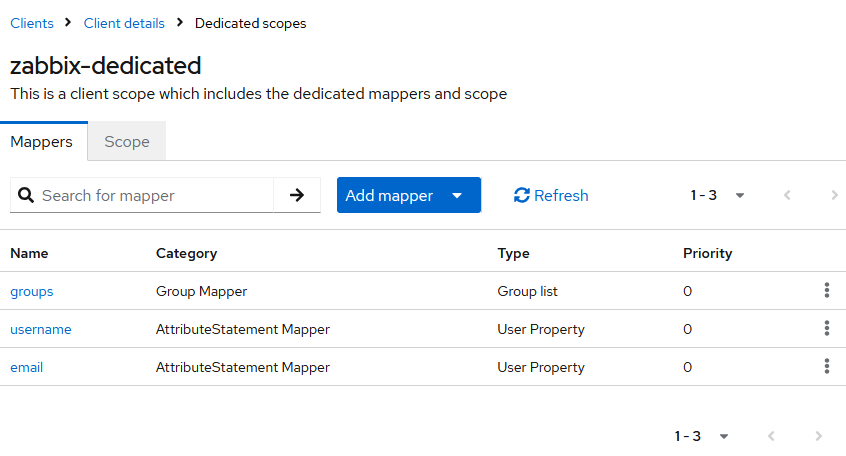
- Create a scope (e.g. zabbix-dedicated) and assign it as Default to the zabbix client.
- Inside that scope: Mappers → Add mapper — add these:
- username
- Mapper type: User Property
- Name: username
- Property:
username - SAML Attribute Name:
username
- email
- Mapper type: User Property
- Name: email
- Property:
email - SAML Attribute Name:
email
- groups
- Mapper type: Group list
- Name: groups
- Group attribute name:
member
- username
Client scopes → role_list → Mappers → role list
- Single Role Attribute: On

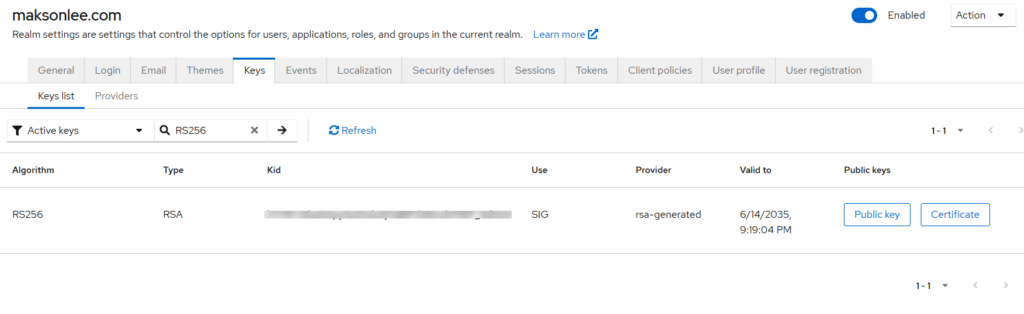
- Zabbix — install the IdP signing certificate
Zabbix should verify Keycloak’s signed assertions with the realm’s signing cert.
- In Keycloak: Realm settings → Keys → Active → (RS256) → copy the Certificate (X.509 public).
- On the Zabbix host:
sudo tee /usr/share/zabbix/ui/conf/certs/idp.crt >/dev/null <<'CRT'
-----BEGIN CERTIFICATE-----
# paste Keycloak realm signing certificate here
-----END CERTIFICATE-----
CRT
sudo chown -R www-data:www-data /usr/share/zabbix/ui/conf/certs
sudo chmod 644 /usr/share/zabbix/ui/conf/certs/idp.crt- Zabbix — configure SAML
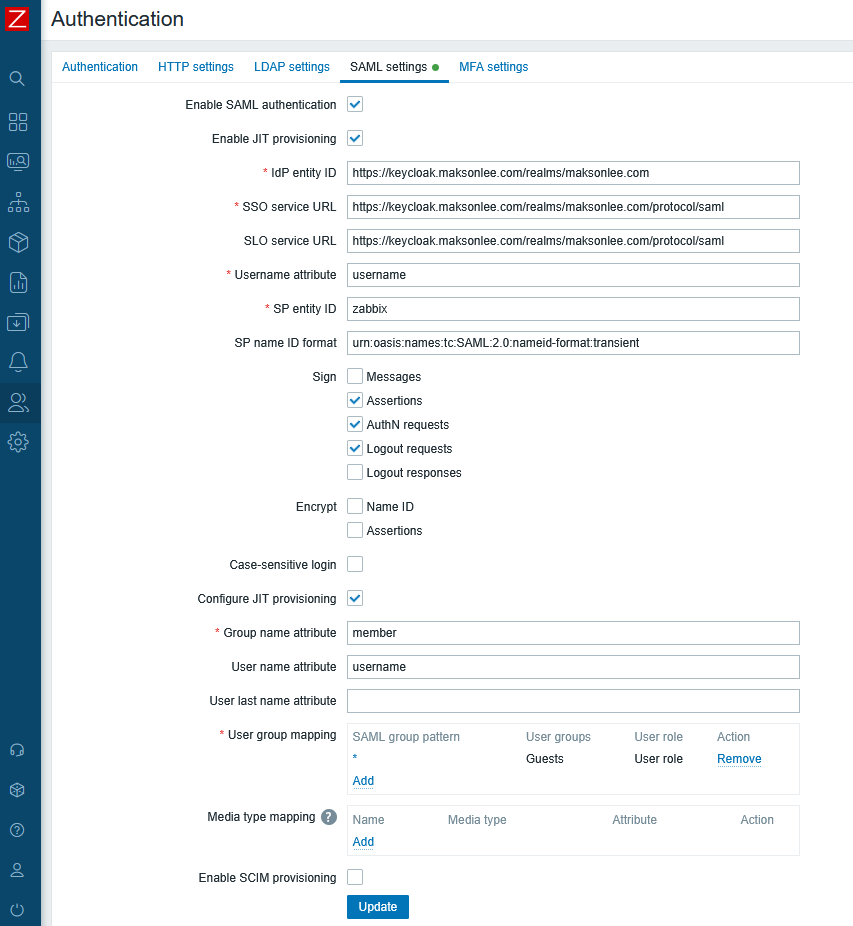
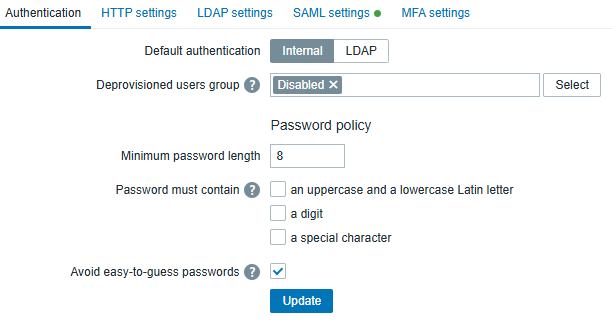
In Administration → Users → Authentication (top tab), set a Deprovisioned users group when JIT is enabled.
- Sign Zabbix AuthnRequests
Create the SP keypair at the default locations:
sudo openssl req -x509 -newkey rsa:2048 -nodes \
  -keyout /usr/share/zabbix/ui/conf/certs/sp.key \
  -out   /usr/share/zabbix/ui/conf/certs/sp.crt \
  -days 3650 -subj "/CN=zabbix.maksonlee.com"

sudo chown www-data:www-data /usr/share/zabbix/ui/conf/certs/sp.key /usr/share/zabbix/ui/conf/certs/sp.crt
sudo chmod 640 /usr/share/zabbix/ui/conf/certs/sp.key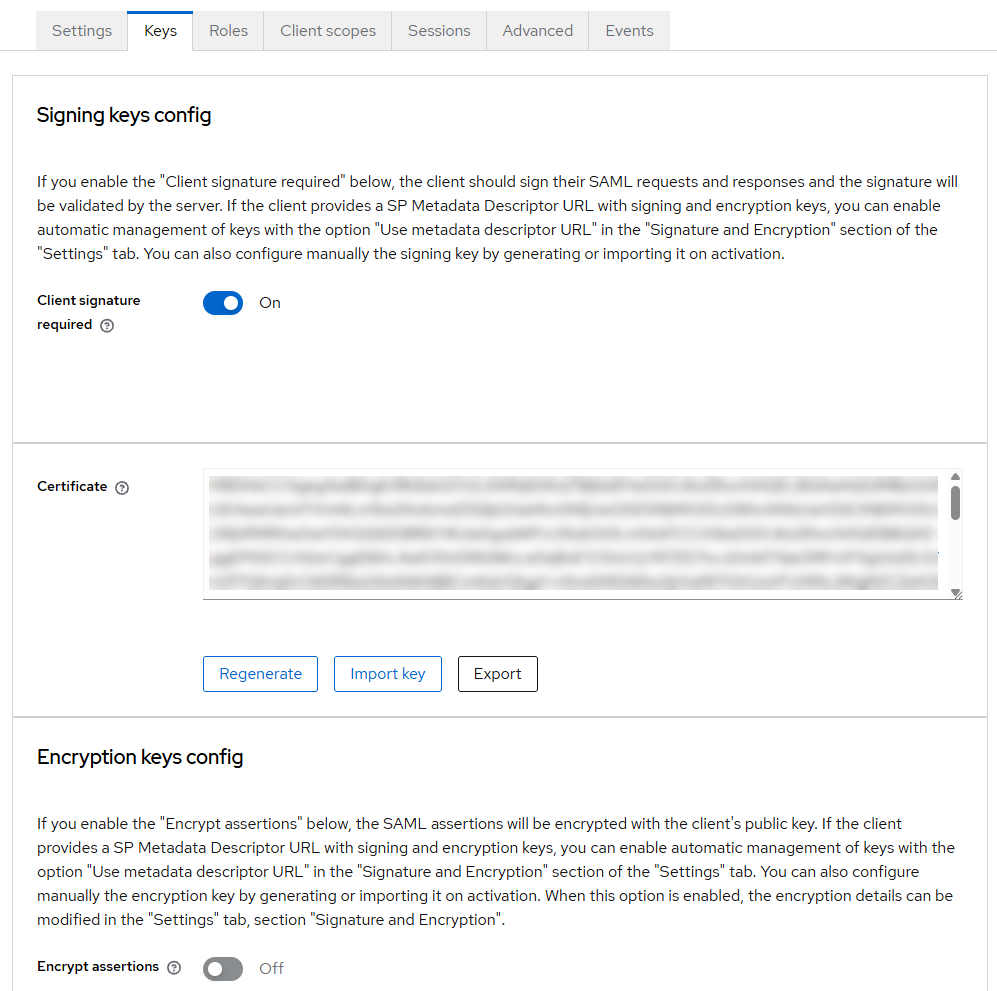
sudo chmod 644 /usr/share/zabbix/ui/conf/certs/sp.crtKeycloak → Clients → zabbix → Keys / Certificate: Import sp.crt
- Encrypt SAML assertions (optional)
If you enable Encrypt → Assertions in Zabbix (Administration → Users → Authentication → SAML settings), you must also enable Encrypt assertions in the Keycloak client.
Keycloak must encrypt using the SP public certificate (sp.crt) that matches the SP private key (sp.key) available on the Zabbix side.
Keycloak: enable encryption and import the SP certificate
In Keycloak → Clients → zabbix → Keys → Encryption keys config:
- Turn Encrypt assertions = On
- Import the SP certificate:
sp.crt
(You may reuse the samesp.crtyou already imported for client signatures, as long as it matchessp.key.)
Keycloak: set compatible encryption parameters
In Keycloak → Clients → zabbix → Signature and Encryption, set (tested working):
- Encryption algorithm:
AES_256_GCM(orAES_256_CBC) - Key transport algorithm:
RSA-OAEP-11 - Digest method for RSA-OAEP:
SHA-1 - Mask generation function:
mgf1sha1
Zabbix: enable assertion decryption
In Zabbix → Administration → Users → Authentication → SAML settings:
- Under Encrypt, enable Assertions
(Enable Name ID only if you also encrypt NameID on the Keycloak side.)
If these settings don’t match (especially the OAEP digest), Zabbix may fail to decrypt the assertion and you’ll see:
Failure decrypting Data (openssl private) … oaep decoding error
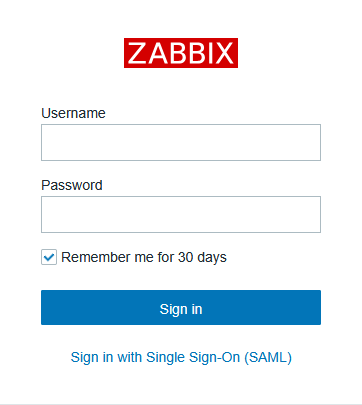
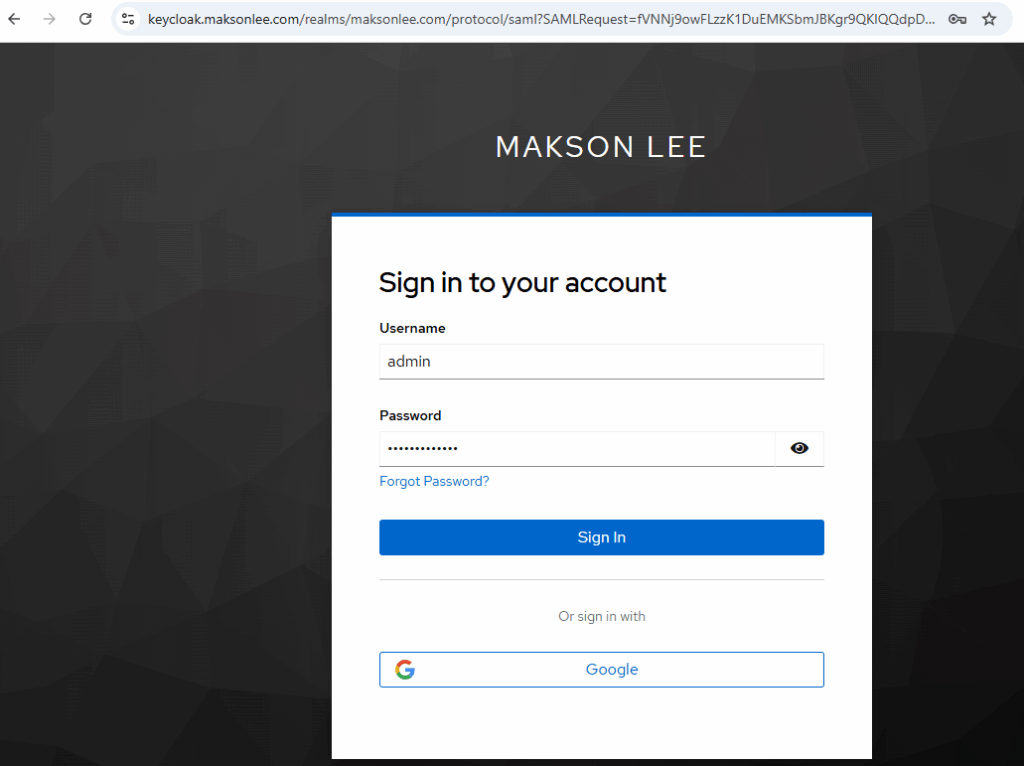
- Test SSO
- Log out of Zabbix
- Visit
https://zabbix.maksonlee.com - Click Sign in with Single Sign-On (SAML)
- Authenticate at
https://keycloak.maksonlee.com - On first login:
- Zabbix auto-creates the user
- assigns User role
- assigns default groups + mapped groups (if enabled)
- On later logins:
- the same Zabbix account is reused
- JIT does not “reset” an existing user
Docker note: cert directory + internal vs external ports (common SAML/Keycloak pitfalls)
When Zabbix runs in Docker, two things commonly differ from a bare-metal install and can break SAML:
- The web container’s internal URL/port is not the same as the public URL/port that users and Keycloak access.
- The default SAML cert directory can differ depending on the
zabbix-web-*image/tag.
Force SAML to use the public HTTPS URL (not the container port)
If your container listens on 8080 but you publish/terminate HTTPS on 443 (or 8443), Keycloak validates exact ACS/Destination URLs. Zabbix must generate SAML URLs using the external address:
services:
  zabbix-web:
    environment:
ZBX_SSO_SETTINGS: '{"strict":false,"baseurl":"https://zabbix-docker.maksonlee.com/"}'Mount SAML certs into the correct directory (varies by image)
Two common cert paths inside the Zabbix web container are:
/etc/zabbix/web/certs/usr/share/zabbix/ui/conf/certs
Mount your host cert folder to the path your container actually uses:
services:
  zabbix-web:
    volumes:
      # Option A (common):
      - /opt/zabbix-docker/saml-certs:/etc/zabbix/web/certs:ro

      # Option B (some images/layouts):
      # - /opt/zabbix-docker/saml-certs:/usr/share/zabbix/ui/conf/certs:ro
If you see “sp certs and idp certs missing and required”, Zabbix is not finding the SAML certificate files inside the web container—in Docker this is most commonly caused by mounting saml-certs to the wrong in-container path. Adjust the volume mount to the cert directory your image actually uses.
Did this guide save you time?
Support this site
Nice tutorial, thank you very much. I have one question, if I want to use keycloak to make calls to zabbix API, is this possible. Best regards.
If you want Keycloak itself to trigger Zabbix API calls (for example, right after a user logs in to Zabbix), you’d need to write a Keycloak Event Listener SPI that listens for LOGIN events and then calls the Zabbix API in the background
Hello there,
Very nice documentation. Almost works fro my setup.
I am struggling with Step5 though.
Did you upload the sp.crt file to both “Signing keys config” and “Encryption keys config” in the Keys tab of the Client configuration?
Would mind adding the complete screenshots of the Client configuration?
Thanks in advance,
Chris
P.S Again very nice and well documented process
Thanks! You only import sp.crt under Keys → Signing keys config when Client signature required = ON. You don’t put it in Encryption keys config unless you also enable Encrypt assertions (which I keep OFF). I’ve added the screenshot of the Keys tab to the post.
Great,
I have managed to proceed!.
Would you at some point be so kind to add a Zabbix docker installation part with necessary steps inside the docker?
I am struggling with the docker zabbix SSO honestly!
Best,
Chris
If you’re running zabbix/zabbix-web-nginx-mysql and exposing HTTPS directly from that container (no extra reverse proxy in front), then the Keycloak SSO steps are the same — Docker shouldn’t be the reason it breaks.
In that setup, SSO problems usually come down to URL/hostname consistency (use one canonical https://… URL), correct TLS certificate for that hostname, persistent DB volumes (so settings don’t reset), and time sync on the host.
Hello there,
After putting zabbix docker behind HTTPS I receive this error in zabbix: Invalid_array_settings – sp certs and idp certs missing and required.
Is it because of the certs themselves or am I doing something wrong here?
Keycloak side should be fine afaik with all the links changes to https.
Would you be so kind to write me some bullet points of how to configure the zabbix docker?
I think this really beneficial for other users as well.
Cheers
I’ve just published a Docker Compose baseline here (Zabbix 7.4 + HTTPS directly from the zabbix-web container, no reverse proxy, DNS-01 Certbot, bind mounts only):
https://www.maksonlee.com/run-zabbix-7-4-on-docker-compose-with-https-no-reverse-proxy-dns-01-certbot-bind-mounts-only/
I haven’t verified the Keycloak (SAML) authentication flow on this setup yet, but regarding your error (“SP certs / IdP certs missing”): in Docker this is very often caused by the cert files not being mounted into the container, incorrect paths/filenames, or file permissions (the container user can’t read them).
Hey Makson,
I have just checked your new settings it looks nice.
Also the new tutorial page on how to put Zabbix Docker behind https!
I had to update the volumes as well, plus the HTTPS URL had to be specified.
I have a working setup now.
2 Notes:
After achieving the right configuration the
– Valid redirect URIs
– Valid post logout redirect URIs
do not seem to work with the ones that you propose.
I used https://xxx.xxx.Zabbix.IP/* for both of them and it works. Let me know if you manage it with proper URIs.
In the “Keys” tab in Keycloak SP configuration I try to enable the “Encryption Config”.
I am using the sp.crt file used in the Zabbix docker files as well. Error is:
Failing decrypting data (openssl private) –
error:02000079:rsa routines:oaep decoding error
Any clue here?
Over all it is a great tutorial with the docker steps as well.
Much appreciated.
I’ve made it work with Zabbix deployed on Docker by following these two posts:
https://www.maksonlee.com/run-zabbix-7-4-on-docker-compose-with-https-no-reverse-proxy-dns-01-certbot-bind-mounts-only/
https://www.maksonlee.com/zabbix-7-4-keycloak-saml-2-0-end-to-end-setup-with-jit-provisioning/
Also noted: I’ve added a new section, “Docker note: cert directory + internal vs external ports (common SAML/Keycloak pitfalls)”.
For Zabbix-on-Docker authenticating with Keycloak (SAML), two things are critical:
1. Force SAML to use the public HTTPS URL (not the container’s internal port/URL).
2. Mount the SAML certs into the correct directory (the expected path can vary by image/tag).
Does it still work with the Encryption of SAML assertion still open in the Keys tab in keycloak?
Yes, it works, but it needs a bit of extra configuration on both Keycloak and Zabbix. I’ve added a new section “Encrypt SAML assertions (optional)” to cover the exact settings.
Thanks Makson,
The configuration works great for my setup.
Now everybody can benefit from this.
Are you planning to document an OIDC OATH2.0 Service Provider at some point?
I have a working setup with Synology NAS OIDC SSO + Keycloak IDP.
It would be great if you could do something similar for OIDC SSO with security best practices plus any other tips and tricks in the future.
Wish all the best,
Chris
No, Zabbix’s built-in SSO supports SAML only, not OIDC/OAuth2.
I can document OIDC with Keycloak for services that support OIDC directly (e.g., Synology DSM), but it wouldn’t be “native OIDC” for Zabbix.
Yes exactly,
This is what I meant. DSM Synology with Keycloak OIDC
I only document setups that I personally use and I’m familiar with, so I can’t promise an OIDC write-up unless I’ve actually run DSM Synology ↔ Keycloak OIDC myself.
DSM was just an example of mine.
If you happen to implement a whatever Service Provider with OIDC in keycloak let me know.
I actually already have several Keycloak OIDC integration posts on my blog.
You can find them here (Keycloak category):
https://www.maksonlee.com/category/keycloak/