If you’re transitioning from VMware Workstation Pro on Windows to KVM on Ubuntu 24.04, you can migrate your VMs with a few key steps. In this guide, we’ll walk you through identifying snapshot dependencies, converting disk formats, and importing it into KVM the right way.
- Locate Your VMware VM
VMware Workstation stores VMs as folders containing several files:
*.vmx: VM configuration*.vmdk: Virtual disk (may include snapshots)*.vmsd,*.vmsn: Snapshot metadata*.nvram: UEFI/BIOS state*.log: VM logs
Example folder:
D:\Virtual Machines\test\
You might see files like:
test.vmxtest.vmdktest-000001.vmdktest-Snapshot1.vmsn
- Check for Snapshots
If you see files like test-000001.vmdk and .vmsn, your VM has active snapshots. This means the latest disk state is split between the base test.vmdk and delta test-000001.vmdk.
Do not convert just test.vmdk — it will be incomplete.
- Merge Snapshots in VMware (Recommended)
To safely convert the VM to KVM, first flatten the snapshot chain:
- Open VMware Workstation Pro
- Select your VM and open Snapshot Manager
- Right-click the snapshot (e.g., clean)
- Choose “Delete”
This merges the snapshot intotest.vmdk. It does not delete your VM data. - Wait for the merge to complete

- Transfer the VM to Your Ubuntu Machine
You can use scp from WSL or any SCP tool:
scp -r "/mnt/d/Virtual Machines/test" user@ubuntu-host:/home/user/vm-imports/Make sure you copy:
test.vmxtest.vmdk(after merging)test.nvram(optional)
You no longer need test-000001.vmdk, .vmsn, .vmsd, or .vmxf.
- Convert VMDK to QCOW2 on Ubuntu
On the Ubuntu KVM host:
- Install conversion tools (if needed):
sudo apt install qemu-utils- Convert the merged VMDK to QCOW2:
qemu-img convert -p -f vmdk -O qcow2 test.vmdk test.qcow2
sudo mv test.qcow2 /var/lib/libvirt/images/
sudo chown root:root /var/lib/libvirt/images/test.qcow2
sudo chmod 600 /var/lib/libvirt/images/test.qcow2Now you have a KVM-compatible disk image!
- Import the VM via Cockpit Web UI
Open Cockpit in your browser. Go to Virtual Machines → Import VM.
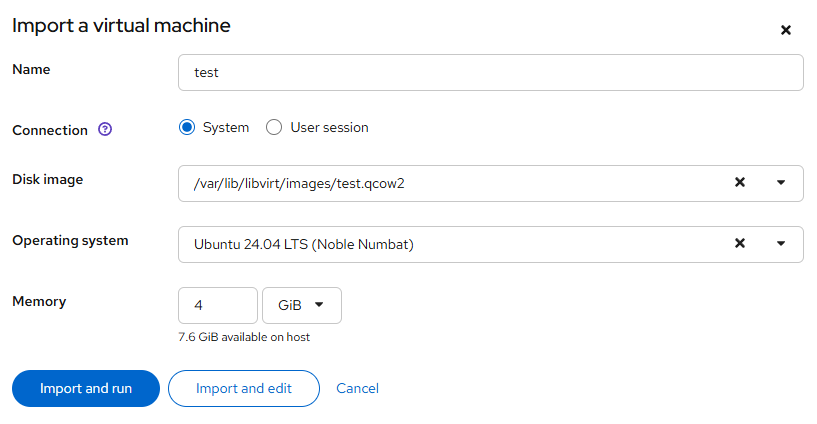
Click Import and edit to set up networking and fine-tune configuration.
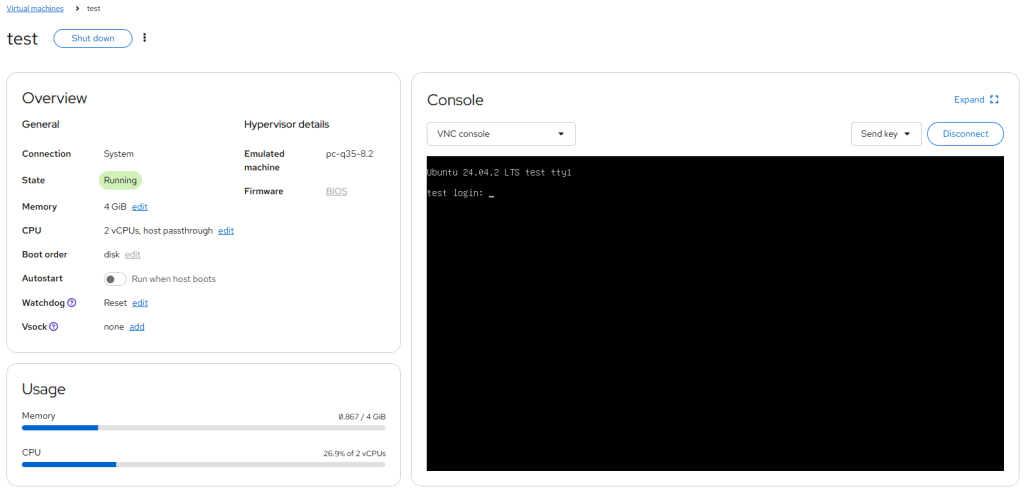
- Boot the VM
Click Save and then Run the VM.
You can access the VM console via Cockpit.
- Fix Network in the Guest (if no IP)
After import, your VM may boot but have no network. For example:
ip aShows:
enp1s0: state DOWNAnd your netplan shows:
ethernets:
  ens32:
dhcp4: trueThis mismatch means your guest is looking for ens32 (VMware NIC), but your KVM NIC is now enp1s0.
Edit the netplan file:
sudo vi /etc/netplan/50-cloud-init.yamlUpdate it to:
network:
  version: 2
  ethernets:
    enp1s0:
dhcp4: trueThen apply:
sudo netplan apply- Remove VMware Tools and Enable QEMU Guest Agent
VMware Tools is no longer needed and can be removed:
sudo apt purge open-vm-tools
sudo apt autoremoveThen install the QEMU Guest Agent for better Cockpit integration:
sudo apt install qemu-guest-agent
sudo systemctl enable --now qemu-guest-agentVerify it’s running:
systemctl status qemu-guest-agentDid this guide save you time?
Support this site