Looking to run virtual machines on your Ubuntu 24.04 system without a desktop GUI? This guide walks you through installing KVM (Kernel-based Virtual Machine) and setting up Cockpit, a browser-based interface for managing VMs, right from your browser.
What Is KVM?
KVM (Kernel-based Virtual Machine) is a full virtualization solution built directly into the Linux kernel. It allows you to run multiple, isolated virtual machines (VMs) using standard Linux tools. Each VM has its own virtualized hardware (CPU, memory, disk, network) and can run Linux, Windows, BSD, or other operating systems.
KVM works in combination with:
- QEMU – which emulates hardware devices
- libvirt – which provides an API and CLI for managing VMs
- VirtIO drivers – for high-performance guest I/O
Key advantages of KVM:
- Native performance (runs directly on the CPU with hardware virtualization)
- Part of the Linux kernel (no extra kernel modules or third-party software)
- Works on headless systems, servers, and desktops
- Supported by tools like
virsh,virt-manager, and Cockpit
Together with Cockpit, KVM turns Ubuntu into a powerful and easy-to-manage virtualization host.
Prerequisites
- Ubuntu 24.04 LTS (server or desktop)
- A CPU with Intel VT-x or AMD-V support
- A user with
sudoprivileges
- Check CPU Virtualization Support
First, verify that your CPU supports virtualization:
egrep -c '(vmx|svm)' /proc/cpuinfoIf the result is 0, your CPU doesn’t support virtualization, and KVM won’t work.
- Install KVM and libvirt
Install the core virtualization stack:
sudo apt update
sudo apt install -y qemu-kvm libvirt-daemon-system libvirt-clientsWhat These Packages Do:
| Package | Purpose |
|---|---|
qemu-kvm | Core virtualization engine (runs the VMs) |
libvirt-daemon-system | Manages VMs via the libvirtd service |
libvirt-clients | CLI tools like virsh (also used internally by Cockpit) |
Add your user to the libvirt and kvm groups:
sudo usermod -aG libvirt,kvm $USERLog out and log back in to apply the new group memberships.
- (Optional) Configure Bridge Networking
To allow your VMs to access your LAN or the internet, create a bridge interface using Netplan.
Edit your Netplan config:
sudo vi /etc/netplan/50-cloud-init.yamlExample configuration (replace eno1 with your actual network interface):
network:
  version: 2
  ethernets:
    eno1: {}
  bridges:
    br0:
      interfaces: [eno1]
      dhcp4: true
      dhcp6: false
      parameters:
        stp: false
forward-delay: 0Apply the config:
sudo netplan applyCheck that br0 received an IP:
ip aYou do not need bridge-utils on Ubuntu 24.04. Netplan and systemd handle bridge creation natively.
For a deeper explanation of bridge networking and why it’s useful for VMs, read this post:
- Install Cockpit with Virtual Machine Support
To get the most recent version of Cockpit and avoid bugs in older releases, install it via the official Ubuntu backports repository:
. /etc/os-release
sudo apt install -t ${VERSION_CODENAME}-backports cockpit cockpit-machinesNot sure what backports are or when to use them?
Open Cockpit in your browser:
https://<your-server-ip>:9090
Login with your Ubuntu username and password.
- Create and Manage VMs in Cockpit
Once Cockpit is installed and running, it’s time to create your first virtual machine.
- Download and Prepare the ISO
Before creating the VM, download an Ubuntu Server ISO and place it in the default libvirt image directory:
curl -OL https://ubuntu.ccns.ncku.edu.tw/ubuntu-cd/24.04.3/ubuntu-24.04.3-live-server-amd64.iso
sudo mv ubuntu-24.04.2-live-server-amd64.iso /var/lib/libvirt/images/This ISO will be used as the installation source for the VM.
- Creating a New VM
Here’s how your setup might look in Cockpit when creating a new VM:
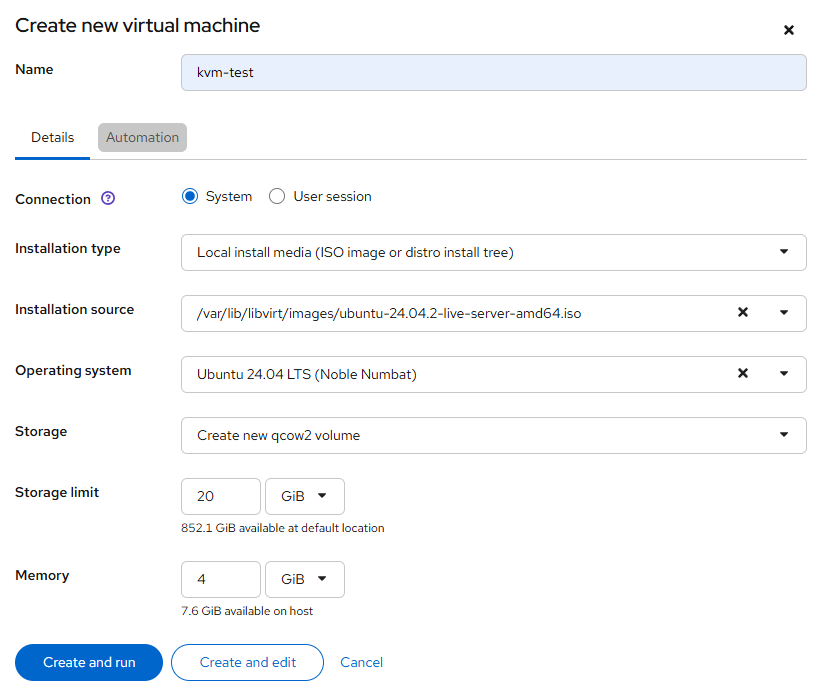
Click Create and edit instead of Create and run, so you can fine-tune network settings.
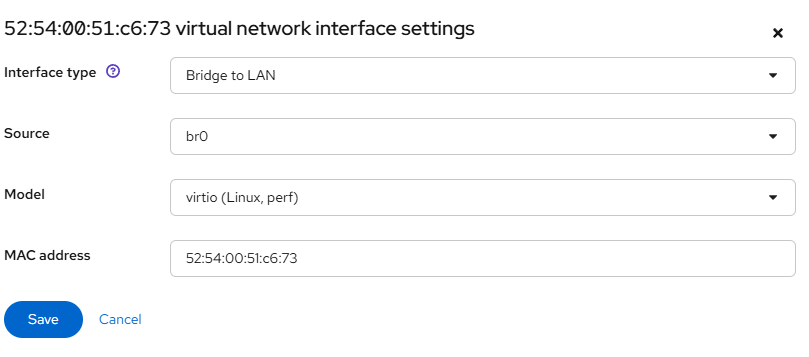
- Configure Bridge Networking
To ensure your VM gets a LAN IP via DHCP (from your router or upstream network), change the network interface to use your custom bridge br0.
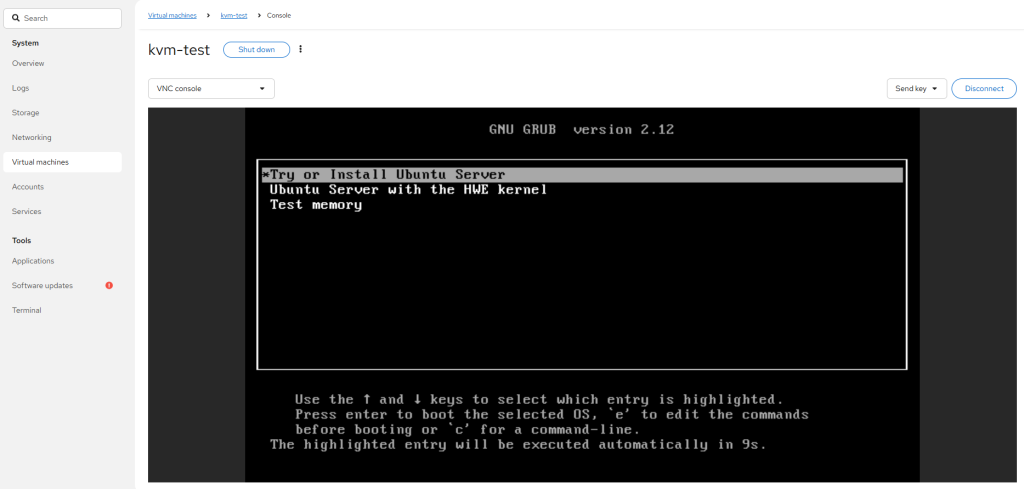
- Start the VM
After saving, return to the VM summary and click Install. Open the console and begin installing Ubuntu as usual.
- Install QEMU Guest Agent (Inside VMs)
For better integration with the host (e.g., IP address reporting):
sudo apt install qemu-guest-agent
sudo systemctl enable --now qemu-guest-agentDo this inside each Linux VM you install.
Do You Still Need virt-manager?
For most headless or remote hosts, Cockpit replaces virt-manager. The current Cockpit Virtual Machines UI handles common lifecycle operations plus snapshots (create, revert, delete), even while the VM is running.
You might still reach for virt-manager in niche cases:
- Very specialized XML edits or device passthrough scenarios that are easier to express directly in libvirt XML.
- Debugging workflows where you prefer a local GTK app.
For everyday creation, networking via a bridge, console access, and snapshot management, Cockpit is sufficient.
Did this guide save you time?
Support this site
Hey, this is Todd, do you have trouble when the network on the VM resolves DNS names (google.com) relatively slow.
What is the workaround or fix?
Please advise.
This article fixed my problem.
Nevermind, I think I fixed it, I added dns entries into NetworkManager and restarted NetworkManager, it seemed to fix the problem.
Todd